Fly Of The Week
Lee's Ferry Midge
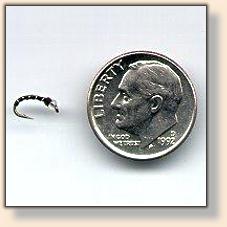
Lee's Ferry Midge
By Ralph D'Andrea Colorado, USA

Previous Flies
Fly Tying Terms

Lee's Ferry Midge

Midge larvae are very simple, primitive animals. Consequently, the flies that imitate them are simple in design and simple to tie. The key features imitated by most midge larva patterns are a segmented body and an obvious head.

The Lee's Ferry Midge is a typical representative of a whole host of midge larva patterns that incorporate these simple, impressionistic features. For as easy as it is to tie (this one took 3 minutes including the time to take the pictures myself), it is deadly effective. It is used as a "go-to" pattern by many guides and anglers in the Four Corners area. I'm not sure who developed it, but I see the fly in lots of fly shops in this area.

I'd like to thank Jerry Schaeffer and Chris Hines of Western Anglers Fly Shop, Grand Junction, Colorado, for teaching me how to fish this fly; and Jeremy Drumm, also of Western Anglers, for teaching me how to tie it.

Materials

    Hooks:  TMC 2487, 2488, or Dai-Riki 135, size 16-24. Pictured is a Dai-Riki 135, size 18.

    Bead Head:  Glass Bead, sized to hook. Midge- or extra small-sized fly shop beads; Petite-sized fabric store beads for most hook sizes. Pictured is a fly-shop extra small.*

    Thread:  8/0 or 12/0 Tying Thread. Pictured is 8/0*.

    Body:  8/0 or 12/0 Tying Thread. Pictured is 8/0*.

    Ribbing:  Fine Wire.*

    Thorax:  Dubbing to match thread (optional).

    *Typical color schemes are listed below. Match midges you see in the water:

    Pearl, white, or diamond bead, black thread, silver wire (pictured)
    Pearl, white, or diamond bead, dark olive thread, silver wire
    Pearl, white, or diamond bead, gray thread, silver wire
    Pearl, white, or diamond bead, brown thread, gold or silver wire
    Copper (copper-colored glass) bead, brown thread, silver wire
    Pearl, white, diamond, or red bead, red thread, silver wire

Tying Instructions:

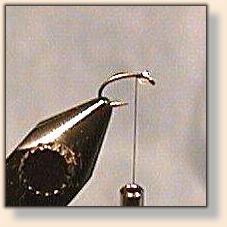
1. Place a bead on the hook, slide it forward to the eye, and set the hook in the vise. Start the thread immediately behind the bead.

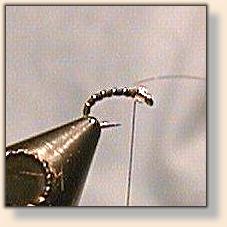
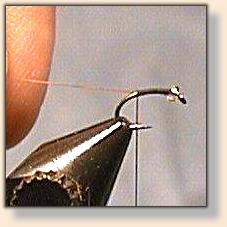
2. Tie in a length of wire on the underside of the hook, just behind the bead, and wrap closely with tying thread to halfway down the hook bend. Tip: holding the wire tight, down and away from you on the far side of the hook, will cause thread torque to pull it to the underside of the hook as you wrap..

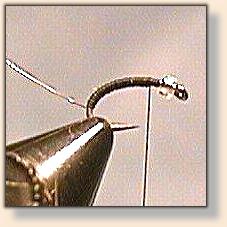
3. Wrap thread neatly forward to the bead. You should have a neat thread body, with no lumps, showing none of the underlying hook or wire.

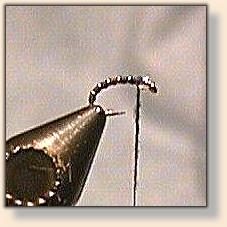
4. Wrap wire forward to the bead. Tip: be careful not to wrap too much wire. Let the thread underbody show through. Five wraps are typical for this fly. The fly looks somewhat more realistic if the wraps are a little closer at the bend end of the hook and farther apart at the bead end. Tie off the wire with 3 tight thread wraps, wiggle it back and forth, and break it off under the last thread wrap. DO NOT CUT THE WIRE. Cutting wire with your scissors dulls the scissors and creates a sharp edge on the wire that can cut the thread when the fly is fished..

5. This step is optional, but results in a somewhat neater looking fly because it covers the wire tie-in and tie-off points and holds the bead in place. Tightly spin a VERY SMALL amount of dubbing, just a few fibers, on about ¾ inch of thread, and wrap 3-4 turns of dubbing immediately behind the bead. Alternatively, you can wrap 4 or 5 more wraps of tying thread in contact with the rear of the bead to cover this area and hold the bead in place. My local flyshop ties this area with a wrap of Micro-Brite, a pre-dubbed wire, behind the bead.

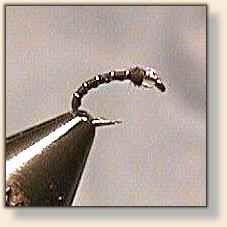
6. Whip finish and clip thread. The fly is complete.

Fishing Suggestions:

This fly is most effective drifted along the bottom as a tailing fly behind an attractor, using short-line nymphing techniques. A tutorial on short-line nymphing is beyond the scope of this article, but a typical rigging is described below, from the fly line down:
    1. Strike indicator at the top of the leader.

    2. Long-enough leader to comfortably reach the bottom where you are fishing.

    3. 1 or 2 small split shot (#4 to #6) about a foot above the first fly, depending on the current. Drifts are usually short with short-line techniques, so you want to get the fly to the bottom as quickly as possible. Two small split shot about 6" apart are better than one large one or a heavily weighted fly, as the weight is less concentrated and you are less likely to throw tailing loops. Also, weighting the line instead of using a weighted nymph gives a more realistic drift.

    4. An attractor pattern such as an egg, or a nymph such as a bead-head pheasant tail, flashback, etc.

    5. Fine (6x or 7x) tippet clinch-knotted to the bend of the first fly. Rule of thumb is that this tippet should be one and one-half times the length of the largest fish you expect to catch to avoid foul-hooking the fish with the fly it did not bite.

    6. The midge. A Turle knot is more effective than a Clinch knot for tying on tiny flies. An Improved Clinch knot can be almost 25% of the length of a #24 hook! A Turle knot is much smaller without sacrificing much knot strength. ~ Ralph