Porcupine, Extended Bodied Comparadun and Spinner
By Allan Podell, NY
This style of fly is a composite of two others. The first
is, that it makes use of a porcupine quill for the extended
body. I'm not sure who should be credited with this idea
but its use is described in at least one of Vince Marinaro's
books. The second uses deer hair or grizzly hackle for a
comparadun or compara-spinner (respectively) wing. I guess
you can attribute this to Fran Betters or Caucci/Nastasi.
At any rate, the result is a large bodied fly that's lightweight,
reasonably aerodynamic and works well. So well in fact that I
used a Green Drake dun, tyed in this style, to catch a 20 plus
inch brown at the recent Roscoe Fish-In. I saw the trout rise
to a natural and on the next cast put the fly over the fish.
After what seemed like 10 minutes I released him. A big question
about this fly is its durability. I did not have a chance to
examine the fly after I released the trout because I cut the
fly off at the tippet. It might be a 'one and done' style.
Theoretically, the style can be applied to any large dun or
spinner by altering the size and dyeing the quill to match
the color of the natural. I can't recommend the use of a
magic marker because when I tried to color the quill with
one, the color rubbed off. I may have used the wrong type.
Materials Green Drake Dun:
Hook: Dry fly size 12 or 14 short shank or size 16.
Thread: White, pale yellow or pale green, 6/0 or 3/0.
Tail: 3 microfibbets(or dark hairs) for dun, 2 for spinner.
Underbody: Dubbing ball same color as the body.
Body: Porcupine quill dyed to match dun or white for spinner.
Wing: Mottled deer hair for dun, HiVis or hackle trimmed
top & bottom for spinner.
Thorax: Dark brown or black for dun and spinner.
Tying Instructions for Green Drake Dun:
1. Prepare quill body and tail by carefully cutting
off the sharp point of the quill. Now cut off the very
tip of the white (color) section. This is the end that
was closest to the skin. Take a sewing needle and stick
it about ˝ inch into this tip hole to clear out some of
the pulp and make it possible to imbed the tailing. Even
out the tips of the tailing and trim the butts to appropriate
length. Place the tailing material all the way into this
hole. Hold quill with tails up and place a drop of crazy
glue at the base of the tailing so that it wicks down into
the quill. Separate the tails with something other than
your fingers. Hold in place until the glue dries. When done,
put aside for now.
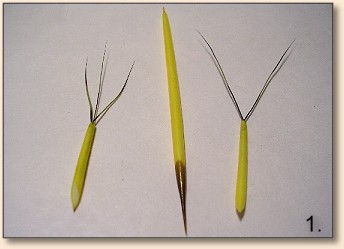
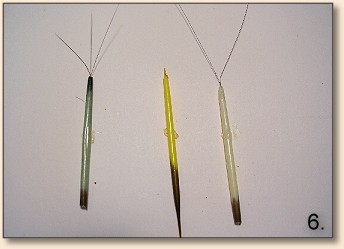
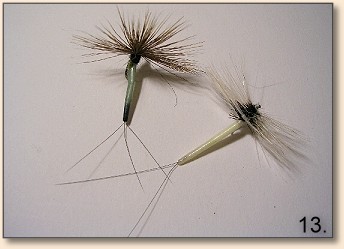
3 dyed and 2 prepared porcupine quills. On the Left is a
quill with the tails inserted for a dun. In the Center is
a dyed quill before preparation. On the Right is a quill
and the tails inserted for a spinner.
2. Place a layer of thread from the eye to just about the
bend. Dub a small amount of fur on the thread and apply this
going no more than ˝ way towards the eye. Continue wrapping
the thread to the thorax area where the wing will be tied down.
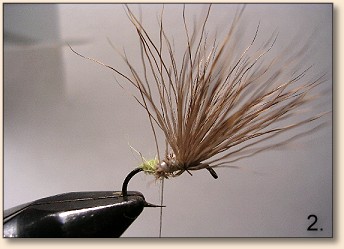
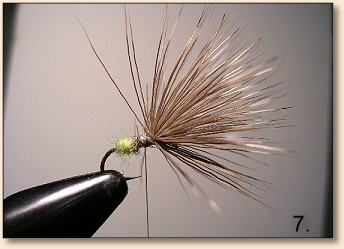
the dubbing wrapped in the rear and the comparadun wing
(for the dun) tied in.
3. DUN: Cut a bunch of hair and comb out any short
hairs and fur. Even the tips in a hair evener. Hold hairs
above and slightly on your side of the shank with the tips
pointed over the eye. Hold tightly with your fingers at the
tie in spot and make 2 wraps of thread. The first should be
snug. As you make the second, tighten it as you bring the
thread around and towards your body. Make this as tight as
you feel you can. Then carefully move your fingers towards
the bend while making successive and adjoining wraps in that
direction. Do not wrap all the way to the dubbing. Do not
release the hair. Cut off the butts of the hair at an angle.
Now make several more adjoining wraps toward and up to the
dubbing. (see #5 for spinner wings)

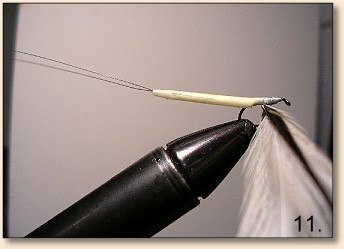
the quill tied in.
4. Notice the angle you've cut and make a similar angle
cut in the porcupine quill. Where the cut starts will
determine the length of the body. Place the cut quill on
top of the cut hair and tie down with successive wraps
going towards the eye. Try not to have the wraps pile up
on top of each other. This process can be made easier with
a little contact cement of applying crazy glue to a short
portion of the thread. Stop wrapping the thread when you
get to a wrap or two behind the wing. Place a drop of
crazy glue along the wrapped quill section and allow to dry.
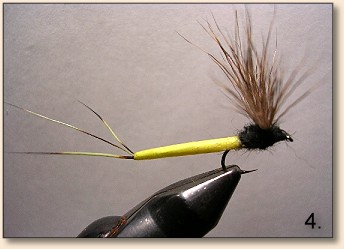
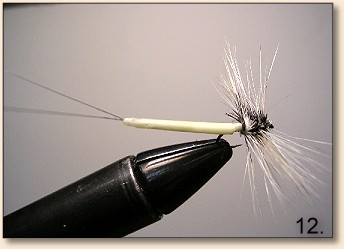
the wing uprighted, dubbing around the thorax applied
and errant hairs trimmed (fly completed).
5. SPINNER: Hold spinner wing material perpendicular
to the shank and tie in with figure Eights. When done, cut to
length and place a drop of crazy glue where shank and material
meet. Grasp the ends of the wings and apply a little pulling
pressure. This should casue the glue to wick a little and
stiffen the wings just at the shank. They won't fold back
as easily.
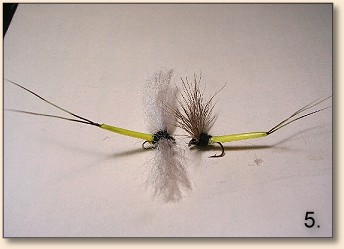
Completed Dun and Spinner for a Potamantus (Yellow Drake)
3 dyed and 2 prepared porcupine quills. On the Left
is a quill with the tails inserted for a dun. In the
Center is a plain quill before preparation. On the Right
is a quill and the tails inserted for a spinner.
6. Apply dubbing to the thread. I prefer plain dyed rabbit.
Wrap the dubbed thread in figure 8s then behind and in front
of the wing. As you do this on the DUN, grasp the deer hairs
and manipulate them so that they flair 180 degrees and stand
straight up or lean a little backward. Do not be afraid to be
rough with the hair. The thorax should be wider than the body.
When done, tie off with a whip finish. Trim any hairs that go
below the shank. Apply head cement if you wish.
the comparadun wing is tied in.
the quill body, with the tail, tied in.
the wing uprighted, dubbing around the thorax applied
and errant hairs trimmed (fly completed).
7. Same fly, different angle.
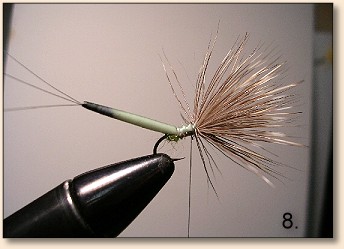
8. Spinner body tied in and hackle wing prepared for wrapping.
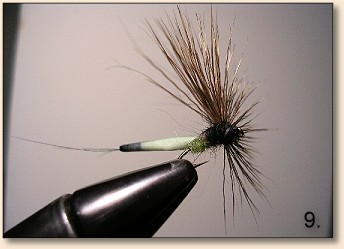
9. Wing wrapped and trimmed (fly completed).
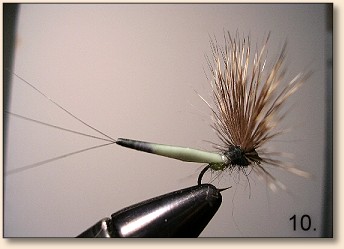
10. Completed Green Drake Dun and G.D. (Coffin Fly) spinner.
11. Find some rising trout. ~ Allan Podell
|

