Although I'm not one to fish too many dry flies,
when I do, hopper patterns are my favorite. They
are durable, easy to see, float well, and can
double-up as a strike indicator. I found the
technique used for making this pattern in the
Fly Tyer's Benchside Reference.
First, the body of the fly is tied on a sewing
needle secured in the vise. Then, this body is
transferred to the hook and the fly is completed.
Even though it appears to be involved, it is, in
fact, quite simple.
Materials List: Souhegan Hopper
Hook: Dry fly, standard, sizes 10-12.
Thread: 3/0 to match body color.
Body: 2mm thick Craft foam, cut a strip Ľ" wide and 2" long.
Underwing: Natural deer hair.
Wing: Turkey tail slip, as wide as the hook gap.
Thorax: Dubbing, match body color.
Head: 2mm thick Craft foam, cut a strip Ľ"
wide and 3/4" long.
Legs: Rubber legs, color to suit tier.
Instructions - Souhegan Hopper:
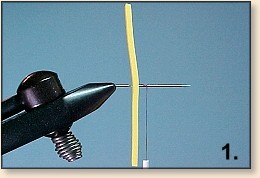
1. Mount a needle eye-first in the vise. Fold
the body foam strip in half and push the foam
onto the needle at the center of the fold. Mount
the tying thread on the needle about 1/8" in
front of the foam. Don't use too many wraps or
it will be difficult to pull the body off the
needle when finished. I'm using brown thread
for this sequence so it shows up better in the
pictures.
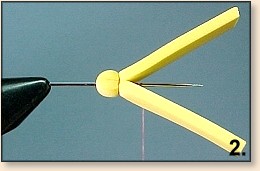
2. Fold the foam forwards, sandwiching the needle
with the ends. Take 2-3 wraps of thread around the
foam to form the first segment. Next, holding the
tag ends of the foam strip back, advance the thread
with open spirals to the point where you want the
next segment to be.
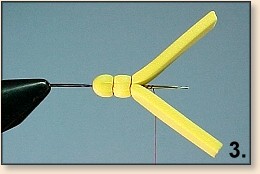
3. Fold the foam forwards again. Take 2-3 wraps
of thread around the foam to form the next segment.
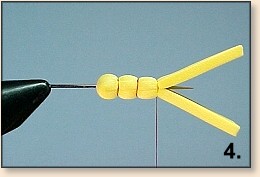
4. Continue forming segments until you have the
desired number. I like to use 2 segments for size
12 hooks and 3 for size 10 hooks. More segments
can be added depending on the hook size or the
size of the natural that is to be imitated. To
tie the body off, take a few half-hitches on the
last body segment. Clip the thread and push the
body off the needle. For more realism, you can
use a permanent marker to color the top of the body.
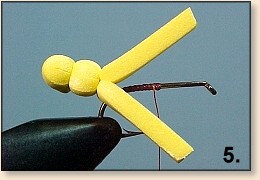
5. To mount the extended body on the hook, poke
the hook point through the lower part of the foam
body. Make sure it is centered and close to the
last segment. Put the hook on the vise. Attach
thread mid-shank and wrap back to the bend and
then forwards to above the hook point. In this
case, I'm using a size 12 hook so the extended
body has 2 segments.
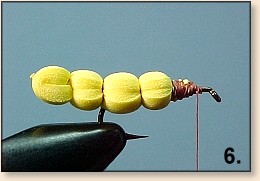
6. Put a drop of Crazy Glue on the thread wraps
near the bend. Using the same technique as for
the extended body, fold the foam forwards and
form a body segment on the hook. Form a second
body segment, then bind down and trim the foam
tags.
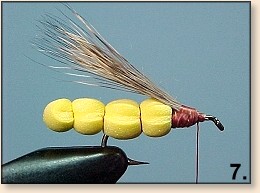
7. Trim a small clump of deer hair, clean and
stack it. Tie in the deer hair underwing, use soft
thread wraps to keep the deer hair from flaring.
Once positioned, use tighter thread wraps to secure.
8. Tie in the turkey wing. Advance the thread just
shy of the hook eye. Trim the turkey wing a little
longer than the deer hair underwing.

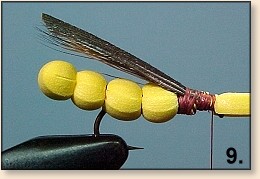
9. Tie in the foam strip to be used for the head.
Spin some dubbing on the thread and wrap back to
the base of the wing.
10. Pull foam back to form the head, secure it with
2-3 wraps of thread. Clip the foam tag.

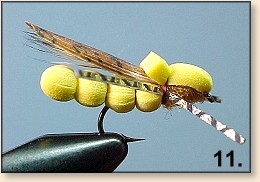
11. Tie in the rubber legs, 1 on each side of the
fly. In this case I used gold Sili-legs. Whip finish
and clip the thread. The Souhegan River hopper is
completed.
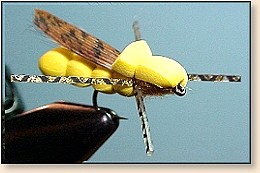
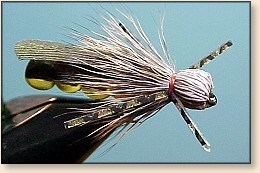
Here is a variation of this pattern that uses a deer
hair bullet head as opposed to the foam head. The top
of the foam body has been colored brown for a more
realistic appearance. I usually omit the deer hair
underwing on this pattern or substitute it for some
pearl Krystal Flash.
Fishing the The Souhegan River Hopper
Fish this fly as you would any other hopper pattern,
upstream, tight to the banks, your choice. Due to
its durability this is one of my favorite patterns
to use for catching pan fish. By changing the colors
of the foam, imitations of other terrestrials can be
tied. Try using black foam for a cricket or perhaps
some bright green foam for a leaf hopper.
~ Alberto Jimeno