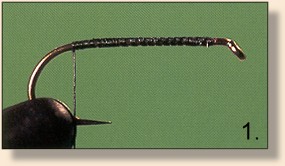
Fly Of The Week
Tom Thumb
Previous Flies
Fly Tying Terms

Tom Thumb
By Philip Rowley

The Tom Thumb traces its origins back to 1940s England. Immigrating to western Canada, the Tom Thumb quickly found a local following. Author Art Lingren credits the naming of the Tom Thumb to late British Columbia angler Collie Peacock. According to Art, Collie Peacock named the pattern after meeting a California dentist who put the Tom Thumb to good use near the town of Jasper. Veteran B.C. angler Bus Ellis uses the Tom Thumb so much we have christened it the Bus Fly. . .the Tom Thumb is one of British Columbia's most famous fly patterns.

Despite the Tom Thumb's fame I can't recall ever seeing any detailed fly tying instructions. Although seemingly straight forward to tie, I have seen many fly tiers driven to fits trying to complete one Tom Thumb. Constructed entirely of deer hair and tying thread, the first key is the selecting the right type of deer hair. Look for a patch with even-length hair and few broken tips. A deer harvested early in the season is ideal as the underfur will be at a minimum. The deer hair also needs to be as long as possible because, when tying size 8 Tom Thumbs I don't want to run out of materials. I know of anglers who use size 6 and larger Tom Thumbs for steelhead too. For tying thread, stick to Monocord or 6/0 UNI-Thread as these threads are strong enough to bind down the deer hair without the risk of cutting it.

Tied in a variety of sizes the Tom Thumb represents Chironomids, mayflies, caddis, even water boatmen. Play with the color and the Tom Thumb makes a plausible ant or beetle imitation. By varying the bulk it is actually possible to duplicate any adult insect or terrestrial found on stillwaters. I have even used a green-bodied Tom Thumb to imitate Green Drake mayflies. But the Tom Thumb is in its element when used as a caddis imitation. The prominent wing, shellback body and trailing deer-hair tail minic the emergence profile of hatching sedges. The Tom Thumb's usefulness doesn't end at the surface. There are anglers who have had good success fishing a Tom Thumb on a full-sinking line. The bouyant characteristics imitate cased caddis and scuds. The only failing of the Tom Thumb is it's durability. Within a couple of fish the Tom Thumb is reduced to a shredded mess and it becomes hard to tell one end of the fly from the other. But the more ragged and beat up the fly get, the more the fish chase it. I have had most of the deer hair chewed off, threading hanging from all points and still taken fish after fish. The Tom Thumb is a magic pattern.

Materials: Tom Thumb

    Hook:  Tiemco 100, #8 - #14.

    Thread:  Black Monocord.

    Tail:  Deer hair.

    Shellback:   Deer hair.

    Wing:   Deer hair.

Tying Steps:


Step 1. Cover the hook shank with tying thread. The thread base provides traction while securing the deer hair.


Step 2. Prepare and stack a clump of deer-hair. Don't fall into the trap of using too much hair. For a size 10 Tom Thumb the diameter of a pipe cleaner is about right.


Step 3. The deer hair tail is tied in at the front of the fly so make sure the tying thread is hanging just back from the head area of the hook. Measure the hair so the deer-hair will be shank length upon completion.


Step 4. Confident of the measurement, trim the butts even with the left thumb and forefinger for right-handed tiers. Keeping a tight grip on the deer hair, place the butts at the front of the hook directly above the hanging thread. Place two loose wraps completely around the butts and then increase tension using a tight, tighter, tightest approach. Secure the deer hair down the hook shank with the tying thread. Once near the tail adjust the tension so the hair does not flare wildly. Keep your hands on the deer hair at all times as deer hair is a high-maintenance material.


Step 5. Once the tail is in place return the tying thread to the head of the fly. The finished tail should have a gathered appearance but should not spin about the hook shank.


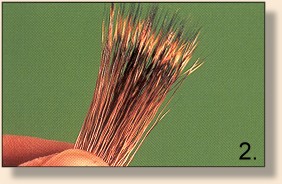
Step 6. Prepare and stack a second clump of deer hair using the same guildelines as for the tail. This second clump of hair forms the shellback and wing. The second stack will be tied in the same manner as the tail so an extra shank length of hair will be needed. The length of the second stack of dder hair should be three shank lengths from butt to tip. Trim the butts once sure of the measurement as was done with the tail.


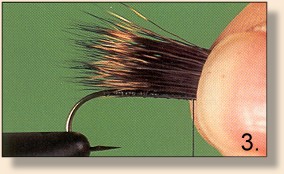
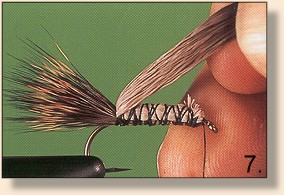
Step 7. Using your left thumb and forefinger to control the deer hair, bind down the deer hair along the hook shank. Do not let go of the deer hair until it is completely tied in. If let go, the second clump of deer hair will mix with the tail making it difficult to separate the two. Just prior to letting go of the deer hair , rock the deer hair tips forward over the eye.


Step 8. Racking the hair forward puts a set into the deer hair separating it from the tail. Make sure the second stack of hair is secure. It should not spin. It is okay to place liberal amounts of thread along the shank for added security. There should be no visible thread wraps separating the tail from shellback as the tail should appear to grow out of the shellback.


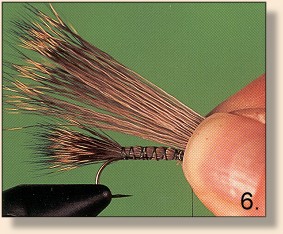
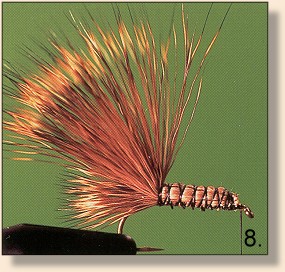
Step 9. Stroke the second clump of deer hair together and pull it over the top of the fly to form the shellback. Hold the tips in place with the right hand and tie down the tips using the left hand, again for right-handed tiers. Tying in and securing the deer-hair tail, shellback and wing in this manner helps provide floatation.


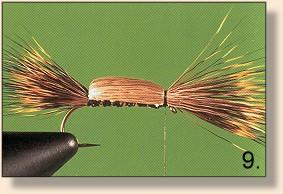
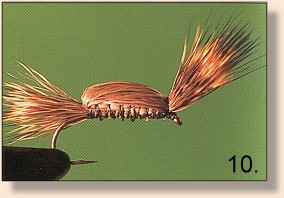
Step 10. Grab the tips of the deer hair and lift them up to expose the hook eye. Stand the wing upright using the tying thread while forming a head at the same time. Whip-finish and apply head cement. Fan the wings like a Comparadun. I like my Tom Thumbs to have an upright and full-fanned wing for optimum visibility, while others may prefer a lower-profile wing. ~ Philip Rowley

Credits: This fly is an excerpt from Fly Patterns for Stillwaters, published by Frank Amato Publications

For more great flies, check out: Beginning Fly Tying, Intermediate Fly Tying and Advanced Fly Tying.