 |
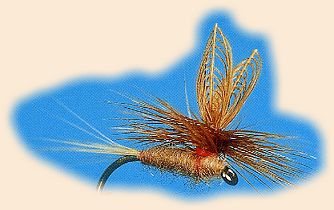 Quick'n EZY Parachute (PMD) |
|
|
Materials for the Quick'n EZY Parachute (PMD):
Thread: Tan, color to match the insect. Tail: Hackle fibers. Wings: Looped hackle fibers. Body: Dubbing to match the insect. Hackle: Color to match the insect.
 Step 1: Place the hook in the vise and lay down the thread base that starts at the one-fourth position travels to the center of the shank and back to the starting point. Select two large, ginger feathers from a rooster cape. Place them so the natural curve slopes away from each other and trim off the large end of the stem. Keep the trimmed stems even with each other and the tips pointing to the right. Hold the feathers in the right hand with about an inch of the butt ends exposed and stroke back the fibers on segments of stem each two-thirds of the hook shank in length. Tie this unit to the hook in the center of the stems (the part that is two-thirds the length of the shank) using three snug but not tight thread wraps. Do not lose control of the fiber ends in the left hand.
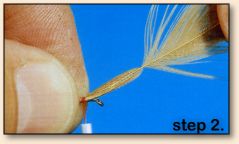 Step 2: Pull on the feather tips with the right hand allowing the fibers/stems to slip out from under the three snug thread turns. Do not pull too hard with the right hand or the whole swept back unit will jump out from under the thread. Pull on the bobbin with the right hand to tighten the thread then place a couple tight wraps to further anchor the wing assembly in place. During this process, never lose control of the fibers in the left hand.
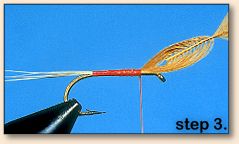 Step 3: Release the fibers captured in the left hand. Somewhere in that mess is the tail. It is up to the tier to determine the fibers that are too short or too long to form a properly proportioned tail and get rid of them. Bind the remaining fibers to the shank forming a tail about as long as the complete hook. Up to this point the process is identical to a standard Quick 'n EZY.
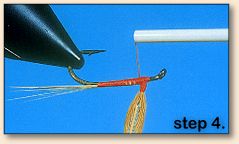 Step 4: Stand up the wing assembly with a thread dam tight in front of the fibers. At this point I want to construct a thread-based, hackle platform over the wing fibers. I find it a lot easier to rotate the vise one-half turn so I don't have to raise my arm to wrap up the post. Wind up the wing (even though I'm wrapping down) to the top of the post area then go straight back to the body (the thread is parallel to the back of the post) and anchor the thread there with several wraps. Wrap up the post in the opposite direct then go straight to the body again and anchor the thread with several wraps. I call the process of going around the wing "pouring cement" and the straight up and down strand of thread "placing rebar." Go through the process one more time ending with the piece of rebar.
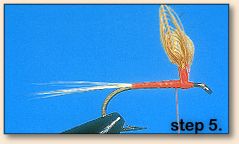 Step 5: Separate the wings then trim off the waste feather. Place the waste pieces of feather in a clothespin for use on a future fly. Crisscross between wings forcing them to remain separated. Notice the wraps also form four more pieces of rebar each paralleling the post. Leave the strands of rebar alone for a moment; I'll anchor them in a few minutes.
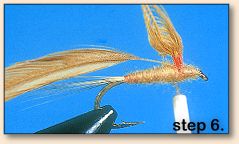 Step 6: Place dubbing on the thread and construct the body up to the back of the wing post. Prepare a hackle feather by stripping the fuzzy material from the end of the stem. Tie it to the hook directly in front of the post. Apply more dubbing to the thread to cover the part of the hook between the post and the eye. Then wrap back to the post ending with the last turn behind it.
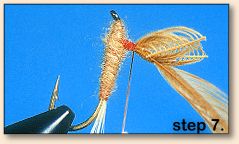 Step 7: Rotate the jaws (not the vise) so the wings are parallel with the tying bench surface. Wrap the thread up the post while anchoring the stem and the last four pieces of rebar.
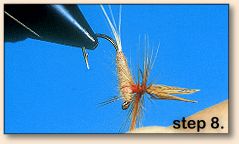 Step 8: Grasp the thread and hackle with the right hand and rotate the vise (not the jaws) to apply the hackle. The thread platform will rotate more or less on axis allowing for a smooth application of the hackle.
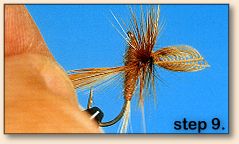 Step 9: Wrap hackle all the way down the post until it meets the body. Anchor the feather with two thread wraps.
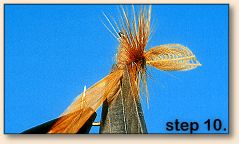 Step 10: Trim off the excess feather then place one more turn of thread to tuck the trimmed end under.
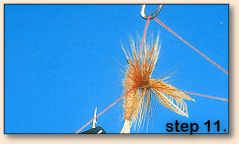 Step 11: Use a tool or fingers to place a whip-finish on the base of the post.
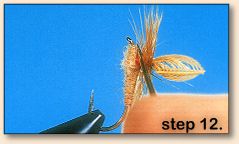 Step 12: Trim off the thread and apply a drop of Aqua Head to complete the fly. Often the wings will twist during the hackling process. Don't worry about it; just use your fingers to straighten them out before applying the head cement.
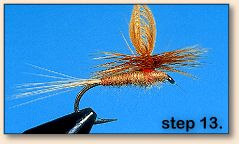 Step 13: I placed a double whip-finish to exaggerate the separation between the bottom of the hackle and the body. When you tie your fly make your whip-finish less noticeable or just pull the thread forward to the hook eye and tie it off there rather than on the post.
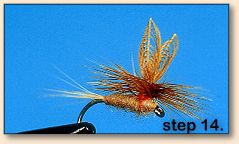 Step 14: Rotating the jaws a partial turn throws the fly in an odd position in the picture frame but the different angle shows a good wing profile and the whip-finish on the bottom of the hackle platform/post. ~ Al Beatty
For more great flies, check out: Beginning Fly Tying, Intermediate Fly Tying and Advanced Fly Tying.
|