For the body I prefer dubbing over chenille. This adds
a great deal of "bugginess" to the fly. I am slow at
the dubbing process, but on size 10 and smaller hooks
the task is accomplished with relative ease. On bigger
sizes you might try an underbody of wool yarn to build
up the body quickly, followed by a layer of dubbing.
'Usual' Ingredients:
Hook: Size 6 to 16, 2xl or 3xl.
Thread #1: 3/0.
Weight: 6 to 12 wraps lead wire.
Tail: Rabbit fur.
Thread #2: 3/0 or thinner, same size or downsize from Thread #1.
Hackle: Rooster saddle feather or hen neck feathers.
Body: Dubbing.
'Adapted' Ingredients shown in photos:
Hook: Tiemco 5263, size 10.
Thread #1: Olive Danville Flat Waxed Nylon.
Weight: Lead wire, .025" inch diameter.
Tail: Olive rabbit fur from Zonker strip.
Thread #2: Brown Danville 3/0.
Hackle: Two brown Conranch hen neck feathers.
Body: Olive Krystal Dub.
Tying Instructions for the Woolly Fur-Bugger:
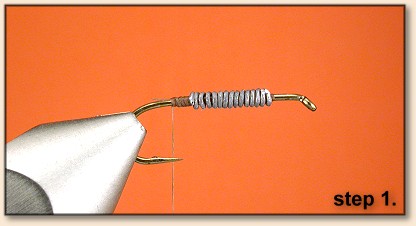
Step 1: Prepare the hook by pinching down the barb,
wrapping with thick thread and adding 8-12 wraps of
lead wire. I use wire that is about the diameter
of the hook shank.
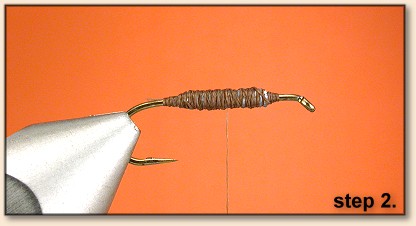
Step 2: Form a cigar-like underbody by completely
covering the lead wire with wraps of thread. Taper
the body at both ends of the lead wire. A thick
thread covers the lead wire quickly and allows me
to tightly cinch down the rabbit fur tail.

Step 3: Tie in a bunch of rabbit fur with just a few
turns of thread. The tail should be about as long as
the hook shank. Shown here is fur removed from about
1" of an olive Zonker strip. (You will notice that
to create a bugger-length tail you will need to work
with a short tie-in area.)

Step 4: Add a touch of head cement or nail polish to
the rabbit fur butts.

Step 5: Tie down the butts tightly. This will squeeze
the head cement into the fur and swirl it around the
shaft, creating a secure bond.
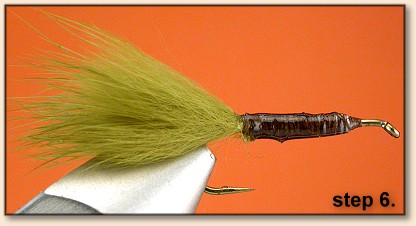
Step 6: Use a whip knot tool to place a whip knot at
the back of the body, right over the cemented area and
cut off the thread. Coat the entire thread-covered body
with a layer of nail polish. This will help keep the lead
from discoloring the dubbing after it becomes wet from
fishing.
Tip 1: Remove the hook from the vise and set
aside to dry. (I like to stick the hook into a discarded
chunk of Styrofoam.) Repeat the process with five more hooks.
After preparing six hooks, re-insert the first hook (which
should then be dry) into your vise, and move to step 7.
Keep tying until you have completed all six flies! For me,
that's a nice 1 to 1 ˝ hour evening activity!

Step 7: Re-tie using thread #2. Dub about 1" of thread and
make several wraps at the rear of the shank.
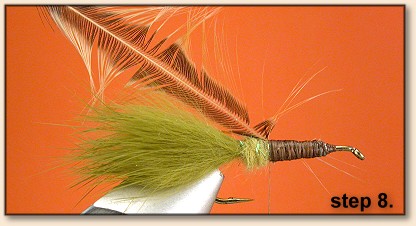
Step 8: Tie in the first hen neck feather, by the tip.
Tip 2: Choose feathers with barbs of a length about
1 ˝ times the hook gap. A hen neck feather will typically
give you three palmered wraps around a dubbed body. So,
you will need two hen feathers to complete the job. Or,
use one rooster saddle feather.
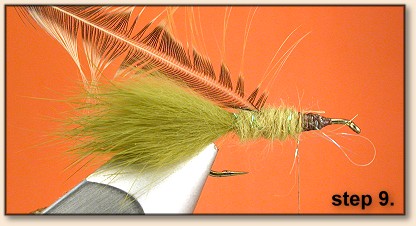
Step 9: Dub the body to approximately mid-shank.
Step 10: Palmer the hackle forward to mid-shank, making two
complete wraps. I stroke the barbs toward the rear, using
my left hand, as I palmer forward. Tie off and trim.
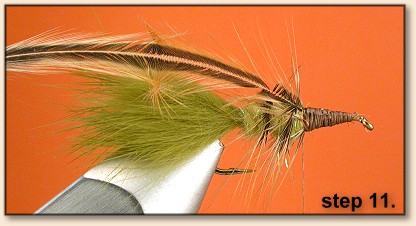
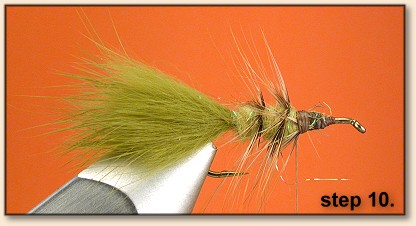
Step 11: Tie in the second hackle.
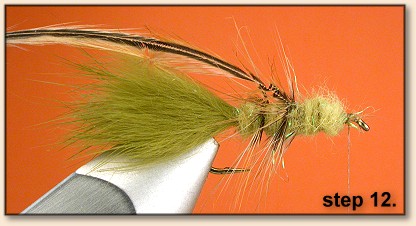
Step 12: Dub the front half of the shank.
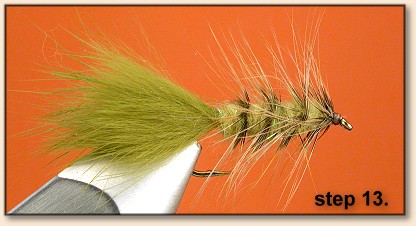
Step 13: Palmer the second hackle forward, making three
complete wraps. You will now have made a total of five
wraps of hackle from back to front. In the photo, there
appear to be only four wraps because the fourth and fifth
wraps are side-by-side in front of the dubbing, to create
a subtle collar.
Additional Tips:
Tip 3: If you prefer, strip off one side of each hackle
before wrapping to provide a softer result.
Tip 4: Different colored hackles will create a two-tone appearance.
Tip 5: If you want to speed things up, try omitting the
rear hackle altogether! Simply wrap one hackle over the front
half only, with three turns. This is not quite a full Woolly
Bugger, but I doubt the fish will notice. Who knows, it might
even outperform the full-length version!
Final Comments:
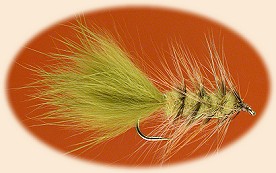
I fell in love with the Fur Bugger the first time I tied it.
To me this variation is buggier and more nymph-like than the
standard bugger. Indeed, much of the time I fish them like
a nymph, dead-drifted over the bottom. But swing 'em to the
surface after the drift is completed and you'll nail fish, too.
~ PF
For other interesting flies and stories visit Peter's Web site:
FishingWithFlies.com