This is a fly that the locals swear by. It's from
Fly Fishing Mammoth: A Fly Fisher's Guide to
the Mammoth Lakes Area by Mark J. Heskett.
It's a really easy fly to tie that has produced some
fine fish. When the fly is wet, it's a good imitation
of Rhyacophila. I have to agree with the
book's author that fishing it with a floating line with
strike indicator and split shot, bounced along the bottom
is the most productive way of fishing this fly. Knowing
that, I'm still surprised the times I get a fish as soon
as the fly hits the water and it never has the opportunity
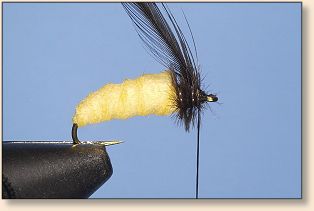
to sink. The fly here was tied on a size #16.
Materials List:
Hook: TMC 200R 14-18.
Thread: Black 6/0.
Weighted: .015, wrap length of shaft.
Body: Chamois.
Thorax: Black Ostrich.
Beard Hackle: Black hackle, two wraps.
Instructions - Chamois Nymph:
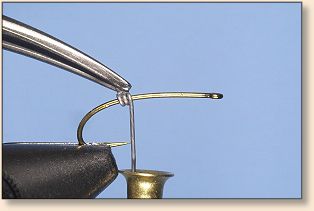
1. Wrap your weight onto the shank. I start right
above the point and wrap forward the required number
of wraps to be 1/3 the shank length behind the eye.
The number of wraps varies with the size of the hook.
2. Tie in your thread just in front of the weight
and wrap back to only slightly secure the weight in
place. Take your thread all the way back to the curve
of the hook.

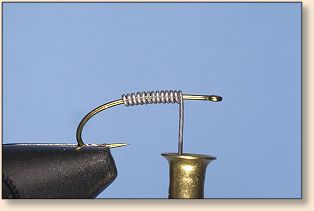
3. Tie in chamois. I personally use the synthetic
chamois and not the real thing. I've found it creates
and holds the look of ribbing better than natural
chamois when wet (no gluing necessary either). Cut
the chamois so it's no wider than 1/8 inch. As you
tie on smaller hooks, you'll want to cut the strips
of chamois even narrower. On the end of the chamois
I'm going to tie in, I cut a point in the chamois to
minimize the hump at the tie in point. Secure the
chamois really well! You're going to be pulling on
it so make it tight.
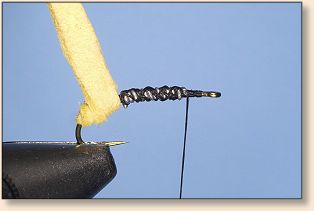
4. Advance the chamois up the shank. Pull tight with
every wrap and layer the chamois so you create a ribbed
appearance. Some use Krazy Glue while wrapping the
chamois to attach the chamois to the weight. I've found
this is not needed when using the man-made synthetic
chamois and it's wrapped tight on the hook.
5. Advance the chamois to just past the end of the
weight. I trim the chamois at this point so it's
narrower than the 1/8" prior to tying it off. I tie
it off using a number of wraps. I pull the wraps as
snug as I can. I then trim the chamois the cleanest
I can. This creates the small hump you see illustrated.

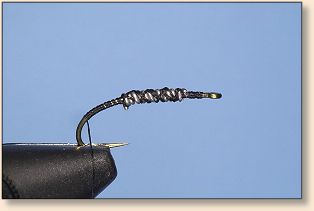
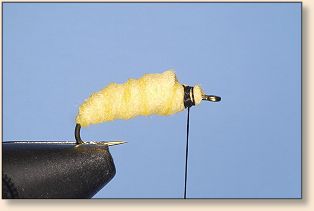
6. Tie in the black ostrich feather on top of the
tie off of the chamois. Open up the fibers of the
ostrich prior to wrapping it. Wrap it around to
create as thick of a collar as you can. Move the
ostrich forward to where it appears you won't have
enough room to create a head.
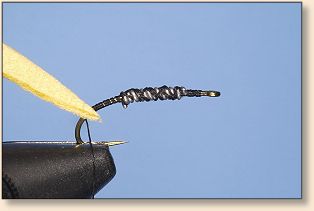
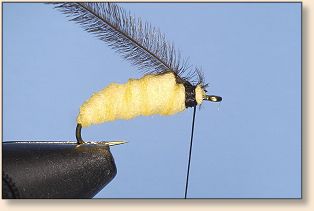
7. Tie in the black hackle. It will seem like there
is no room to tie it in, but there is. Wrap the black
hackle only two full wraps. These wraps will be in the
black ostrich and not directly on the hook shank. Tie
off and create a head.
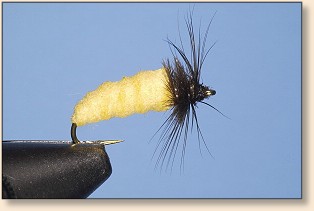
8. Finished fly
Photographic note:
Photos captured by Nikon D1H, 60f2.8AF Micro with
SB-29s flash on Lexar digital film. ~ Moose
About Moose:
 Moose is a professional wildlife photographer, and
obviously a fine fly tyer, who lives in Mammoth Lakes,
CA. He has an extensive website to furnish wildlife
photographers with information to make the most of
their photographic pursuits. You will
find it at: www.moose395.net/
Moose is a professional wildlife photographer, and
obviously a fine fly tyer, who lives in Mammoth Lakes,
CA. He has an extensive website to furnish wildlife
photographers with information to make the most of
their photographic pursuits. You will
find it at: www.moose395.net/
