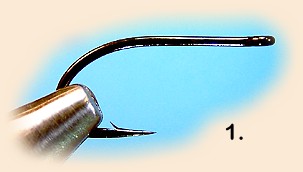
1. Mount the SL45 Bonefish hook securely in the vise.
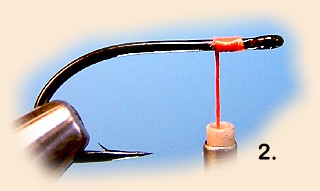
2. Start the UNI-Stretch yarn behind the eye,
leaving enough space in front of the yarn for
two wraps. Advance the yarn five (5) tight
wraps along the hook shank. Moisten that last
wrap with a small spot of Zap-A-Gap Super Thin
adhesive and allow it to set.
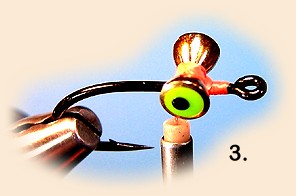
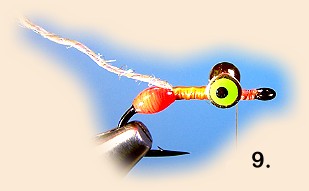
3. Attach the Real Eyes Plus to the top of
the hook shank using a figure eight winding
pattern. Make a medium sized build-up of yarn
between the eyes and then take two or more tight
wraps around the base of the eyes like you are
winding hackle around a parachute post. This
method tightens the crossed yarns at the hook/eye
intersection and locks the eyes securely in place.
Finish with a locking hitch directly behind the
eyes as shown.
Take the fly out of the vise temporarily. Inspect
and adjust the Real Eyes Plus as need to be lined
up perfectly straight on the hook. Apply a small
drop of Zap-A-Gap with a bodkin to the criss-crossed
yarn on the top of the fly. Add another small droplet
on the bottom side wraps to lock down the dumbbell
eyes permanently. Re-mount the fly in the vise
while the adhesive sets.
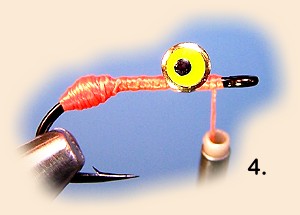
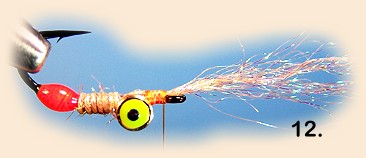
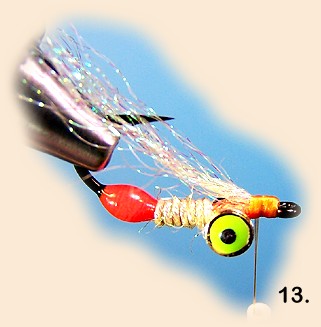
4. Now advance the UNI-Stretch all the way back
towards the hook bend. Terminate the yarn two
wraps beyond the hook barb. Wrap the yarn forward
about eight (8) turns & build a substantial
bulb-shaped egg sack with the UNI-Stretch as
shown above. Wind the yarn tightly so that it
will not slip and unfurl. Keep the forward edge
of the yarn "bulb" abrupt. Once the bulb is shaped,
wind the yarn forward in a tight open spiral.
Pass the yarn under the eyes and continue forward
towards the hook eye. Terminate the yarn by filling
the two-wrap space that was left open behind the eye
(see next photo). Hold the yarn out from the hook
with low tension and place a single small droplet
of Zap-A-Gap (apply with bobbin) to the front yarn
wrap. Wait 10 seconds and trim the yarn close to
the hook. Press the wetted yarn ends down onto the
hook shank and hold them down until they stay put.
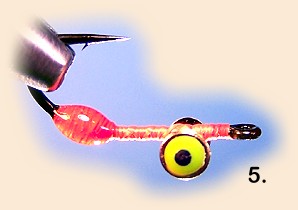
5. Apply a thin coat of UV Knot Sense to the yarn
Bulb using a bodkin and allow time for this coating
to thoroughly soak into the yarn body. Apply enough
UV Knot Sense to fully coat the yarn bulb. Rotate
fly in the vise to insure full and even coverage.
Do not put any coating on the yarn ahead of the
yarn egg sack. Keep that area dry. This clear
liquid coating will not gel until exposed to strong
UV lighting-so take your time.
Wearing UV Filtering goggles, activate (harden)
the UV Knot Sense liquid using a UV Cure Lamp at
the bench. Cure time varies with the power of
the available UV light source. Rotate the fly
while exposing it to the UV light to insure
complete irradiation of UV polymer. Typical
cure time is less than one minute. Note: For
example, a 6-Watt UV flash lamp cures Knot Sense
in 5 seconds.
Optional Cure processes:
A) Hold the uncured, coated fly with a pair of
forceps and rotate the fly in direct sunlight
outdoors until cured - approximately 30-60 seconds.
B) Coat with 5-minute epoxy and control the shape
by hand as it cures and gels.
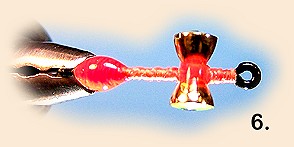
6. Apply a small amount of UV Knot Sense in
between the eyes on the top of the hook. This
will become the bottom of the fly when fished
and the extra coating in this area will impart
abrasion resistance to the yarn wraps. Repeat
the cure steps above.
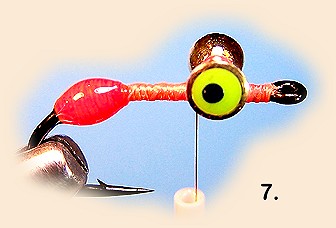
7. Start the FlyMaster 6/0 thread immediately
behind the eyes.
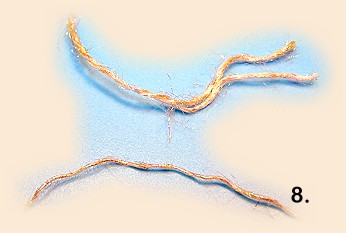
8. For a fly tied on a size #6 hook, cut a 3-inch
long piece of Ice Yarn from the master coil. Use
a slightly longer yarn if tying on a larger hook
etc. Carefully and gently untwist the two main
yarns and split them apart. You now have two
separate Ice Yarn elements (strands). Each
individual yarn strand is made from a multitude
of ultra-thin Mylar flash filaments. Keep the two
yarn strands intact and minimize any further
unraveling of these two yarns at this point
in the construction of the "Tan Mistress."
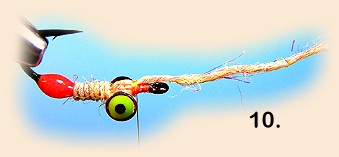
9. Tie-in a single Ice Yarn strand right behind
the eyes. Bind the Ice Yarn down on top of and
parallel to the hook using the Flymaster thread.
Secure the yarn by wrapping it tightly along the
hook shank with touching, smooth wraps of the
Flymaster thread. Force the Ice Yarn up against
the front edge of the coated yarn bulb. Take a
few tight wraps there to lock it in place.
Reverse the thread-wrap direction and advance the
thread forward. Direct the thread under the eyes,
and secure the thread just in front of the eyes
with a half hitch in the position shown above.
Move your bobbin into a bobbin rest if using a
rotary vise.
10. Twist the Ice Yarn & compress the strand
tightly. Twist it down as thinly as possible
without putting kinks in it. Wrap the tightened
Ice Yarn strand forward in tight touching wraps
to form a segmented body.
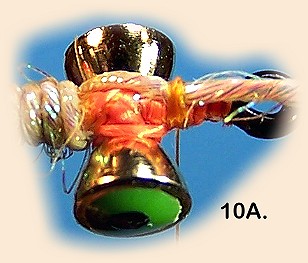
Butt the last yarn wrap against the back of the
eyes and pass the tightened yarn across and between
the eyes on the underside of the hook as shown
(see detailed close-up photo above). Throw in a half
hitch to secure the Ice Yarn tightly with the 6/0
thread just in front of the eyes.

11. Use a bodkin and very carefully and gently
tease out the individual fibers from the twisted
yarn. These slivers of Mylar are very fragile
and you must take care in preserving the integrity
of these filaments. It helps to un-twist the yarn
and then start splitting the yarn apart from the
open end first. Then gradually work your way down
to the base of the yarn. I advise against using a
comb or rake to perform this step.
Tip: Pick out any loose or broken filaments
from the yarn and save those for adding to your
favorite dubbing fur later!
12. Once the yarn is splayed apart and flattened,
bind it down tightly all the way forward to the
hook eye with the thread. Lock it down with a
tight half hitch or two. Make sure that the yarn
is indeed secured right up against the eye of the hook.
13. Fold the splayed-out yarn backwards towards
the hook point and bind it down with the thread.
Stop just in front of the eyes. Lock it down
with another half hitch.

14. Select and prepare two barred neck hackles
as shown. The feather-portion of these hackles
is approximately 1-ľ inches long not counting
the stems. Try to select matching left hand
and right hand feathers of similar shape.
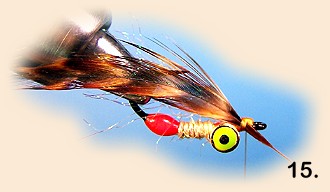
15. Invert the fly in your vise and tie-in
the hackles. Locate and secure a hackle on
each side of the fly and insure that the tips
are matched to the same length. The shiny,
bold colored side of the feathers should face
to the outside of the fly! The stem is placed
in front of the hourglass eyes. The hackles
should arch upwards past the hook point. Keep
the hackles from twisting as you secure them.
The hackles need to sit broadside.
Tip: Flattening the hackle stem using a
pair of pliers will help to keep the feather
from twisting sideways as it is being placed
and secured. Another hackle placement technique
is to take several light wraps of thread around
the stem and then draw the hackle down into the
thread wraps (see photo detail). Add a tiny drop
of adhesive to the wraps. Trim the stems close
to the wraps. Build a smooth thread head and
bury the stems.
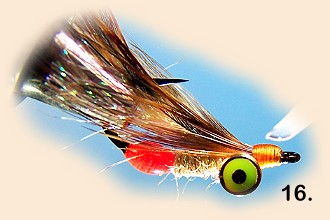
16. Finish off the thread head close to the
hook eye. Tie-off the thread (or bond it down)
and trim the thread. Add a small amount of
Zap-A-Gap to the thread head and allow it to
soak in and set. Note: Use a bodkin to
apply the adhesive, as a drop from the bottle
is too large. Make small adjustments to the
wing if required as the adhesive sets. Apply
another light coat of Zap-A-Gap to insure that
there is a slight gloss on the thread wraps.
Don't allow the adhesive to wick into the
hackles, or flood the hook eye.
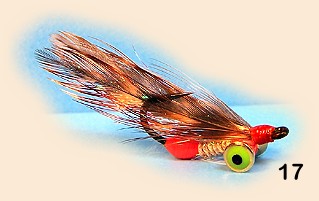
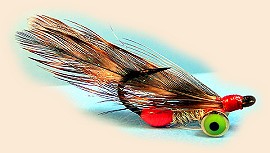
17. Finished fly.
For fishing bays and estuaries, fish the "Tan
Mistress" on a floating line and a long tippet.
Using a 10-foot floating, clear poly leader will
help to turn over a long thin tippet. A leader
system of 18-20 feet is oftentimes used in skinny
water situations.
For those fishing Bonefish or other flats fish
species, use your normal tactics and gear with
the "Tan Mistress" used in place of your "Gotcha"
or "Crazy Charlie" etc. You can also tie the
"Mistress" with lighter bead chain eyes to prevent
the splashdown from spooking those shy flats fishes.
Up-size the "Tan Mistress" to a size #2 for tarpon.
Experiment with various color schemes, as the Ice
Yarn and UNI-Stretch are both available in a rainbow
of colors. ~ Richard A. Lewis