Pettis' Pulsating Caddis
Pupa (Hydropsyche)
By Joe J. Warren
One great idea leads to another and so it was with
the creation of the Pulsator Caddis. This pattern is
Jim Pettis' first glass-bead fly. He originated the
fly in 1993 after being inspired by John Ciulla's
article, "Gas-Bubble Pupa." Jim opted for a slightly
different approach for incorporating beads into his fly
patterns. Both fly tiers have completely different motives
for using beads, this helps show tiers the many different
possibilities for using beads in flies.
Jim has set a trend by utilizing the light-absorbing
characteristics in glass beads to give them a transparent
look as he ties the materials in between and around the
beads. Just add water and watch them come alive.
Jim ties the Pulsator Caddis as a pupa, pupa bead-head,
and an emerger. . .
The two prominent caddisflies Hydropsyche
(a net-spinning caddis) and Brachycentrus
(a tube-cased caddis), that inhabit the Sacramento River
near Redding, California, are a main staple in the diet
of very big rainbow trout that thrive there. I am certain
that if you take Jim's lead, you can effectively match
your local caddis flies with the appropriate color scheme.
When the caddis are in season, try fishing the fly on the
bottom (don't negate the use of split-shot) in early
morning, the mid-water column in the afternoon, and in the
evening convert over to Pettis' Pulsating Caddis Emerger
for the surface action. Keep a firm grip on your rod!
Materials List:
Hook: Tiemco 2457, Daiichi 1250, sizes 12-16.
Thread: Olive 6/0, prewaxed.
Body: Four to six orange (sl) beads, small.
Bead Dressing: Lava brown Buggy Nymph Dubbing.
Legs: Wood duck flank fibers.
Thorax: Dark brown Buggy Nymph Dubbing.
Instructions - Pettis' Pulsating Caddis:
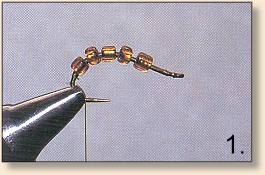
1. If desired, slide one small gold bead onto the hook
followed by the glass bead and place the hook in the vise.
Start the thread at the eye and wrap towards the beads
leaving ample room for the thorax and head. Wrap the thread
to the hook bend by securing the glass beads in succession
with one or two wraps.
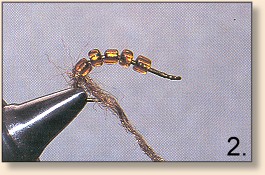
2. Form a dubbing string with a moderate amount of dubbing.
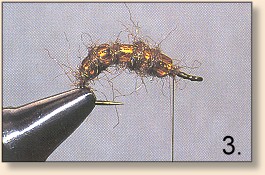
3. Dub forward with one or two wraps between each bead,
gradually building the abdomen as you wrap to the front.
Bring the thread ahead of the font bead and wrap several
times to secure.
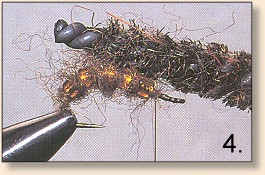
4. Brush the dubbing in a circular motion until beads
are slightly exposed.
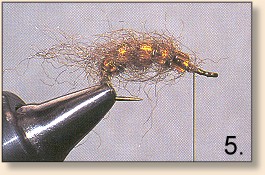
5. Gently brush dubbing to the rear to lay down fibers
(Author's Note: the fingers work well, too).
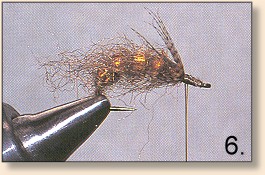
6. Tie in 8 - 12 wood duck fibers per side. Spread the
fibers in a fan-like array and secure them with tight
thread wraps.
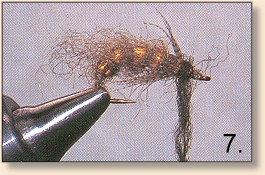
7. Add dubbing material to the thread and wrap forward
to form the thorax. Whip finish the thread to complete
the head. ~ JJW
Credits: This fly is one of hundreds of innovation flies
included in the book, Tying Glass Bead Flies by
Joe J. Warren, published by Frank Amato Publications. We appreciate
use permission!
|

