
 |
|
Alewife
|
|
Step 1. Place the hook in the vise in the normal position,
but I would hide the point in the jaws so as not to
get stuck.
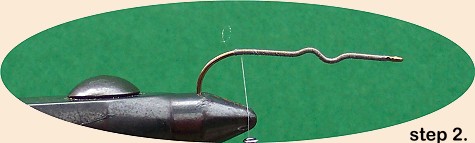 Step 2. Level wind the thread (Gray, 8/0 Uni-Thread) from the eye of the hook to the beginning of the hook bend. Coat with cement.
|
|
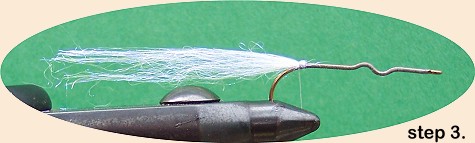
Step 3. When preparing the Hanked Lite-Brite
for your patterns cut it twice as long as needed.
This will allow you to double it back when tying
it in. This is better than tying it in, cutting
it off at the tie in point, and then gluing. This
material is very slick and will easily pull out.
Gluing this material hardens it and causes it to
break off where it is glued. Don't use glue in these
patterns except where I suggest. Most tiers tend to
make the first few minnows too bulky. Learning to
"pull" the correct amount of material for each part
of the pattern comes with practice. Because you will
be doubling back the material, pull half as much as
you think you need. Place it under your thread,
double it back, and see if it is right. Remember
all flies catch fish. Tie down the Tail portion
of the fly (Pearl Blue Magic Hanked Lite-Brite)
double it back and wrap down with five or six wraps.
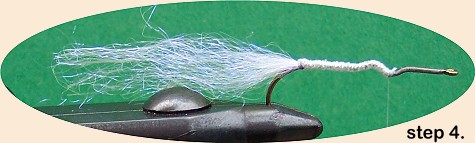 Step 4. Tie in the Body portion of the pattern (Pearl Bodi-Braid) at the same point as you tied in the Tail. Wind the thread forward to the first wiggle in the hook shank. Wrap the Bodi-Braid forward to the first wiggle of the hook shank. Tie off and trim.
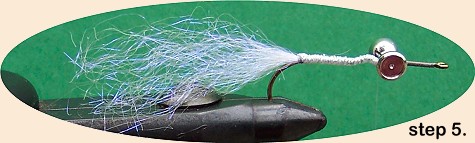 Step 5. Tie in the appropriate size Silver Real Eye. Use a crisscross method of wrapping until the eye is secure, then an under the eye, over the hook shank, under the eye, over the hook shank five or six times. Don't super-glue the eye yet.
|
|
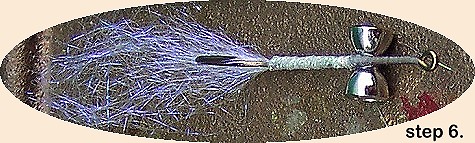
Step 6. Before super-gluing the eye, remove the
hook from the vise. Place it on a flat surface
with the hook point up and the eyes on the flat
surface. Now adjust the hook point perpendicular
with the eyes and the flat surface. This adjusting
step is very important in making the minnow run
right-side-up. Return the hook to the vise in the
normal position and super-glue the threads tying
in the eye. Make sure both sides of the eyes are
saturated with glue.
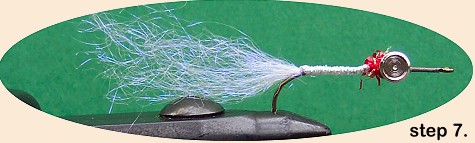 Step 7. This is an optional step, however I think I get more strikes because of the realism it adds to my patterns. Behind the eye tie in two wraps of Fine Red Pearl Chenille or red yarn for the gills of your minnow. Move the thread in front of the eyes.
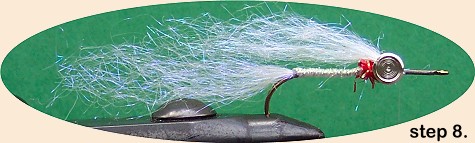 Step 8. From here on it is important to remember that this is a clouser style pattern. So with the hook in the vise in the normal position, the Belly is up and the Dorsum or Back is down. Remember the Back of the minnow will have the hook point sticking out of it. Tie in the Lower Side portion of the pattern (Pearl Blue Hanked Lite-Brite) right in front of the eyes. Double it back and "X" the Lower Side to eye. One or two X's will be enough.
|
|
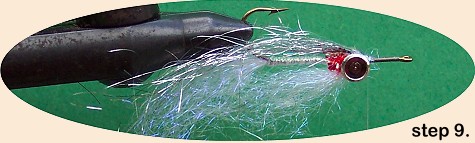
Step 9. Rotate the vise or the hook so the hook
point is up. Tie in the Upper Side portion of the
pattern (Silver Hanked Lite-Brite) in the same
manner as you did the Lower Side. Right in front
of the eye, double it back, and "X" the Upper Side
to the eyes. Do not glue at this point.
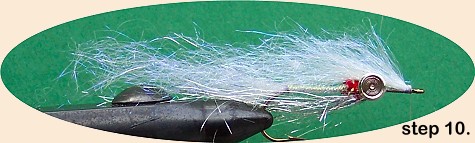 Step 10. Wind the thread to the eye of the hook. Rotate the vise or the hook so the hook point is down and the belly of the fly is up. Tie in the Belly portion of the pattern (Pearl Blue Hanked Lite-Brite) at the eye of the hook. Tie it down, double it back, and use only two or three wraps to secure it. This is the place to conserve your thread wrappings. The smaller the snout of the minnow the more stable it will run.
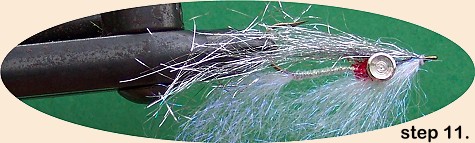 Step 11. Rotate the vise or the hook so that the hook point is up and the belly of the fly is down. Tie in the first portion of the Dorsum or Back (Silver Hanked Lite-Brite). Use the same method as you did with the Belly portion. Tie it down, double the material back, and secure with a couple of wraps of thread.
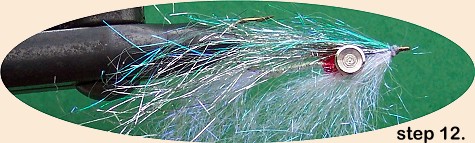 Step 12. Tie in the second portion of the Dorsum or Back (River Green Hanked Lite-Brite) sparsely over the first portion of the Dorsum or Back. The second portion of the Dorsum or Back is sparse because it is supposed to give a blue-green hue to the mostly silver back of the Alewife.
|
|
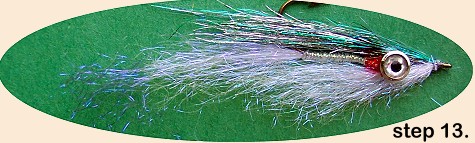 Step 13. Wrap a fine head on the pattern keeping it small. Whip finish. Head cement the thread wraps of the snout only. I use a head cement that is half cement and half thinner. I want my glue to penetrate the threads not build up on them. Step 14. For this step you will need a small brush and a piece of cardboard or sturdy-board. A mustache brush or a soft toothbrush will do fine. The cardboard or sturdy-board needs to be about six inches long and three inches wide. This will be your "Brushing, Trimming, and Coloring Board". With your scissors make a hole in the board about one inch from one end and in the center. Make the hole just large enough to hold the eye of the minnow snuggly. Now brush both sides of the minnow before trimming. Trim your pattern making it look like a Slab-sided Alewife. Step 15. Now place the pattern back on the board and color in the Cool Gray Prismacolor Pen Tail Fin and the Black shoulder spot behind and slightly above the eye. Do this to both sides. The rest of the fins are clear so you do not need to color them.
About Fox:Fox is a retired educator, fly designer for Spirit River, guide and author of Fishing What They See, available on his website, www.fishinwhattheysee.com or P.O. Box 1352, 993 Hunter Cemetery Trail, Salem, AR 72576.
|
|
|