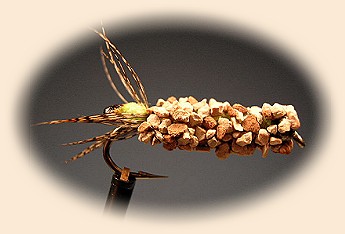
Cased Caddis
By Ron Eagle Elk, (REE) Washington
Okay, in light of recent posts about fly
thieves by D. Micus, I'll admit up front that
I stole this fly from someone else. Actually,
two someone elses. One was a poster on this
site who suggested the material for the exterior
of this version of a cased caddis, the other is
Oliver Edwards, who provided the insight to
creating the front half of the fly.
Anyhow, to tie up this version of the cased
caddis your going to need hooks (I used Mustad
9772 in size 8; antron yarn in cream, tan or
olive green; tying thread in your choice of
color; something to use as an underbody I
used chartruese flexy-floss because it was
what I had available); small partridge feathers;
the smallest dark colored metal bead you can
fit on the hook; a good cement such as fleximent,
softex or 5 minute epoxy; and lastly, model
railroad ballast in a color to match the
naturals in your area. Oh yeah, you're also
going to need a cigarette lighter and maybe
a little air freshener.
A word about model railroad ballast. When I
went to buy some I figured I'd spend a couple
of bucks and get a little of the stuff. When
I got to the local hobby shop they had a
selection of ballast that boggled the mind.
Lots of colors and various sizes of rock,
not to mention quantities. For about six bucks
I got a small bag of tan and one of brown.
Once mixed together in a tupperware bowl
stolen from my wife's kitchen (Ssssssshhhhhhhhhh!)
I found I have enough ballast to tie several
lifetimes worth of cased caddis.
There are probably better and faster ways to
tie this fly but this is how I started, and
after a dozen it just seems natural. Before
you start to tie you flies, mix your model
railroad ballast to get the desired effect.
Dump the mix into a tea strainer and rinse
well under running water. Spread it out on a
paper towel to dry completely before you start
tying. Once dry, put it back in the bowl stolen
from the kitchen.
Tying Instructions: Cased Caddis:
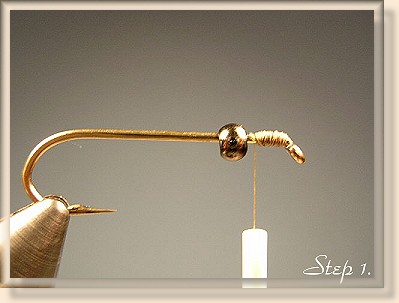
1. Slide the bead on the hook somewhere on the
shank. At the hook eye build up a small thread
bump, so that the bead has a snug fit next to
the eye. Whip finish the thread and snip it.
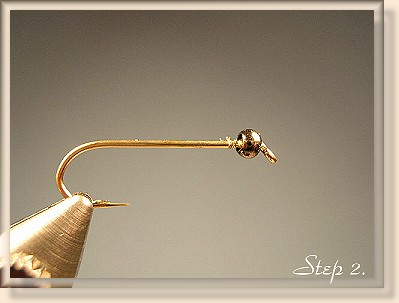
2. Place a drop of head cement on the thread
bump and slide the bead over the bump next to
the eye.
Cut a piece of antron yarn about 2 inches long.
With your trusty lighter in your hand try to melt
one end of the yarn without setting it afire.
Don't feel bad, I couldn't do it either. Once
it's aflame, do NOT allow the flaming or dripping
antron to drop on any clothing, good furniture,
or bare skin. Blow it out quickly and observe
the newly formed, shiney black head of our cased
caddis. You, and most likely your significant other,
will also notice a disagreeable smell due to the
burning of the yarn. Time for a shot of air freshener
to keep peace in the family.
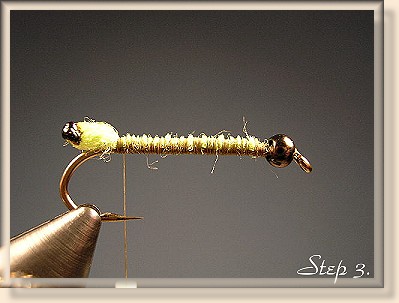
3. Remount your tying thread behind the bead
and wrap a thread base back to the hook bend.
Lay your newly formed caddis headed yarn on
top of the hook with the head over the hook
bend. The cased caddis seldom expose much of
their tender body, so only allow about 1/8
inch to hang over the bend. Secure the yarn
with a couple of wraps of thread. Keeping the
yarn on top of the hook as much as possible,
tie the yarn down the hook shank back to the
bead. Trim the excess yarn and wrap back to
the hook bend. I tried tying in at the bead
and wrapping toward the bend, but the yarn
always stretched and left too much yarn exposed.
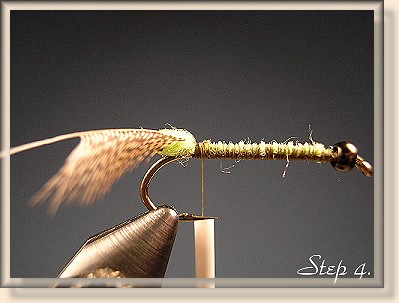
4. Select a partridge feather with short barbs.
I use those nicely marked feathers from the
saddle area of the skin. Strip the barbs from
one side of the feather and tie the feather
in by the tip right behind the head of the
fly. Clip the excess tip.
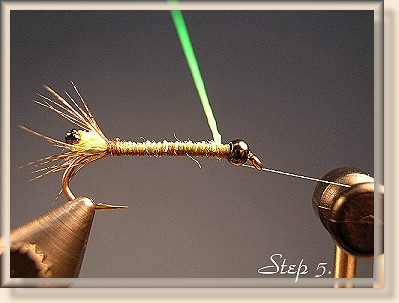
5. Wrap the partridge hackle around the hook,
using two or three turns. Secure the feather
with a couple wraps of thread and clip the
excess. Take a couple more wraps behind the
hackle to force the barbs out and around the
yarn head of the caddis. Wrap the thread back
to the bead and tie in the chosen underbody
material. Again, I used Chartruese flexi-floss
because that's what I had laying around. It
also has a nice insect green color when wrapped.
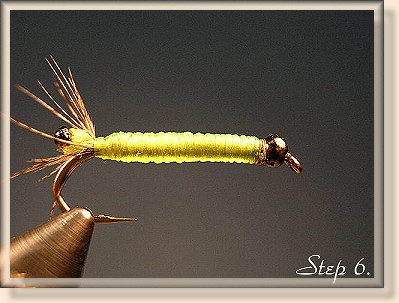
6. Wrap several layers of the underbody to
build up some bulk. If you use flexi-floss
you can also stretch the floss near the bead
and ease up on the tension near the head to
create a tapered under body. When you have
attained the desired underbody, tie off the
material, clip the excess and whip finish at
the bead.
When I'm tying these caddis flies, I usually
tie more than one, so I tie all the flies to
this point before going on to the next step.
Grab your adhesive; fleximent, softex or epoxy;
the mixed, rinsed and dried model railroad
ballast; some old newspapers and the air freshener.
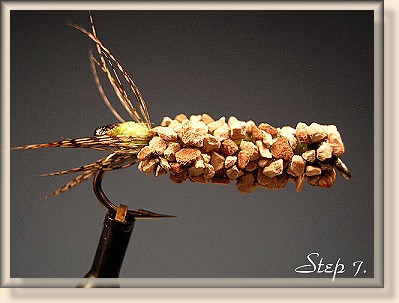
7. Spread the newspaper out over the work area
and open the adhesive. For those using epoxy,
mix small batches as needed or it will set up
before your done. Apply a liberal coat of your
chosen adhesive on the underbody of the fly, let
it get a bit tacky then roll the fly in the
ballast mix. Use your fingers to force the ballast
into the adhesive and shape the final body. Be
sure to keep the hook eye clear of stones and
adhesive. About this time your significant other
should start complaining about the smell of the
adhesive, so a couple squirts of air freshner will
usually stop the problem.
Hang your finished flies to dry overnight.
This is a really tough fly that trout just
seem to love. I hope they are as successful
for you as they are for me. ~ REE
|