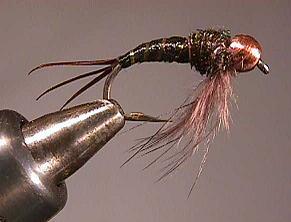
The nymph tends to "swim"
through the water upside down due to the beadhead,
so maybe the rainbows figure the legs are not legs
but wings. Who knows? All I know is that D's glory
in bright yellow does consistently catch fish. The
black version is new.~DS
Materials List:
Hook: Mustad 3906, #12.
Thread: Chartreuse 6/0 for yellow,
black for black nymph.
Head: Brass beadhead of proper hook size.
Tails: Three dark brown goose biots.
Body: Yellow Nylon Stretch 1X, black floss
for black nymph.
Ribbing: Fine gold wire or gold oval tinsel.
Collar: Two Peacock herls for #12, 5 for
larger nymphs.
Legs: Lemon or partridge fibers, black fibers for
black nymph.
Tying Instructions:
1. Squeeze the barb of the hook flat with pliers,
being careful not to damage the point of your hook.
2. Mount brass beadhead by inserting hook point into
small hole and place bead right up against the rear
of hook eye.
3. Start a normal wet fly wrap around shank, stopping
in mid-shank.
4. Glue the center biot on top of hook shank before tying
in the two side tails. Tie in the biots by wrapping with
several turns to hold them in place on each side of shank,
but first apply some cement to help hold them in place. I
start with the farthest side of the shank first, then tie in
third biot on my side of vise, trimming the ends and cementing
them in place for strength. Tip:You will note
that when you remove a biot from the quill it will tend to curve
out in one direction or the other. This curve should face to the
outside of the nymph so a "fanned" effect results. The tails
shoud spread out from each other.
5. Wrap your thread to rear of shank and tie in gold ribbing,
enough to form four or five segments.
6. Wrap thread forward, leaving enough room in back of
beadhead for your herl collar material and legs, then wrap
back and forth over existing thread to form a built up base
for thorax. Continue back to tail with thread.
7. Tie in a length of Nylon Stretch 1X floss; wrap it in a
firm manner to and over thorax and back to tail. Add
another length of floss, wrapping it over the first,
stopping in front of thorax, then build up thorax with a
few more wraps of floss until you have a nicely shaped
nymph body. Tie it off. Remember that we need the space
in front of thorax for our herl collar. Tie off nylon
with three or four wraps of thread.
8. Wrap your ribbing material over body material to form
four or five segments. In front of thorax, take two turns
with ribbing around ahank; tie in end of ribbing material.
Trim off excess.
9. Take two peacock herls approximately 5 inches long and
secure them in between the beadhead and front of thorax. You
can insert the ends into the beadhead and then tie them in. Hold
herls together between your fingers, stretching them out straight
making sure that they atch in length; if not, cut them with your
scissors so they are the same lengths. If you do not do this at
this point, once you wrap them in to their ends, one or more may
spinn off and unwind. The larger nymphs will need five to six
herls to create the right sized collar.
10. Wrap herls together clockwise around shank starting in
front of thorax and ending behind beadhead. Tip:In
order to strengthen the herl wrapping FAOL friends advised me to
wrap the herl around fine copper wire. Do what you feel is best,
but after several strikes the herl on one or two nymphs had a
tendency to loosen even when well cemented in place, so this
may be a good solution to that problem.
11. After wrapping the herls around the shank with six or eight
turns, tie them off.
12. Turn your vise upside down. Gather nine to ten lemon duck
hackle fibers, (black for the black nymph version,) that will
extend beyond the point of your hook and tie them in between the
back of your beadhead and in front of herl collar - do not trim
ends of legs.
13. Cement behind head by letting cement flow down into the
thread, but not over herls or onto legs. Let dry. Half-hitch
or whip finish the fly and go fishing. Then,
E-mail me and tell me
about your story of glory. Catch you on the fly!
~ Dave Salamone
Fishing the Fly
This portion is simple: fish the fly as any nymph
pattern, casting upstream, drifting down to where you
believe your trout sits at her or his breakfast nook
or dinner table. But watch out! When you least
expect it, on the final leg of its journey,
when you line begins to turn in the current and you
relax, if you just happen to let your thoughts wander
off a little too far, you might hear a splash, and
ping and lose the biggest rainbow you have ever seen.
You know, the one that "got away."~DS