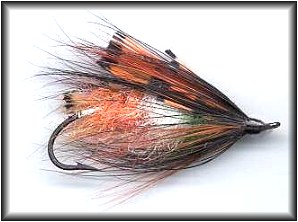
The Jacobite
This fly is also called the Irish Flag Spey Fly. It can be tied with either gold or
silver tinsel. I tie it both ways.
Materials List:
Hook: Partridge Traditional Spey Hook CS 10/01 size 1 or 2.
Thread: Black 6/0 non-waxed thread,
preferably silk but cotton will do.
Tail: Golden Pheasant Tippet size from
point of hook back to hook gap.
Rump: Silver tinsel small.
Body: Equal parts of one third of
Hook shank of Ronn Lucas Sr. Iridescent Dubbing (14) Orange,
(01) White and Special colour Dark Highland Green.
Bottom Hackle: Golden Pheasant back Dk Orange.
Top Hackle: Dekes Spey Hackle Black.
Beard: Highland Green Schlappen or
strips of dekes red spey hackle (optional).
Wings: Golden Pheasant Tippets as wide as hook gap.
Tying the Fly:
To tye this Spey Fly you need to have a Highland Spirit so I would suggest that after
you have collected your supplies that you also buy a bottle of a Good Highland
single malt preferable a 20 to 30 year old. But do not drink it like bourbon, you sip
this as your pocket book will be a bit faint. (for those who do not drink I suggest
watch the film Braveheart, Rob Roy or Tight Little Island (Black and White).
Now that you have gotten in the right spirit.
1. Start your wrap of thread about half way down the shank to the barb, not the
point front, but the barb point near the back. This is where you will add your silver
tinsel, making sure that when you start the tinsel it is at the bottom of the hook
and never on the side. This is done by bending over the end to make a hook
or kink to place on your thread and pulling the thread straight up; you
might have to guide it in place until you get the hang of it. Wrap sparsely to
the eye of hook to get your spool out of the way. Start your wrap of Gold Tinsel
from barb tip to point of hook in length, then unwrap your thread back to tinsel and
wrap on shank three times. Then pass your bobbin around in front of tinsel and back,
then wrap three times on shank; do this a couple of times.
2. Next you place your Tail Piece of Golden Pheasant tippet on top of Shank holding
it with your Thumb and Forefinger pulling firm but gentle as not to break the tippets
and wrapping your thread back to just three thread widths over the tinsel and
securing with a couple of half hitches.
3. Next measure in your mind a division of Thirds where you are going to put the
Dubbing. Measure out about as much Dubbing as you think it will take. The
Dubbing is not spun on the Thread. You draw your Spool down about four (4)
inches in length then make a loop of thread back up close to the thread you started
with and wrap three times around the shank of hook. Then pass the bobbin in front
and wrap three more times around the shank, do this twice. Make sure you do not
let the loop go as this will cause it to tangle and you will have to start over. Always
when you are tying in the next step loosely wrap your thread to the eye and the
bobbin tip tight up to the hook eye to keep it out of the way and from swinging.
4. Place your Index finger of your Right hand in the loop. Betwixt the thread you place
your dubbing. (dubbing should be about 1/2 of the section you are about to tye) hold
the thread together with your left index and forefinger and your forefinger of your
right hand in betwixt the loop thread, draw a counter clockwise circle with your finger
about 10 times, this will hold the dubbin. Make sure that you spread the thread loop
so it will make the dubbin spin into a cork screw-like pattern loosely. Now you are
ready to wrap the dubbin on the shank, pulling back to keep the dubbin uniform and
in that 1/3 space you have provided. Now tye in like I have told you before, using
three wraps of thread near the end of your dubbin pass in front of thread and three
more wraps on shank. This is how we tye off so I can save space here.
5. Now do the same to the White dubbin and tie off. The same then the Green Dubbin
and tye off the same. Add a drop of head cement to each section except after the
white section. You should have passed up on the loop point of the eye a 1/6 of an
inch. Take an old Emery board and glue a piece of Velcro bristle on it; this you can
use to brush your Dubbin. Brush down and back towards hook barb. (Do not worry
if you lose some of the dubbin just worry if all of the dubbin comes out).
6. Now Select a gap width of GP Tippets for the wings and strip back to show about
1/4 inch of quill, you should have the same width after you do this. Place them on
either side of body, tye in and secure with two half hitches and dap a small amount
of head cement on this.
7. For the Beard, this shoud be tyed in such a way that it is divided and swept back
to hook barb point; divide should be even on both sides of body.
8. Select a Piece of GP rump hackle, Dk golden brown. I start at the tip end and
draw back fibre and stip off fibres closest to you. Then tye the tip end in and wrap
away from you using your hackle pliers (be careful not to pull too hard or you will
break the tip or pull it out and you will have to cut and prepare another.) Wrap the
quill end around the hook shank and tye in like the dubbin.
9. This is the hard part. Select a thin quill of Black Dekes Spey hackle, tye it in
the same way you did the GP hackle, but this one you do not strip off one side.
10. I strip off fibres so that I have about 1/2 to one (1) inch of Quill showing to grab on
to with hackle pliers. Now lift the hackle pliers straight up and draw back to wrap
your thread over the bit of tip end so that it is secured and won't pull out. Moisten
your thumb and forefinger of your left hand and pull the hackle fibres back.
Start your wrap away from you holding down the hackle fibres with your left forefinger
and let go of the hackle pliers. This will keep it from spining and getting you all tangled up.
Now reach under the hook and grab the hackle pliers, still holding the fibres with your
left forefinger and pull toward your chest and up to start your wrap again. Do the same
until you are at the quill end and then wrap the quill end around the hook eye. You
should be about at the part of the loop eye when it starts it's curle upward swing.
Tye this in like you did your Dubbin and then Whip finish. Now cut the excess quill and
other loose fibres that stick out over the eye and clean your head up. Place several drops
of Sally Hansen Hard As Nails clear enamel on the head, allowing to tack between drops.
This spey fly can be used both for Atlantic Salmon and NW Steelhead or just as well
as hat pins. You do not have to use a spey rod for this but it helps.
Now for those of you who still bibe take another sip of your 25 to 30 year old single
malt and Salute your favorite Fishing Sponsor and the FAOL WebSite.
Hector L. L. MacLean
|