
 Morrisfoam Golden Stone By Skip Morris
|
|
|
|
Tying Instructions: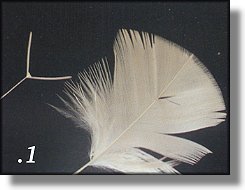
1. Mount a beading needle in your vise. Lightly start the thread on the
needle. Strip the fibers from the sides of the tail feather; then snip the
center from the tip leaving short split-tails.
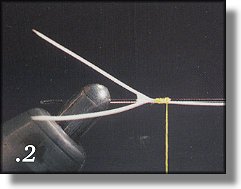 2. Mix up some epoxy and dab a tiny amount onto the thread-turns. Tie in the tail feather by its stem as shown.
|
|
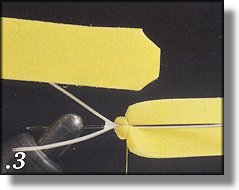
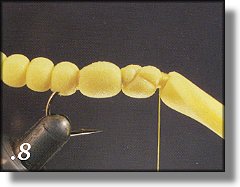
3. Snip a strip of foam about one-shank wide. Trim the edges at one end
of the strip to a short, blunt taper as shown. Tie in the tip of the taper at the
feather's tie-in pont, on the far side of the needle.
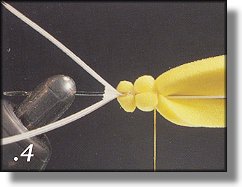 4. Advance the thread a turn or two over both the needle and the stem, (not the foam); them form a segment in the foam with two snug thread-turns. Continue making segments in this manner until there are six or seven. Add a Skip's whip over the last thread-turns, and then trim the thread.
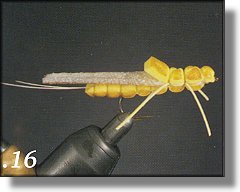
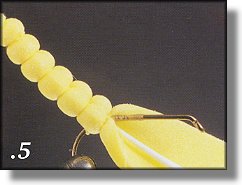 5. Slide the foam abdomen off the needle. Remove the needle from your vise. Mount a hook in your vise. Start the thread at about midshank, spiral it to the bend, half hitch it there, remove the hook from your vise. Push the hook's point through the center and out the bottom of the last segment, opposite the seam. Return the hook to your vise.
|
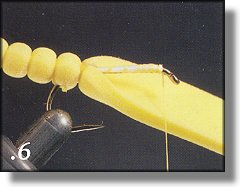 6. Add a bit of epoxy at the hook's bend, secure the last foam segment with a few new thread-turns over the old, spiral the thread over both shank and feather stem to the eye. Trim the stem.
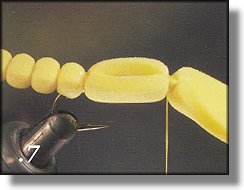 7. Add a bit of epoxy along the shank, up to the eye. Lift the foam up and forward, and then secure it at the eye with several thread-turns. Work the thread back a few turns, 1/16'" or slightly more; this should form a short thread collar.
|
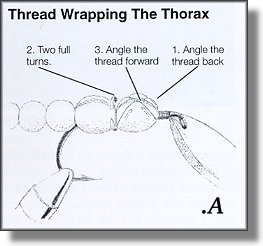
8. Angle the thread back over the top of the abdomen to about midshank. Two two full truns there. Again over the top, angle the thread forward to the front of the foam abdomen. The abdomen now has two segments and the thread should cross itself over the front segment. |
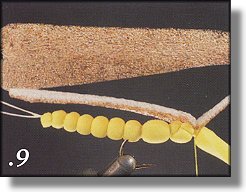
9. Cut a wing from thin foam-sheeting in the shape shown. (I still use
colored Ethafoam for this.) tie in the wing behind the eye, projecting
back over the body. The wind should reach a bit beyond the end of the
abdomen.
 10. Trim the stub end of the wing's base. Work the thread to the rear of the thread collar behind the eye. Pull the front of the foam up, and then tightly back. The eye with push right through Ethafoam; but if you've used a soft-foam, you may have to poke a hole in it with your scissor tips for the eye to reach through.
|
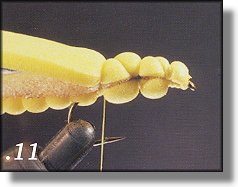 11. With the foam back and stretched slightly, take a few tight securing thread-turns. Angle the thread back over the first segment, and then take one full turn of thread. Angle the thread back over the second segment, and then take a full turn there. The thread should now be at the bend.
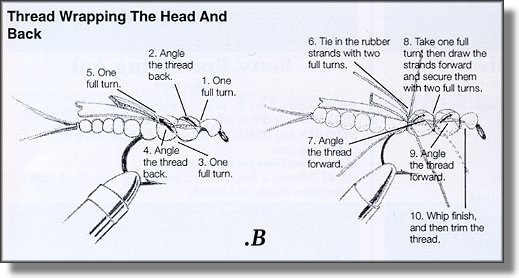
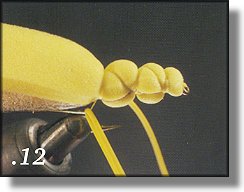 12. Loop a short section of rubber-strand over the thread the slide the section to one side of the hook. Do the same on the other side. Draw the strands back out of your way and angle the thread forward over the foam segment. Take a full turn of thread at the front of that segment.
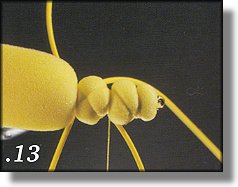 13. Pull one, then the other, rubber-strand forward and secure both to the sides of the abdomen.
|
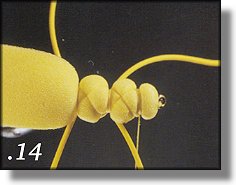 14. Draw the strands back out of your way again, and then advance the thread forward over the next segment - this should leave the thread at the thread-turns just behind the head. Add a Skip's whip, and then trim the thread.

We thank Frank Amato Publications Inc. for use permission for this excerpt from Tying Foam Flies. |
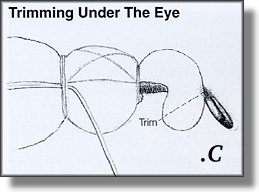 15. If it is too long, trim the end of the foam where it extends over the wing.
Trim the legs to stonefly-length. If there is a bulge of foam obstructing the
eye from beneath, trim it away and trim the underside of the thorax if the [hook]
gape seems crowded. Color the body with a marking pen if needed. The
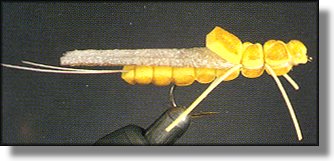
Morrisfoam Stone is complete - just try to sink it.
15. If it is too long, trim the end of the foam where it extends over the wing.
Trim the legs to stonefly-length. If there is a bulge of foam obstructing the
eye from beneath, trim it away and trim the underside of the thorax if the [hook]
gape seems crowded. Color the body with a marking pen if needed. The
Morrisfoam Stone is complete - just try to sink it.