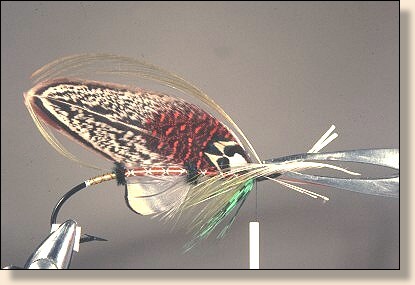
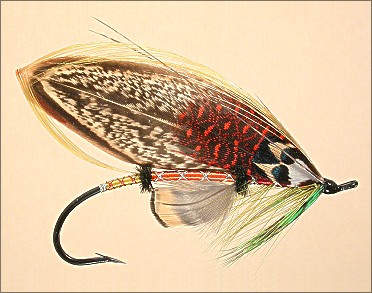
Lesson 1 - Cheap Atlantics
This lesson will be the most challenging one yet for novice Tyers.
It involves a lot of techniques not used in other types of tying so
in some ways even accomplished Tyers of some styles of tying will
share some of the same frustrations as new Tyers. I will show you
how to make feathers in particular do things contrary to their
structural makeup. The patterns in this part of the series are
not overly complicated. I don't want to give you patterns at
this stage of your tying that will be overly frustrating to you
and run the risk of turning you off to tying these flies. There
will be quite a lot of new things to learn here but, many of the
basics we have already covered will be used here as well. A big
part of tying these flies for myself and just about every other
Tyer of these kinds of flies is the challenge of overcoming often
stubborn materials, to create a fly that is easy on the eye and,
to continue a very old tradition.
I originally came up with a series of "cheap" Full Feather Wing
Salmon flies a few years ago to utilize some of the many beautiful
feathers found on various Gamebirds, Ducks and, some of the more
common Pheasants. Another reason for doing them was an attempt to
show Tyers that they can tie beautiful full dressed flies without
spending a ton of money and, often with materials you already have.
This fly will hopefully encourage you first to try tying the full
dressed flies and, second, to look at everything with the question,
"will this be useful as tying materials?" I have even used strands
of a copper scrub pad as tinsel before. This particular fly has
been tied using 100% inexpensive and available materials. If you
don't have the exact feathers or, other materials, substitute
similar ones. The three patterns I am presenting in this lesson
are fairly simple in their construction and number of parts. Later
in the series, we will tie some much more complicated full dressed
flies. The techniques presented here will allow you to tie just
about any full feather wing Atlantic Salmon fly either simple in
design or complicated.
I will guarantee once you have tied one of these flies, you will
have embarked on a new and exciting tying journey. Tying full
dressed flies is probably the most satisfying and challenging
of the craft. Having said that, it is not necessarily that much
harder than other styles once you have learned the "tricks" and
techniques.
Matching Feathers For Full Featherwings
When you are matching feathers for flies that use the whole
feather for the wings, great care in matching will make the
task of setting the wing either easy or difficult. It can
also prevent wings that flair to one side or twist out of
shape.
When I first started to collect my "special" feathers and before
I had actually begun to tie full featherwing flies, my routine
for matching was simple. First, look at the outline and match shape.
If the curve of the feathers shafts didn't curve in the same
precise direction and follow the changes exactly down the shaft,
I didn't see as all that important. So, I had all these feathers
matched and in labeled bags ready for me to tie with. I soon
found out that trying to make two dissimilar feathers behave as one,
no matter how slight the difference, is difficult at best and
near impossible at worst.
My matching criteria now is a three step test. A feather passing
all three qualifies as a matched pair. Two of three tests relegate
the feathers as non-pairs. First, I select two feathers whose
outline, curves and, length look the same. Second, I place them
together good sides out and, hold them up to a bright light. If
the outsides match exactly and, the shafts are also matched exactly,
it passes the second test. Third, while still holding them together
with my right thumb and index fingers, I flick the "wings" with my
left index finger rather hard. If the feathers do not move any
amount, they pass the third test. Now and only now, they qualify
as a matched pair. I then put a dab of hot glue on the bottom tip
of the feathers to stick them together and bag them for later use.
One other visual thing to look for in matched feathers is that the
wing will be perfectly straight but, this is a natural result of
the three tests so, doesn't qualify as a fourth test. If the barbs
curve unnaturally even a little, you can be assured there is a
conflict somewhere.
If you really look at feathers, you will see some amazing structures
that are incredibly strong for their weight. Every curve has evolved
to produce maximum strength. This is especially true of the wing
feathers that are some of the more frequent feathers used for full
featherwing flies. If you have a pair of feathers that for every
purpose match but, one is a little shorter or, slightly more or
less curved than the other, you will have one feather that is,
for lack of a better term, stronger or weaker than the other.
When you assemble these two dissimilar feathers, a conflict arises
and the stronger feather will win. You may be able to finish a fly
that looks great with such a pair of feathers, but the slightest
disturbance will make the feathers move to the path of least
resistance. The wing will "blow up." If this happens, the options
are limited to none. A little more careful matching could
save that one of a kind creation and, all the work that goes into
putting it together.
Before we get started with this lesson, let me explain how I go
about creating a Full Feather Wing Fly. Almost 100% of the time,
I choose the wing feathers before any other component of the fly
including the hook. Some Tyers will go by an existing pattern and
others will draw the pattern as they want to tie it. I have never
been able to end up with a fly that I have tried to draw out and
choose all the materials beforehand. Some may be able to do it
this way I can't seem to make that approach work for me.
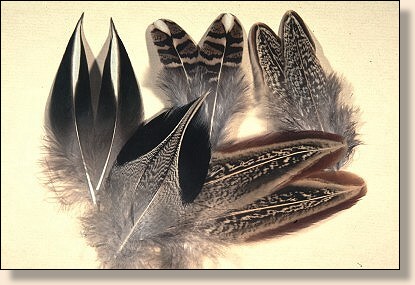
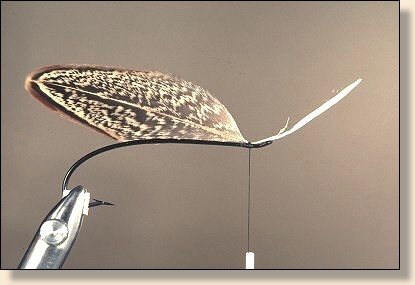
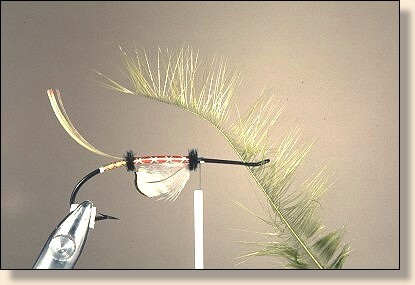
Assorted matched feathers for full featherwing flies
I have boxes of matched feathers that over the years, I have
either plucked pairs of feathers from a skin or, sorted through
countless thousands of molted feathers (a grueling and time
consuming process in itself). Most of these feathers have been
washed and attached with a dab of hot glue on the bottom end
of the shaft to keep the pairs together. Then I have pairs of
like feathers in zip-loc bags and, these in plastic boxes.
Over the years I spent literally, thousands of hours sorting,
washing and, matching feathers. All of this time pays off when
I am ready to tie a fly though.
When the inspiration to tie hits me, I go to the matched pairs
boxes and, go through the various bags of feathers until one or
more jump out and, say, "use me, use me!" Then, I lay them all
side by side and determine which "speaks" the loudest. That one
is the cornerstone of next fly I tie.
Now that I have the rough wing, I select the hook of the shape
and size that will best show the beauty of the feathers of the
wing. While choosing the hook size, I start to get a rough idea
of the length of the wing. I strip away much of the fluff at the
base of the feathers to get it out of the way but, not before
careful consideration. All the rest flows from these two components.
The colors of the fly are determined by the color/colors of the
wing and, the "style" of the fly is determined by the shape of
the wing. It's these first few steps that are the most important
in my tying a Free Style fly.
It will take you a few flies to begin to understand the limitations
of the materials, the different feather types and, the mechanics
of their structure and, how to make it all work together for you.
Sometimes a material simply has a "mind of it's own" and, all the
tricks and techniques will simply not make it conform to your will.
These times need a different approach. Let the peculiarities of the
material work for you, not, against you. This is when you need to
think "outside the box." What is the structure of the material that
can't be changed without a detrimental effect on the final look of
the fly? How to make that problem be part of the solution?
Throughout this series you will see flies with unusual materials,
uses of materials and often unusual combinations of materials. To
me, my materials are my paint, the hook my canvas. If you don't
have the materials to draw upon, your finished "painting" will be
bland and uninteresting. This is not to say that, the fly needs
to have wildly bold and bright colored materials to be a great
looking fly however. It means you may have a fly that seems incomplete
or lacking something.
I am sure you have seen flies that have tons of parts sticking
out in all directions and, at first they are amazing to look and
marvel at. Sometimes though, a fly can have so many parts that it
renders it confusing. What is the focal point? Where does one
material end and the next begin? In my view, a successful display
fly needs to be a "quick read." By that I mean you needn't look
at the fly for an extended period of time to figure out whether
or not you like it. It either "speaks" to you or it doesn't. But,
since we all like different things, not every viewer will react
to the same flies in the same way. So, that brings me to the second
step that I mentioned in the introduction, "The real intent is to
have fun tying". Do what you enjoy tying, develop your own individual
style of tying and the rest will take care of itself.
If you find that you like tying the Full Feather Wing Atlantics
and/or the Free Style flies, you will be doing yourself a huge
favor if you try to buy full skins to work from. There are a huge
number of feathers that you will never see in fly shops that are
on full skins. Even when you do find full skins, it is likely that
they trimmed any number of feathers off when it was skinned. When
I get dead birds and skin them myself, I take great care to skin
them as though it were going to me mounted. I leave the legs and
all the head feathers on. Many of these make wonderful veilings
for my flies. If you hunt or, know hunters, let them know you
will take any birds they don't want. Even if they don't want to
give up the birds, maybe they will save the plucked feathers for
you.
In any case, keep an eye out for feathers because you just never
know when an opportunity of a lifetime will pop up.
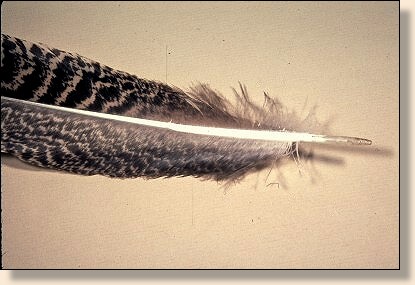
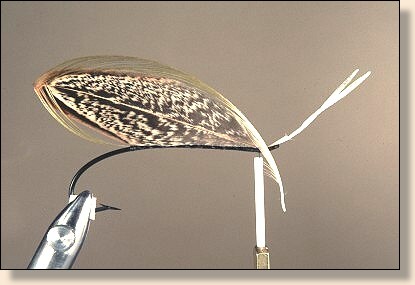
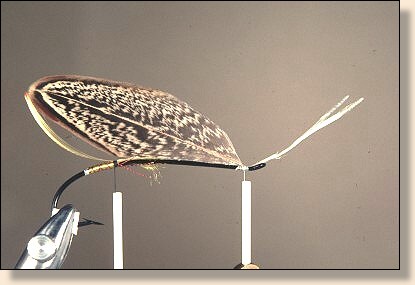
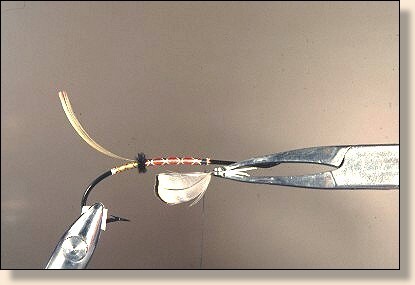
A. Prior to removing any part on the feathers, assess how much of
the feather you want to use for the finished wing. Remember that
some will be covered by other materials along the sides near the
head. I try to use as much of the "good area" of the feather which
is usually the upper part. Now, select the hook for the fly. You
have already established the basic wing size/length/shape so, just
match that to the correct hook size and shape. Strip the fuzz from
the base of the feather to a place just short of the actual wing
size. If the feathers are of a type that can be tied in and stay
tightly together with their curves canceling each other out, lay a
temporary thread base at the wing tie in area. Now, you can strip
a little more fuzz away until you are at or just about at the final
wing size and tie the wing on temporarily. You can "fine tune" the
length of the feathers before you set the wing in place for the
final time.
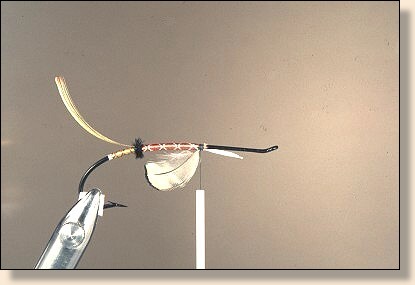
A word on feather fuzz; some feathers have barb shapes that when
the fuzz has been stripped up to the "good area" the shape of the
wing will have a shallow curve at the base of the wing which will
accommodate the topping easily. Other feathers have steep curves
that make adding a topping difficult at best and, impossible at
worst. It is much easier to plan and select the topping at this
point rather than ending at the front of the fly with no easy
topping solution. If you had planned to put a topping on, selected
and tied in the tail which anticipated meeting the topping, and,
it turned out impossible to select a topping that would accommodate
the wing, the tail may look odd back there all alone! In such a case,
that tail may be too long and a shorter one or another material would
look more appropriate. Some wing shapes simply will not accommodate
a standard topping so alternatives must be found. Sometimes, a short
partial topping can be used to good effect or, none at all. Leaving
some or all of the fuzz on can actually enhance some wings. I have
said it before, "think outside the box" to find solutions to problem
materials. Make their structures and looks work for you rather than
against you. You are going to get tired of hearing this but, for this
type of tying, it can make the difference of a fly that works and one
that falls flat.
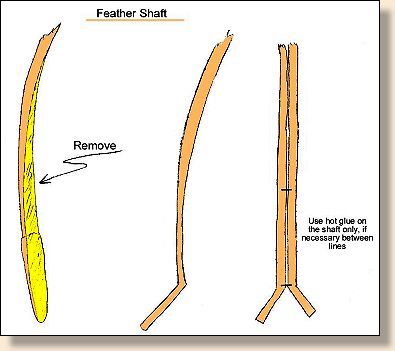
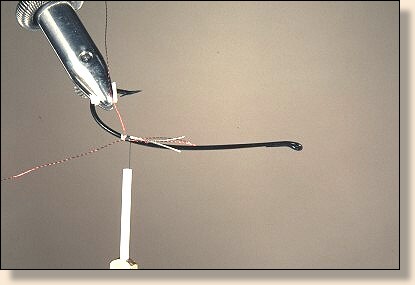
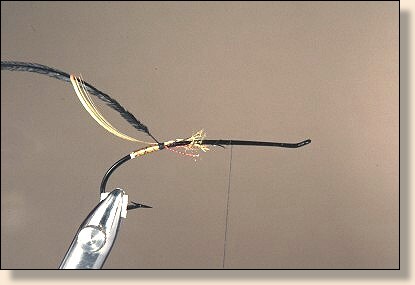
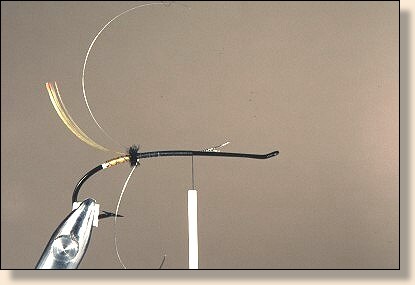
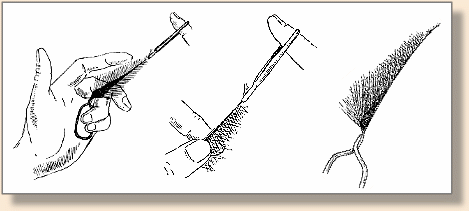
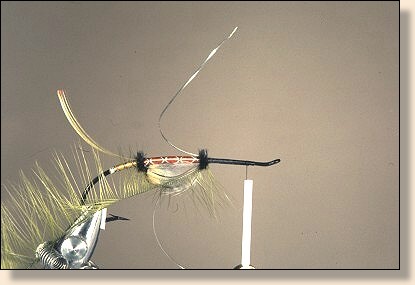
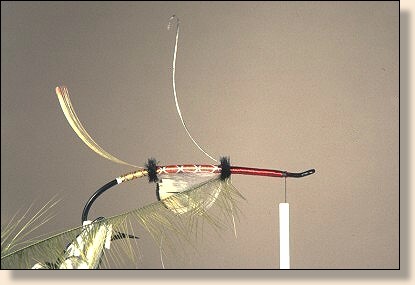
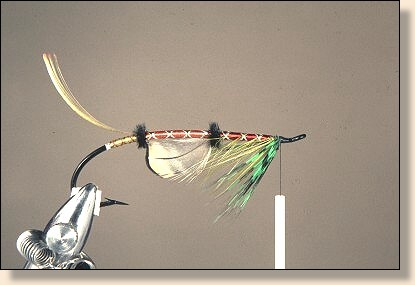
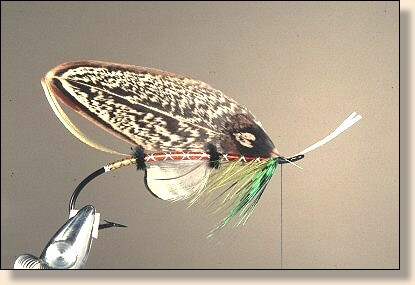
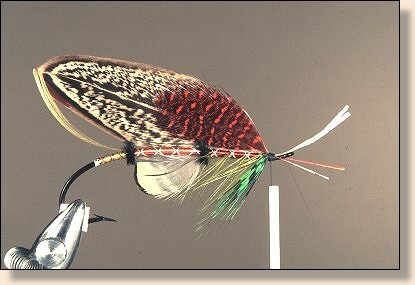
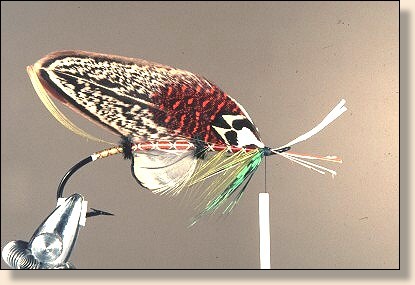
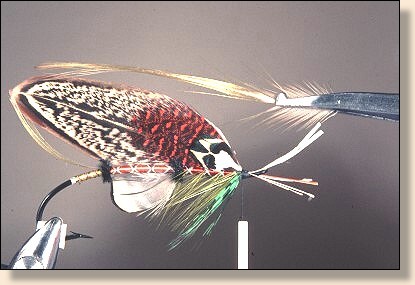
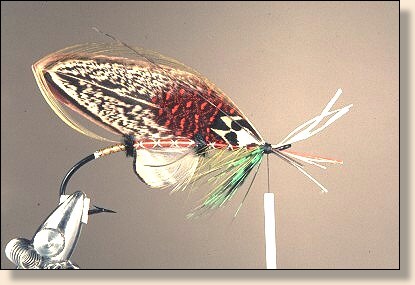
On this fly, I will not be leaving any of the fuzz on the wing.
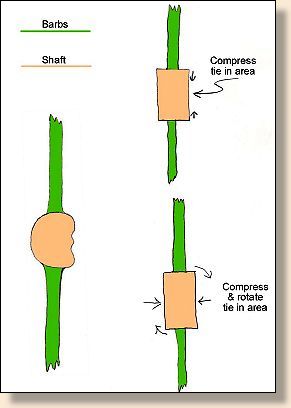
With that decision made, we have the question of how to remove
the fuzz. We have two alternatives. One is to strip the barbs
with the fuzz away but this "eats" up much of the wing length.
We also do not want the shank of this hook to be hidden anymore
than absolutely necessary so, we would have to strip away a
lot of the barbs to the point of where they no longer cover
the shank. Well, as you can see in the illustrations, this
leaves a sizable void underneath the wing. That void will need
to be covered somehow and that can be very difficult to do. It
will also leave an area that will not provide a base to lay our
sides, cheeks or, shoulders onto. So, these parts will want to
go in every direction in those areas. One solution is to VERY
carefully and, with very sharp scissors, cut the base of the
feather in the shape you desire. This procedure can be very
tricky to do without wrecking feathers. The blades of the
scissors can and will push the barbs ahead of the cut so the
resultant edge is sometimes uneven. Since these areas will be
in plain view, uneven edges will ruin the look of the fly. So I
recommend practicing cutting similar feathers until you have a
good degree of control. It is best to take care of this step now,
at the beginning of tying the fly. If you wait to trim the wing
until you are ready to tie it in and mess it up then, you will
be one unhappy camper especially, if these were your only two
wing feathers like them. Easier to find another wing now in
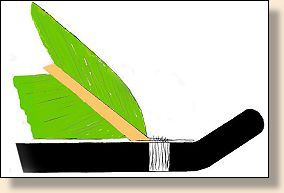
the event you make a mistake.
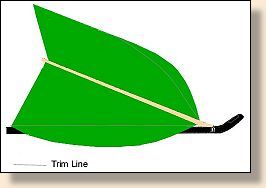
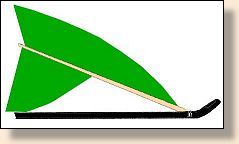
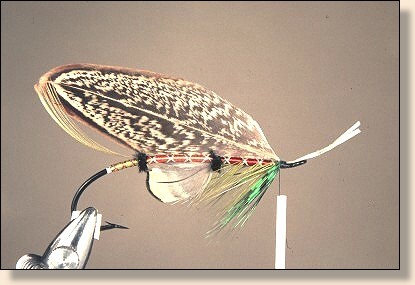
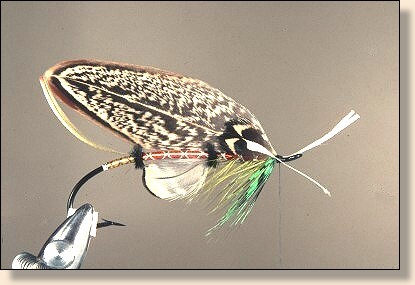
Wing feather shape prior to trimming and, showing the ideal
shape indicated by the trim lines.

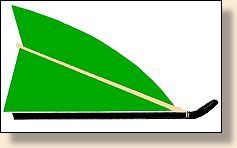
Wing feather showing the potential areas to be removed or, modified.
|