Building A Cane Rod, Part VI.
 In our last column
we progressed to the point of having a cane rod blank sanded and
straightened. At this point the ferrules can be mounted. Ferrules
come in a variety of different styles, but they all perform the important
function of joining and holding the rod sections together. All ferrules are
simply pieces of nickel silver tubing with a male ferrule (mounted on a tip
section) that slides into a female ferrule. (Mounted on the butt section).
In our last column
we progressed to the point of having a cane rod blank sanded and
straightened. At this point the ferrules can be mounted. Ferrules
come in a variety of different styles, but they all perform the important
function of joining and holding the rod sections together. All ferrules are
simply pieces of nickel silver tubing with a male ferrule (mounted on a tip
section) that slides into a female ferrule. (Mounted on the butt section).
Quality ferrules are constructed of machined nickel silver as the zinc in
this alloy prevents the metal parts from 'sticking' together. It is
imperative that ferrules are prepared properly to slide together well and to
be mounted permanently on the bamboo rod shaft. The most common problem with
vintage cane rods that we have encountered is a loose ferrule-to-cane bond.
This malady presents itself a slight 'ticking' sensation as the rod is cast
or the ferrule coming completely off the rod as it is disassembled. If such
is the case, have the rod evaluated by a competent restorer.
Regardless of the type of ferrule used, ferrules are designated by the inside
diameter of the tubing. The designation is in 1/64ths of an inch. For example
a size 13 ferrule has an inside diameter of 13/64 thousandths or .203.
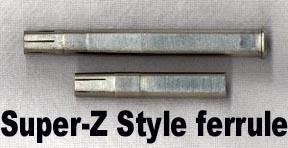
Most rodbuilders use a type of ferrule designed by Louis Feirabend and given
the trade name Super-Z. This type of ferrule is designed so that the inside
diameters of both the male and female ferrules are equal, as opposed to the
Step-Down or Leonard style wherein the inside diameters of the male and female
ferrules are different. Since the name Super-Z is a brand name, people making
ferrules today may refer to the same style and construction method with
another name, such as Super-Swiss. Notice from the photos the difference in
the method of construction.
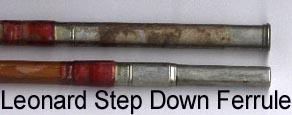
Step-down ferrules are designated by the inside diameter of the female
ferrule and with this design the male ferrule must be of a smaller inside
diameter in order to fit into the female. The difference between these
measurements is referred to as a 'step' or 'drop'.
The theory behind the Super-Z is that since the inside diameters of a given
ferrule size are the same, less cane has to be removed from the rod sections
to mount the ferrules and therefore the rod section is stronger at this point.
It is also easier to mount a Super-Z ferrule as the tip and butt sections
need only be turned to one diameter. It is for these reasons that most
builders prefer the Super-Z style.
In addition, ferrules may also be supplied as a truncated style. These
ferrules are manufactured in the same fashion, but are just a bit shorter in
length. These ferrules are used on three piece rods or on two piece rods in
applications where the builder thinks that a smaller ferrule will be
aesthetically pleasing.
Ferrules are traditionally supplied as a set with one female and two male
ferrules. The male ferrules are supplied oversized, which means that the
slide portion must be lapped (reduced in diameter) before they will fit
inside the female. They are supplied this way so that the builder has control
over how tight they wish the fit to be. Some rod customers wish to have their
ferrules lapped a bit tight, while others prefer an easier fit.
After the ferrules are lapped, the inner surfaces must be cleaned to remove
oxidation and residual flux from the solder used during their manufacture.
Finally, the serration tabs must be dressed to make them taper to a fine
thickness near the ends. Tapering the serration tabs allows the rod to flex
freely at this point and also to provide a smooth transition from the ferrule
edge to the rod shaft.
The choice of adhesive used to mount the ferrules is up to the builder. The
various types that builders use are: hot melt (thermoplastic) cement,
Pliobond (rubber) cement, epoxy, or urethane cement. If an adhesive other
then epoxy is used, it may be wise to pin the ferrule. I would recommend a
two-part epoxy that is formulated for industrial use and will stand extremes
in temperature.
Mounting the ferrules is accomplished by turning the cane to the required
diameter and applying epoxy to the inside of the ferrule and the seating area
of the cane. Care should be exercised when turning the rod section to insure
that the cane is turned concentrically. In addition, it is not a good
practice to make the fit of the ferrule to the cane so tight that the ferrule
must be driven onto the cane under extreme pressure. Epoxy bond needs a film
thickness of .001 or more to function properly. The application of the
ferrule to the cane may be facilitated by gently heating the ferrule and cane
after the glue is applied. A firm and steady push will seat the ferrule, and
the serration tabs can be bound down by wrapping with a strong thread or cord.
Customers can do their part to assure trouble-free ferrules by making sure
that they are kept clean after use and also prior to joining the rod
together. A small bit of dirt or a grain of sand will play havoc with a
ferrule! If a ferrule should become stuck and difficult to disassemble it is
good to enlist the help of a friend. Here's the procedure: Stand face to
face. Each person takes a hold of the rod section with one hand grasping the
butt section near the ferrule and the other hand grasping the rod section
near the tip ferrule. The rod is slowly pulled apart. Do not 'yank', twist
the rod section or use a guide for 'leverage'. A couple pieces of rubber
inner tube material can also help to get a good grip on the slick varnish of
the rod and can be stashed in one's vest for such an emergency.
~ J.D. Wagner ~
1999, J.D. Wagner, Inc.
|