Summer time, the dog days we all either love or hate. Not many people sit on the fence about the
subject of hot or cold weather, most of us definitely prefer one or the other. If you are one of the
legions who wilt in the sweltering heat of August, the last thing you want to think about is putting
on a heavy vest, or even a chest or fanny pack. It is just too stinking hot to add another layer of
anything on top of your birthday suit that doesn't by law have to be there!
If you float tube, a vest is just about out of the question to begin with, as are chest or fanny packs.
You do have those neat pockets on the side of your tube to put things in, but then you have to feel
them out, or go looking like a woman rummaging through her overstuffed pocket book for a pair of
nippers.
Now a lanyard is just about the neatest solution there is to this problem. They weigh hardly anything.
They do not stop what precious little breeze there may be from cooling you. And they keep all of the
essentials right at your fingertips, as does no other system.
Looking through the catalogues, which tower like a mountain in the corner of the room, lanyards can
be found and had quite easily. For a price, which might range from ridiculous to a mere fortune. Well,
OK, perhaps that is a bit over stated, but they do run a few bucks, and you are limited in the design
choices.

With about $5.00 or less in materials we can make a lanyard, to our own specifications. The choice in
color and materials, how many clips and how they are arranged are up to us.
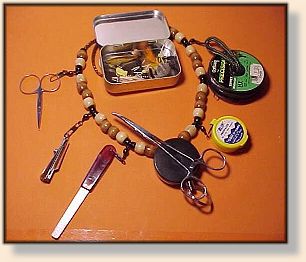
The materials we will need to make a lanyard as pictured are:
- 15 feet of plastic craft lacing (color of your choice, plastic is waterproof, leather is not).
- 24 ˝" Wooden beads with a 3/16" hole in the center (light and dark pictured).
- 14 5/16" Plastic beads with a 3/16" hole in the center (Black pictured).
- 6 Black Barrel Snap Swivels, Large.
- 9' of surgical tubing or an eyeglass retainer with rubber tube ends.
Feel free to substitute materials as you like, but the plastic lacing is the most practical as it will not
absorb any water when it gets wet.
To begin, we must weave the main lanyard body. We will need a hook to hold the material while we
weave it. This hook is no more than a large fishhook with the barb and point removed with a pair of
diagonal cutters. (Be careful to watch where the point goes when you cut it, you don't want your
wife to find it with her big toe.)

Now place your modified hook into your vice upside down and backwards as shown here.

Cut two 7ft long pieces of craft lace, even the ends and fold them in half so that you have four
equal length strands when holding the two by the middle.
Place the strands onto the hook with one pair held to the right with the right hand, and the other
to the left with the left hand.

Now take one of the two strands on the right and bring it between the two strands on the left and
then back into the left hand. (All of these braids should go behind and then between).

Next bring one of the strands from the left between the two strands on the right and back to the left.
At this point you should have one strand decidedly higher than the others and to the right as shown.

Continue braiding bringing the higher lace behind and between as above. The higher lace will alternate
from right to left as you work, thus almost keeping track of itself. If you learned this in camp as a kid
you are way ahead at this point. Braid until you have used up all of the lace. Tie off the ends to
keep it from unraveling.
Next we want to whip the ends to make them stiffer and also to resist unraveling. We are using 17lb test
mono here, but any heavy mono should work, so use what you have on hand.
Begin by making a loop in the mono with the ends back toward your right. Hold the loop on top of the
braid with the end of the braid to your right also.

Now switch your hands and hold everything in your left hand. Take the long end of the mono and
wrap a series of contiguous turns toward the left for about ˝" or so.

Now, take the end of the mono and put it through the eye of the loop you formed earlier.

With a pair of pliers pull on the short mono end opposite the loop. The loop and end of the mono
will disappear under the wraps and are thus secure.

Cut off the tag ends and seal with fleximent or crazy glue to insure that the wraps never come
undone in the future.

Slip, twist cajole and by any means necessary insert one end of the braid into one end of the surgical
tubing. This should take a little bit of effort as friction is all that holds the braid inside of the tubing.
This is very important for safety reasons. If you should get hung up on some sturdy object, the braid
will pull free of the tubing with much less force than it would take to strangle yourself. Helpful indeed,
particularly if you fish alone.
Now comes the fun part. String the beads and snap swivels in whatever order you like to achieve the
design that works best for you. If you don't like your first effort, after trying it on the water, no sweat.
Go home, take the end of the braid out of the tube with a firm tug and re-arrange your lanyard to suit.
You can do this as many times as you like, and tailor it to the specific type of fishing you are doing today.
The lanyard shown has a net retractor in the middle to which the forceps attach, you could also add
a zinger for the nippers. Use your imagination and carry what you need effortlessly.
A lanyard and an Altoids box full of flies are all you need to have a great time in the hottest weather!
And you minimalists would be hard pressed to do with less.
And in the dog days of summer, 'effortlessly' is the only way to go.
"Fish On!"
If you have any tips or techniques, send them along, most of this
material has been stolen from somebody, might as well steal your ideas
too! ~ George E. Emanuel
(Chat Room Host Muddler)
|
