Welcome to Intermediate Fly Tying

Part Fourty-two


Intermediate Fly Tying:

Foam Panfish Flies

Bluegill

By Al Campbell


One of the easiest ways to catch a bluegill is on a foam bug. And, since these are some of the easiest flies to tie, I don't understand why more folks don't use them. Do you suppose folks don't think any fly that simple could possibly work? Hmmm, you got me wondering on that one.

Another thing I don't understand is why people won't use foam flies for trout. I've used them with great success, but when I told others about it, they almost always refused to even try these simple flies. It must be some kind of unwritten rule I don't know about.

If you're looking for a sturdy strike indicator to use with your favorite nymph, consider a foam bug. Not only is it a great indicator, it often catches more fish than the nymph you suspend below it. For some reason, fish are suckers for beetles with rubber legs. You won't catch me arguing with a trout over the ethics of eating foam flies when everyone knows foam bugs are only for panfish.

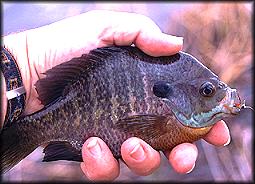
Some of the biggest bluegills I've had the privilege to catch fell for foam bugs of several varieties. A few of the nicest bass I've landed were fooled by foam bugs too. Add a few dozen perch and crappie, a few hundred more trout, and you might get the picture. Foam is a great material to tie flies with, and the fish seem to agree.

You can usually find a few colors of closed cell foam at the local fly shop. But, if you really want to zoom in on the best selection of closed cell foam, I've found the local craft stores to be great. For instance, the local Ben Franklin craft store carries over a dozen colors of closed cell sheet foam at less than two dollars a sheet. Comparing that to two or three colors of foam in sheets that are half the size of those found in craft stores and at least twice the price per sheet, you should be able to make a firm decision on where to do the most economical shopping.

I usually use a paper cutter to slice my foam into nice, even strips about a quarter inch wide. Scissors work fine, but since I already own a paper cutter, and since I like even cuts of a fairly consistent width, I use my paper cutter to do the job. Those roller-type pizza cutters rolled along a straight edge also work well and provide a consistent width.

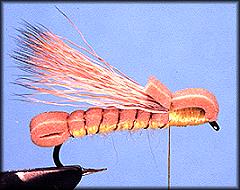
If you want to add some color and a hard back to your foam beetles, consider adding an epoxy or Anglers Choice soft body back to your beetle patterns. Create the humped back by dabbing epoxy or similar textured materials onto the back with a brush or toothpick. Once the hump has dried, you can color it with waterproof markers and if you wish, add additional clear hump material over the colors.

Since whole books have been dedicated to foam bug patterns, it's obvious I'll only scratch the surface of the possibilities with the three patterns I'll be showing you. I'm more interested in showing you the techniques and letting you apply them to patterns that use them; than I am in showing you dozens of patterns you can find in other books that use these simple tying techniques.

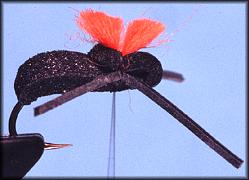
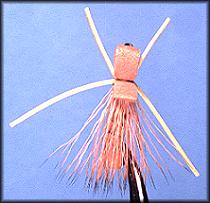
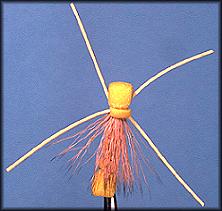
Let's start with a high visibility foam beetle.

List of materials: Foam Beetle

  • Hook: Mustad 94840 or any other standard dry fly hook. Sizes 12 to 18.

  • Thread: 3/0 or 6/0 thread, color to match body or create desired effect.

  • Body: Closed cell foam, color to match the natural you want to match.

  • Indicator: (optional) Poly yarn or egg yarn.

  • Legs: Rubber leg material, color to match body.

  • Antennae: optional.

  • Tying steps:

  • 1.Select a strip of closed cell foam about a quarter inch wide and tie down to the hook covering about 3/4 of the hook shank. Move the thread back to the starting point.

  • 2. Pull the foam forward over the shank of the hook to create a humped back. Secure to the hook at the same point you started tying the foam down.

  • 3. Tie the foam down to the hook all the way to the hook eye. Return the thread to the starting point.

  • 4. Pull the foam back over the hook and secure to the starting point. Trim the foam to leave a slight tag end extending over part of the humped back.

  • 5. If desired for visibility, tie in a small bunch of foam on top of the fly at the same point the front or head of the fly is tied down.

  • 6. Trim the yarn short on top.

  • 7. Tie in a pair of rubber legs on each side of the hook as shown. If you need to, straighten the legs out before you cinch the thread tight.

  • 8. Clip the legs to be even on both sides of the fly and cement your whip knot.

  • List of materials: Al's Foam Hopper

  • Hook: Mustad 9671, 9672 or any other standard 1x or 2x long hook. Sizes 4 to 14.

  • Thread: 3/0 or 6/0 thread, yellow.

  • Body: Tan closed cell foam (you can use other colors if desired).

  • Wing: Elk hair tied the same as an elk hair caddis or stimulator wing.

  • Legs: Yellow rubber leg material.

  • Underbody: Yellow yarn or dubbing.

  • Rib: Copper wire.

  • Tying steps:

  • 1. Select a strip of closed cell foam about a quarter inch wide and tie down to the hook covering about 3/4 of the hook shank as shown. Move the thread back to the starting point.

  • 2. Secure the ribbing wire to the hook.

  • 3. Create an under-body of yarn or dubbing. Return the thread to the starting point.

  • 4. Pull the foam forward over the hook and secure to the starting point. Notice how the foam extends over the hook bend.

  • 5. Rib the body down to the hook with even wraps of wire.

  • 6. Create an elk hair wing about the same length as the wing on a stimulator fly. Wrap the foam all the way to the hook eye and return the thread to the base of the wing.

  • 7. Fold the foam back over the hook and secure at the base of the wing as shown. Trim the foam to form a tag end that extends slightly over the base of the wing.

  • 8. Tie in a pair of rubber legs on each side of the hook as shown. If you need to, straighten the legs out before you cinch the thread tight.

  • 9. Clip the legs to be even on both sides of the fly and cement your whip finish knot.

  • 10. This picture shows the same fly tied using yellow foam.

  • List of materials: Al's Foam Damselfly

  • Hook: Mustad 94840 or any other standard dry fly hook. Sizes 6 to 14.

  • Thread: 3/0 or 6/0 thread, color to match body.

  • Body & Tail: Blue, green, or tan closed cell foam (you can use other colors if desired). Segment marking is created with waterproof markers.

  • Wing - White or gray antron.

  • Tying steps:

  • 1. Create a wing of antron (as shown) by securing it to the hook with figure 8 wraps of thread.

  • 2. Tie on a thin foam body and tail of foam by securing it to the hook just behind the wing and again just behind the hook eye. Whip finish and cement your knot. Clip the tail to the desired length and create segmented markings on the body and wings with a black waterproof marker.

  • 3. From the top your fly should look something like this.

    Three simple fly patterns that float like a cork and catch fish like magic. What more could a fly-fisher ask for? I hope you learned the simple techniques used in these flies. Go ahead, experiment a little.

    Until next week my friends, practice and have fun. See ya next week - Remember, I'm always happy to answer your questions, feel free to email me. ~ Al Campbell

    For more on fly fishing for panfish, check Panfish!

    Fly Tying Archives


  • [ HOME ]

    [ Search ] [ Contact FAOL ] [ Media Kit ]

    FlyAnglersOnline.com © Notice