


I'm quite new here though i've been registered for a long time, i haven't had the opportunity to stop by often. well here is a mullet imitation i came up with... if you guys would like detailed tying instructions, i'm happy to put them up..
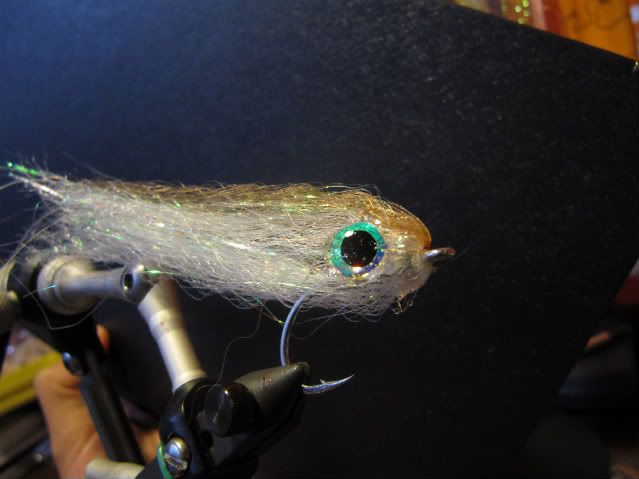

I'm quite new here though i've been registered for a long time, i haven't had the opportunity to stop by often. well here is a mullet imitation i came up with... if you guys would like detailed tying instructions, i'm happy to put them up..
Nice fly; please do post some instructions. Did you use Slinky/Kinky Fiber?
Regards,
Scott
Hmmmmmm ... I'll have to mull et over.Originally Posted by freshwaterpirate

The fish are always right.
Ba dump bump!Nice John!
Sure, FW Pirate! That's a good-looking pattern. Likes like maybe similar instructions as the Diamond Hair Streamer?
http://www.flyanglersonline.com/flyt...041607fotw.php
...except using a different synthetic for the body, and tying more "sparse" (less full? are these an oxymoron?)?
Anyway..I like it! What size/style hook did you use?
David Merical
St. Louis, MO
John & Scott: thank you very much...
David: its a gamakatsu SL12S... really one of the best hooks there is...
here we go... instructions... which are similar to the diamond hair streamer,
here are the items you'll need (in 2 parts)
tying materials:
Steve farrar flash blend, flash, short shank hook and lead wire. you can substitute the SF blend for kinky fiber, flash and slinky, i think you get the picturethere's a myriad of fly tying materials for the job!
to finish the fly
no epoxy as i think the soft head is more realistic for the fish to chomp on
okay! tying steps proper are as follows :
step 1: start the thread near the hook bend, and tie in a length of material (shuffle the strands to achieve a taper), this length you tie in will determine the length of the whole fly. having tied in the tail, tie in some flash, one length the same as the fly tail (bunch A), another length long enough to cover the lead wire wraps (bunch B) that you'll tie in the next step or 2 .
step 2: tie in some lead wire and wrap it forward, leaving a small gap on the shank in the front of the fly. the gap should be just big enough to tie in about 3-4 bunches of material. the great thing about this fly is you can wrap in easily 2 layers of lead wire if you need the fly to sink quickly or you can even leave the fly unweighted. if you wanted a surface fly, maybe even some foam would be a good option!
step 3: wrap a length flash that was tied to the hook in step 1 (bunch B) over the lead wire.
*sorry i forgot to take a picture here*
step 4: flip the fly upside down (if you've got a rotary vise), grab some white H2O products SF blend, fold it in half, and cut it, then tie it in, spreading the material around in a semi circle shape, this bunch will form the belly. turn the fly the right way up, and tie in a dark coloured bunch of SF blend material, again cut in half (here i used brown). This bunch will form the back of the fly. then, i tie in another bunch of material the same colour as the belly. the fly should now look like this: of course if you wanted to graduate the colours and top the fly with black and have the "shoulders" as brown, tie in the topping material first, then the "shoulder" material.
step 5: push all the fibers into place, ie, they should now no longer point forward over the hook bend, then pull them tight. this is to help form the shape of the head and the profile of the fly. the fly should now kinda look like this.
step 6: while holding the material back, wrap the thread a few times around the hook, in front of the material and whip finish. now the tying is all done, let the gluing begin!

step 7: again, pull the tail of the fly nice and tight so the fibers are almost all touching the hook, peal off some stick-on eyes, and stick them on =) in this image, i stuck the eyes too far back, so i moved them further forward. try to tension all the fibers of the fly... just don't yank them out
step 8a: while still pulling on the tail of the fly, apply some Loon UV knot sense/UV fly finish or softex on the front of the fly, without touching the eyes, (forming the nose of the fly), release and adjust the shape of the fly (if needed) then zap the resin with the UV light! step 8b: once done, apply some more resin sparingly over the eyes to ensure they stick to the fly body and again, zap with the UV light. (no image)
step 9: look at your finished product, put it into ur fly box and off you go fishing!
thanks for reading! =))
Great looking pattern and it looks fairly straight forward to tie. I'll be tying some up in different colors as it looks like it would also work great in freshwater as well on LM and Stripers. Thanks for sharing and especially for adding the directions and photos.
Jim Smith
Conyers, GA
 Posting Permissions
 Reply With Quote


