Tying Deep Minnow Clones Fly and photos by Richard A. Lewis, CA
Background:
The Clouser Deep Minnow, which is the universally popular
mid-eighties fly design of Bob Clouser, is one of the most
versatile fly patterns ever created. This pattern has caught
at least 86 freshwater and saltwater species and the list
is still growing! This great fly pattern, in all its variations,
could easily be considered the “perfect” minnow imitation.
The reason that it works so well, according to Bob Clouser
himself, is that the fly is always in motion. Even while
this fly is at rest, the winging and flash materials slither
to and fro suggestively. The placement of the weighted
dumbbell eyes on the underside of the hook impart a dipping
and darting motion and also forces a hook-up swimming
configuration which and makes this fly virtually snag-free.
The “Clouser Deep Minnow” is a relatively easy fly to tie.
In fact, besides the Woolly Bugger, it may be the one of
the first flies that many beginning tyers, myself included,
learn to tie. However there is more to making a perfectly
balanced and well proportioned “Clouser” than meets the eye.
In fact, Bob Clouser has authored a two-volume video set
dedicated to tying his pattern: “Complete Clouser Minnow”
Volumes 1 and 2" Ref: Ref: ISBN: 0-0RR-00090-0 and Ref:
ISBN: 0-0RR-00110-0; Publisher: Reel Resources. Bob Clouser
recently releasd a new book titled Clouser’s Flies-Tying
& Fishing the Fly Patterns of Bob Clouser. Mr. Clouser
also has a thriving fly shop, guide service and a website:
https://www.clouserflyfishing.com/.
Owing to the extreme popularity of Bob Clouser’s fly pattern,
Rio Products has designed a series of specialty fly lines
designed to throw weighted Clouser flies easier. Rio sells
both Freshwater Clouser lines and Tropical Clouser Lines.
These new Clouser lines make fishing weighted flies much
easier and therefore a lot more fun and rewarding.
Tying Clouser Deep Minnows
If you want to tie better, or even perfect “Clousers” then
besides visiting Bob Clouser’s books and videos, you will be
well served to re-visit some excellent “Clouser Deep Minnow”
tying instructions found here in the FAOL archives. “Deep Minnow”
By Art Scheck are some of the best instructions that I have
ever found on this pattern. Art Scheck even ties them fancy
and I appreciate the extra touches on the pattern he so well
illustrates for us in that FOTW article. Please review those
instructions here:
</t/8044>
Two (2) Key Elements: I personally feel that there
are two (2) important elements that need to be maintained
in order to get the best performance out of the Clouser
Deep Minnow. These key elements both involve maintaining
proportions-something common in tying a great fly pattern
of any type faithfully.
1) The Eyes: Placing the eyes in the correct position
along the hook imparts the famous Clouser Deep Minnow’s
“dipping/darting” action. Therefore, incorrect placement
of the eyes dramatically affects the way that this fly
swims. If the eye is too far forward (a common oversight),
the fly nose-dives and becomes merely a “doll jig”. If
placed too far back, the fly drops flat without the dipping
motion known to trigger strikes. As important as eye placement
is on this fly, I have even noticed Clouser Deep Minnow flies
tied by seasoned professional tyers can be inconsistently tied.
Do you make six (6) wraps from the hook eye and then attach
the dumbbell eyes? Or do you “eyeball it” and hold the eyes
about where you want them to be, depending on the particular
hook you are using, and then get those eyes tied in? Is hit
or miss eye placement good enough? Bottom line: It is not
that easy to tie a dozen Clousers and have them all look
and swim exactly alike.
2) The Tail: Extending the flash materials beyond
the winging materials will enhance this fly’s undulating
action. Of course it also adds additional reflected
prismatic light to this already attractive and deadly fly.
The extended flash tail is a straightforward addition to
the Clouser Deep Minnow. Dan Blanton is responsible for
the innovation of the “Flash Tail Clouser” modification
as well as other “FT” enhanced flies. The “Flash Tail”
upgrade, if you will, improves the action and fish
catching prowess of the Clouser so much that Bob Clouser
himself now advocates the incorporation of the “FT” into
his Clouser Deep Minnow pattern and credits Dan for this
improvement to the pattern.
Cloning the Clouser Deep Clouser
I ran some experiments a few years ago and feel that I have
solved the eye placement issue on Clouser Deep Minnows once
and for all. This method makes perfect eye placement extremely
easy on these types of flies. In doing this experiment I also
stumbled on a few more refinements to the Clouser that I would
like to share with you.
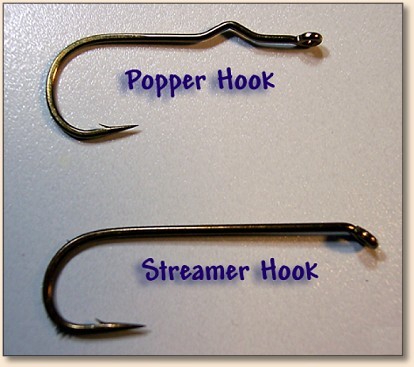
I am now tie Clouser Deep Minnows on Mustad Signature Series
CK52S and CK74SS popper hooks. Yes Popper Hooks! These forged,
chemically sharpened, tempered hooks have kinked shanks, and
have been developed to provide proportionally accurate bends,
gaps, and shank lengths across the hook style for more accurate
scaling of fly patterns.
Since these Signature Model Popper Hooks are available in sizes
ranging from #14 through 3/0 in both fresh and saltwater finishes,
just about any Clouser Deep Minnow pattern can be tied on these
fantastic hooks. There is an added benefit of this particular
hook style having a wide gap.
The obvious question is: Why would you tie a Clouser on a
popper hook? Admittedly this sounds odd! Well for one thing,
since the Mustad Signature hooks are proportionally accurate
across the entire range of sizes, it allows you to place the
dumbbell eyes in the exact same location along the hook shank
each and every time. In doing so, your Clouser Deep Minnows
will be clones that swim exactly the same-no matter which
size hook you use. Tying the pattern on a popper hook totally
eliminates the problem of irregular/improper eye placement
when tying Clouser Deep Minnows.
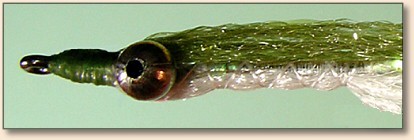
Secondly, placing the dumb bells into the kinked shank of
the popper hook places the weight of the eyes “barely below
the centerline” (BBCL) of the hook shank. As long as weighted
dumb bell eyes have been placed below the centerline of the
hook, the fly will flip to the weighted side. This yields
the classic hook up, snag resistant swimming position of a
Clouser Deep Minnow.
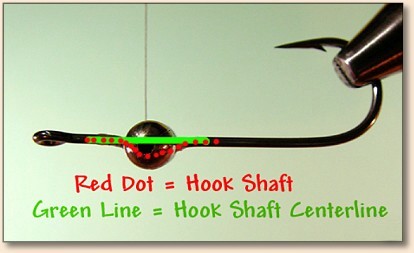
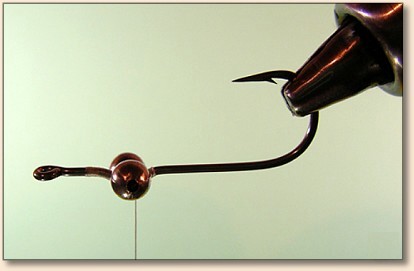
Note: Above image shows the weighted eye is located 2/3’s below the
hook shaft’s centerline. The kinked portion of the hook shaft also
hangs below the centerline. This weight distribution is ideal for
a properly swimming fly.
Balance and Dynamics: One notable difference when
using the popper hook is that the eyes are placed into
the kink on the shank from the “bend” side of the hook.
This is opposite and unlike the traditionally placement
of the eyes on top of the hook shank “away” from the bend.
However, placement of the eyes into the kink of the popper
hook locates the weighted eyes below the center axis of
the hook shank. Placing the eyes barely below centerline
balances the fly such that is maintains the snag resistant
“hook Up” swimming action. Furthermore, the “BBCL” placement
of the weighted eyes streamlines the fly! This important
refinement makes the fly more aerodynamic and hydrodynamic.
Streamlined Clousers tied on popper hooks can be cast further
and can also be cast with less effort! The reduction of
parasitic drag yields performance gains both in and out
of the water. Clouser Clones swim elegantly and are easier
to cast into the wind. Those of you trying to shoot a full
line with a big fly will benefit greatly from tying “Clones.”
Bonded Eyes: Additionally, I utilize adhesive
wicking to bond the eye wraps to the hook using a high
quality cyanoacrylate adhesive. This robust bonding
technique eliminates another common problem with poorly
constructed Clouser Deep Minnows; the eyes loosening as
the fly is fished hard. Using this bonding technique,
along with the braced eyes in the kinked shaft completely
solves this issue once and for all. This fly is solid!
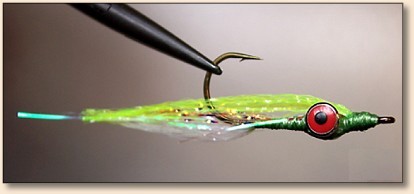
Materials for Deep Minnow Clones:
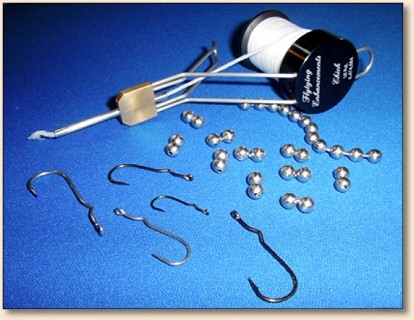
Hook: Mustad Signature Series CK52S and CK74SS popper
hooks-Size to match game fish species.
Thread: UNI-Stretch, UNI-Floss, or any un-waxed
thread in color of choice.
Eyes: Stainless, Brass or Plastic “Bead Chain” -
sized to match hook size.
Flash Tail: Flat prismatic strands such as
Mirror Flash, or Flashabou.
Optional Wing Flash: Krystal Flash.
Wing: Natural (Bucktail, Squirrel Tail, Arctic Fox
etc.) or synthetics as desired. Choose a light and a dark
wing material for a traditional pattern.
Adhesive & Head Cement: Zap-A-Gap CA Super Thin.
Optional Head Coating: Z-Poxy 5-Minute Epoxy, Loon
Hard Head-Clear, or UV Knot Sense.
Special Tools/Safety Equipment:
Vise: Rotary Tying vise, such as the Dyna-King
“Barracuda Indexer.” Rotary vises make working with
polymer coatings a breeze.
Bobbin: Automatic bobbin. Using a bobbin such as
the Ekich Automatic Bobbin will provide superior control
of yarns and threads.
Adhesive Applicator: Modified Interdental Tool or
plastic toothpick.
Tying Instructions Deep Minnow Clones:
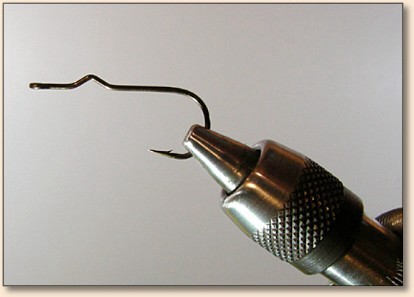
- Mount the Popper hook securely in the vise.
- UNI-Floss can be used effectively. Uni-Stretch Yarn
can also be utilized for its superb constriction locking
and wicking capacity. Any non-waxed thread is a good choice.
Start the thread of choice behind the eye, leaving enough
space in front of the yarn for two wraps. Advance the yarn
with taught wraps to a point just behind the kink in the
hook shank. Moisten that last wrap with a small spot of
Zap-A-Gap Super Thin adhesive and allow it to set under
tension.
-
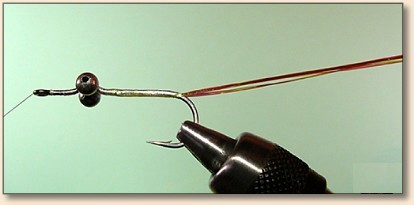
Key Element #1 - Place the Bead Chain Eyes “dumb bell”
into the kink in the hook. Secure eyes using a figure eight
winding pattern and finish with a Boy Scout hitch. Make a
medium sized build-up of yarn between the eyes and continue
the thread base onto hook aft of eyes. Secure with a hitch.
Spot bond it with a drop of adhesive and trim yarn. At this
point I usually take a file to the rough burred edges of the
crimped holes on the bead chain. These burrs can nick a tippet
and cause you to drop a hooked fish. Smooth the edges of the
holes for best performance. -
Important Adjustment: Take the fly out of the
vise temporarily. Inspect and adjust the eyes so that
they are lined-up perfectly straight on the hook. Apply
a Zap-A-Gap to the X-crossed yarn on the top of the fly.
Add another small droplet on the bottom side wraps to lock
down the bead chain eyes permanently. Make sure that the
yarn wraps along the hook shank are saturated with adhesive.
It takes very little glue and it wets-out fast. Re-mount
the fly in the vise and allow the adhesive to dry for a
few moments.
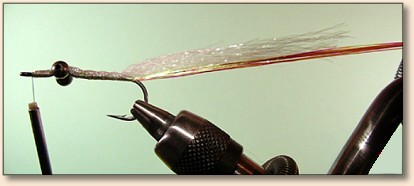
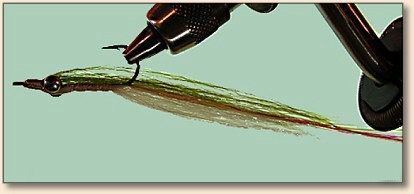
- Key Element #2 - Working from the bend side
of the hook, tie-in at least a dozen strands of flat prismatic
flash material, such as Flashabou or Mirror Flash. Extend the
flash strands well beyond wing-length to create the key
“Flash Tail” element. A Flash Tail — Inch longer
than the wing after final trim is appropriate. It helps
to hold the flash tail in a vise-mounted spring clip. You
can alternately use tape or a cloths pin to hold the flash
tail straight. Once the flash tail is tied-in securely and
stretched taught, wet the first half inch (1/2") of the flash
tail right behind the hook bend with a head cement and allow
the cement to dry. This cement treatment stiffens that portion
of the flash tail and prevents it from fouling the hook when
this fly is fished.
-
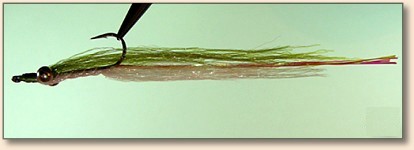
Tie-in Lower Wing material.
-
Optional Step (not shown): Tie-in a few Krystal
Flash strands in front of the eyes and place these even with wing.
- Tie-In Upper wing material. Use one or two upper winging
material colors as desired. Keep the wing sparse. Finish thread
head.
-
Trim Flash Tail approximately " longer than the wing.
-
Optional: Apply protective coating (Epoxy, Super
Glue, Goop, UV Cure adhesive or multiple coats of Head Cement)
to head and area between eyes to enhance durability. Allow fly
to dry, or cure.
- Utilize your usual “Clouser Deep Minnow” tying tips and
tricks above and beyond the listed instructions to create
your perfect clones - each and every time.
Fishing Tips
Imitate free-swimming baitfish with long, fast strips of
about 2 feet or more followed by a pause. Imitate bottom
dwellers with longer continuous strips. ~ Richard A. Lewis
Originally published March 6, 2006 on Fly Anglers Online by Richard A. Lewis.