You can buy them for 39.95 so making them is more of a pain in the butt
since Im still getting replies could you guys steer me in the general direction of a link for how to epoxy (for beginners) . I have tried several heads which turned out great but I soon discovers 5 minute epoxy doesnt work well on bodies. I guess im gonna have to purchase slower curing epoxy.
I have gotten a rotary thats doing 8 rpms …I can slow down the rpms a little with a larger foam drum.
Flyguy,
That seems like a decent price if it runs on AC and not batteries.
JRA,
I see you’re getting into SW with a new 9 wt. Some great all around saltwater patterns for stripers, blues etc. like deceivers, clousers, bendbacks, epoxy flies, and glass minnows are pretty simple. Dress them sparsely to improve action in the water and castability.
You can keep costs of initial materials down too.
Some good SW hooks Mustad 34007 size 1, 1/0 and 2/0 (or to save initial money just one box of 1/0 will do fine, or 2 boxes 1 and 2/0 to imitate a good size range of baitfish). These should cast well with your 9 wt. I’d advise crimping down the barbs on all of them, and wear a hat and sunglasses. when you take them for a swim.
Flat waxed nylon thread in Black, White and Chartreuse
Bucktail in White (natural), Chartreuse and Light Blue
a package of pearlescent crystal flash for highlights on all flies. The pearlescent will pick up and reflect other colors in the fly, so it’s a great color to start out with instead of buying a bunch of different colors when you’re starting out.
a package of peacock herl for topping deceivers, bend backs and glass minnows and some clousers too if you want.
a package of lead dumbell eyes (red painted pupils)
a package of strung white hackle feathers
a package of pearlescent mylar tubing, white chenille for bodies of deceivers, bendbacks and glass minnows. (Actually I don’t bother with a body on deceivers, I just tie a bunch with just the tails, epoxy the over the thread, let it dry overnight, and finish off the flies the next night. Most of the body is covered by bucktail on a Deciever anyway, and this way they’re very durable.)
a package of white or clearish synthetic fiber for epoxy flies
a package of stick on mylar prism eyes
With this stuff you can make:
Deceivers: in blue/white, all white, chartreuse/white to imitate alewives, menhaden, herring, mullet. I do a lot of fishing for stripers and throw a blue/white deciever at least 80% of the time)
Glass Minnow type flies: in chartruse, white, blue/white This is just basically a bucktail streamer without a tail. You can imitate same as above in smaller sizes on the same size hook (eg a deceiver on a 1/0 hook maybe 4-5", a bucktail streamer on a 1/0 is 2-3")
Clousers: all chartreuse, Chartruese over white, all white to imitate sandeels, spearing
Epoxy minnows: to imitate sandeels, spearing, bay anchovies. (These are especially good flies for spanish mackeral, albacore and bonito which can be very picky.)
Bendbacks: a few might be useful to prevent snagging on weeds. peacock herl over all white, blue/white, chartruese/white, with a body of mylar tube or chenille. Don’t go crazy on this pattern, deceivers and clousers fish better and have better hook holding power.
Some other stuff to add down the road:
a patch of natural deer body hair (not bucktail) for spinning heads on the front of a deciever style body to end up with a tabory slab sider. It’s a good imitation for mullet which probably will be running out of bays soon, and herring if you get them in late November on 2/0 hooks. It makes a great waking fly for top water action when fish are on big bait.
strung chartreuse hackle to make all chartreuse deceivers. This super high visibility fly is great for fish feeding on heavy schools of bunker (menhaden) and also in murky water.
Black bucktail and black strung hackle for all black deceivers if you plan on doing a lot of night fishing.
Package of ethafoam popper heads. Be sure the size will fit the hook without crowding the gap, and leaves some room for tying in a tail of bucktail. You can put the heads on both ways to make sliders and poppers. Not a fly that has worked as well as crease flies for me, but they’re an easy tie for top water action and they’re fun to fish.
Hope this helps to get you started without breaking the bank.
peregrines
Here’s a link:
http://flyfisherman.com/ftb/ejsurfcandy/
The 8 rpm sounds about right. The biggest tip I can give you is to make the first coat very light, just brushing on some on each side, so it’s tacky, not goopy (if that makes sense). Wait till it dries and then attach prism eyes, make gill slits with a red sharpie and apply a light second coat, let dry and you’re done.
Can you post pics? It might help get a better sense of the problem you’re having.
peregrines
I have been messing with some DNA holofusion and mylar tubing. I have been tying with some krystal flash and some flashabou as well. Here are 3 flies I did recently one of which was in a swap .The top one was one I did just to see what it would look like I …it has epoxy on the head and yes its upsidedown. the middle one is a popular one at the local shop . the buttom one is just a copy off one I saw somewhere. Opinions? please be brutal!!! 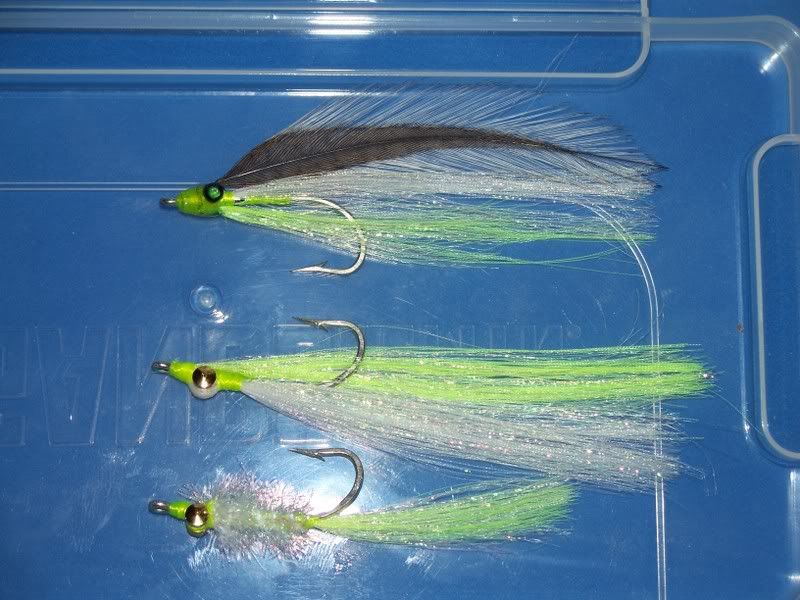
peregrines - Thanks for all the info and the link is just what I need.
As far as the problem -I think it could be a matter of the batch I mixed was so small that too much of one ingredient went in and it started to harden with a minute. Per your other post perhaps my other problems is not doing it in coats.
As for the new 9 wt St Croix …I purchase a cheap reel sometime back to use for a few months until I got the cash for a proper reel. I discovered the reel seat is too small for this reel and I cant file down the reel (plastic) ![]() . Im going to see if I can talk the wife into me getting a proper reel asap so I can take the boat out and fish.
. Im going to see if I can talk the wife into me getting a proper reel asap so I can take the boat out and fish.
Yeah, getting the right proportions on the epoxy is pretty critical. It doen’t have to be exact, but it should be close. I use jar lids and squeeze out a nickle size of A and the same size of B next to it, then mix, to make sure I have about the right proportion of each.
Your flies look great. On flies like you tied, i use Sally Hansens Hard as Nails or head cement rather than epoxy… I save the epoxy for surf candies and stuff like that where the epoxy is actually providing the shape of the fly. Again, as with epoxy, you’re better off putting on several coats and letting them dry in between rather than one heavy coat. If you put the coats on light enough with the Sally Hansen or head cement you get away without turning them, tho I usually do anyway.
Here are some comments on your flys:
Top:
It’s got a fishy shape and it’ll work as is, but you may also try it without dumbell eyes so it rides higher in the water column and hook point down as in the picture. It’ll be easier to cast and looks like a good menhaden imitation. You can use the same material and same tying techniques to make a deceiver. Just tie in at the tail position, 2 hackles on each side (not splayed) for the tail. It helps to dip the matched pairs of feathers in a glass of water before you tie on. The feathers should extend about 2 1/2 to 3 shank lengths beyond the bend. Add a couple of strands of crystal flash on each side if you want. If you do cut each of the strands on each side a different length, it’ll make it look more natural in the water than if they were all the same length. Bind down the stems with thread to the front of the hook, tie off and apply Sally Hansen over the thread wraps and let dry over night. It pays to tie up a bunch to this point and let them dry over night. Next day, finish them off by putting on the deer hair collar. I usually do this in 4 steps with each bunch of bucktail being as thick as a wooden kitchen match. One bunch, usually white goes on the bottom. Another bunch goes on each side, usually white for me. You should be able to just make out the hook shank through the bucktail (you want to keep it sparse. The last bunch of bucktail is usually a different color (blue, chartreuse etc.) You can top it with 4-6 strands of peacock herl if you have it, eyes etc, a couple of strands of crystal flash along the sides etc. and tie off and apply Sally Hansen or head cement. The bucktail along the bottom, sides and top should extend down about 2/3 of the length of the tail. When it’s pulled through the water it should have a great fish shape. (I don’t bother with hackle on the sides of my Deceivers as some do.) This will end up as a very castable fly on your 9 wt, but still presenting a large size baitfish like menhaden.
middle
I’d say that’s a perfect clouser. A great sandeel imitation the way you’ve tied it. A great fly to get down in deeper water, and a perfect imitation for the sandeel when you puff it along the bottom. The same fly in all white (for silversides), all chartreuse (for really murky water) and you’re covered.
bottom
This could be a good shrimp imitaion for weakfish (sea trout), and if you have a lot of grass shrimp, or casting behind working shrimp boats it might work very well for you. In smaller sizes, in this color and tans and browns it could also work on bonefish too. As an aside I tie up a similar pattern, without dumbell eyes, in red cactus chenille, red hackle tail, and a couple of wraps of peacock herl at the head to make an imitaiion for cinder worms, which “hatch” at nights in huge swarms out of soft muddy areas on new moons in June and July up here. Fish (stripers) go crazy when it happens, and generally ignore baitfish imitations. Ask around down there at SW fly shops and see if they get them down there.
Earlier I said that the foolproof epoxy comes in two bottles not the hardware store duel push tube type and the best is call “SIG” found in model air plane hobby stores. I can use very small or large amounts with a perfect mix. Perfect amounts each time. Duel push tubes very seldom will give correct amounts mix with poor drying. Ten RPM motor driven disk. BILL
What Bill said…
yes they run on ac i sell alot of them at that price
peregrines -I thought the clouser one was more for imitating minnows/baitfish ? Am I wrong?
I used plastic eyes one that top one so I assumed it wouldnt sink too fast…wadda ya think?In case you didnt notice the center of the eyes is Sparkle body flourescent Chart…
As for the menhaden imitation - I had thought the same thing .
Ill go searching the hardware stores for some better epoxy I can mix .
I use a stainless steel dental tool to mix and apply the epoxy do you think that is ok?
I’ll add a few things I’ve found about working with epoxy to the already excellent info in this thread.
- a pad of post-it notes is an excellent disposable mixing pallet for small batches of epoxy
- Sally’s Hard as Nails has a solvent in it that will make paint or prismacolor marker run a little. If I’ve painted the head, I prefer epoxy. Sally’s works great over just thread or stick-on eyes.
- 5 minute epoxy looks too cloudy/yellowed for my taste. I prefer the look of 30 minute, even if it means waiting longer between coats or tying steps.
- A bodkin is a great epoxy stirrer/applicator. Your dental tool will work great, too. Just wipe it clean with paper towel before it dries. If it does dry, steel wool cleans it right up.
And last, but most importantly
- Don’t let your wife catch you getting epoxy on the dining room table.

MM
PS JRA, the clouser minnow is one of the most versatile patterns out there. Since the fly sinks fast and generally hits the bottom hook up, your retrieve can make it look like just about anything.
I’ll presume to add to Muddler’s post …
I’ve done quite a bit of small dose epoxy when making golf clubs so haven’t been concerned with color…do all 5 minute epoxies tend to yellow…I currently am using Devcon and it looks pretty clear.
I too use the post-it’s though also plain note pads…used to cut up plastic milk cartons.
I use a small finish nail to mix…and apply…I haven’t worried about bubbles…is a toothpick better?
Sally’s Hard as Nails won’t make Acrylic craft paint run or smear…learned that from the good folks here…
Well I’m trying my first epoxy head right now on a BBQ motor I got at a thrift store years ago …says $3 on it and someone had already mounted it…we’ll see how it goes :lol:
As far as I know, all epoxy will yellow eventually, but the longer curing they are the slower they yellow
Do not use wood to mix epoxy! That’s the quickest way to “yellow” there is
I use the 2 ton (30min Devcon) epoxy you can find at most harware stores for <$3. It is the one with the two tubes connected together! I like it because I can cut the two tubes apart with heavy duty scissors. I then have the two components in two separate syringes. You can measure out small equal amounts easily like this. Also, it is readily available. The 30 min does not yellow as quickly as the 5 min. Also, if you store the flies out of the sunlight they will stay clear longer.
Regards,
Keith