Fred Vargas watched Dave Whitlock tie this type of fly
and liked the simplicity of the pattern. It also intrigued him
because he knew it would work on his home waters of the
Muskegon River [Michigan]. Fred liked the overall design
and the materials used on the fly, but he thought he needed
to eliminate a few of the bells and whistles. He guides fly
anglers on the Muskegon River and needs flies that are
simple to tie, yet effective, simply because of the nature
of the river. The Muskegon was a logging river, so there
are snags lurking at the bottom that devour flies when an
angler is trying to get them down to the fish. The depth and
current requires the use of a 300-grain sinking line to get the
fly down to the popular steelhead on the Muskegon River.
With this type of rig an angler can lose a lot of flies.
Fred explains, “Patterns used for guiding have to be effective,
yet easy and quick to tie. When I find something that I think
will work with a few minor changes I will tie them. In this case,
the Wet Burrito was an instant success.”
Whitlock’s original is called the Sheep Minnow. Tied as a bass
streamer, the pattern is varied to imitate bluegill, crappie, and
shad. Some were tied sparely to run deep in the water, while
others were laden with wool to make them swim with more
action. You can find this pattern in Fly Patterns of
Umpqua Feather Merchants.
“I added a flash tail and the dubbed body to this pattern while
leaving out the outer wing and eyes. When you look at Whitlock’s
original recipe in the book, I think you’ll understand about the bells
and whistles,” Fred says.
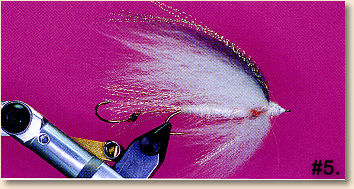
He enjoys the simplicity of the fly, but that does not take away
from its effectiveness. The flash and overall white color of the fly
work very well on steelhead rivers, especially when the water is
somewhat off color or murky. The red throat adds the
strike-triggering color and represents gills. And trout like it.
Materials for the Wet Burrito
Hook: 7X Streamer, size 4 Daiichi 2370
Stinger: Scud Hook, size 10 Tiemco 2457
Thread: White 6/0, Gudebrod
Tail: Krystal Flash, pearl
Body: Lite-Brite Dubbing, white (Spirit River Inc.)
Lite-Brite Dubbing red
Belly: White wool
Underwing: Krystal Flash, pearl
Wing: White wool, topped with gray wool
Overwing: Krystal Flash, peacock colored.
Method for the Wet Burrito
-
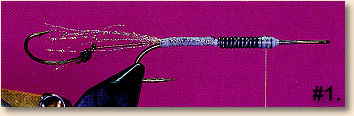
Prepare the stinger hook before tying this fly. Any stiff bite
tippet of 40-pound test will work to attach the stinger hook to
the main hook. We are using brown Maxima on this example.
Snell the stinger hook using a nail knot tool. This works really
well with a three-turn nail knot. Start the thread on the main hook
at the one third point and wrap to the back creating a smooth
thread base. Move the thread back to the one third point. With
the hook point up, secure the stinger hook on the fore side of the
hook and wrap to the back of the hook. Move thread forward
again. Pull the tag end of the bite tippet back, lay it on the far side
of the hook, and wrap back with very tight wraps. Trim excess
tippet and drop a spot of super glue on the thread wraps to lock
the stinger hook in place. Add several turns of .030 lead wire in
front of the stinger-hook tie-in point to about the ¾ point
of the hook shank and lock it in place with thread. -
Secure 13 strands of Krystal Flash at the back of the hook for
the tail. Half jokingly, I asked Fred to be more precise about the
number of strands. He jumped right in and said he does count
them because he wants all of his flies to be consistent. Consistency
is an inherent, spiritual trait of a pro tier. Length is up to the tier,
however, cutting the strands right at the point of the stinger hook
looks pretty good. Save this bundle of flash for later use. Wet them
with a little spit to keep them together.
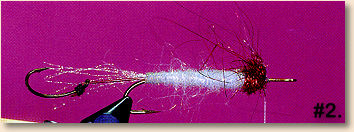
- Dub the body to the ¾ point of the hook. Taper the dubbing
slightly as you go forward. Dub a red throat area to the seven eights
point of the hook. The dubbing should be pretty rough looking with
loose fibers of the Lite-Brite sticking out around the hook shank.
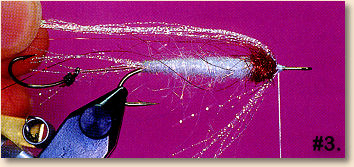
- Take the 13 strands of Krystal Flash you used for the tail and secure
them on top of the hook. Make sure the strands extend beyond the
stinger hook on the back. Separate the strands hanging out over the
eye and pull them back and under the hook shank. Make a wrap or
two to lock them in place. Trim the strands under the hook at the hook
point. Trim the strands on top of the hook to the point of the stinger
hook, even with the tail.
- Take a patch of white wool and comb out the fibers with a fine-toothed
comb. A pet brush works very well to fluff the fibers up. Snip out a clump
about the size of a wooden match stick. Secure it under the hook so that
the tips extend back to the inside of the bend. Trim excess. Cut out another
lump of white wool about twice as nick as the first. Secure it on top of the
hook with the tips extending back to he point of the stinger hook. Comb
out patch of gray wool and snip out a lump about the size of a wooden
latch stick. Secure it on top of the white wool so the tips of both clumps
are even. Make sure to put a drop or two of head cement at the wool
tie-in point to help lock it in place.
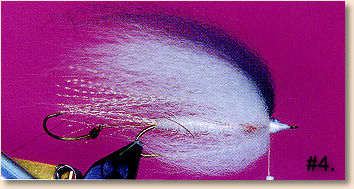
- Add 8 or 10 strands of peacock-colored Krystal Flash for a topping
and whip finish. ~ Marty Bartholomew
Publisher’s Note: Stinger or double hooks are not legal
everywhere. Please check the regulations before you use such
flies.
Credits: From Tying Flies Like a Pro by
Marty Bartholomew. Published by Frank Amato Publications.
For more great flies, check out: and
Originally published September 15, 2008 on Fly Anglers Online by Fred Vargas.