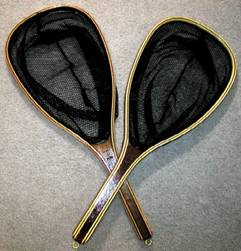
NET MAKING TUTORIAL
WHAT YOU WILL NEED:
DECIDE SIZE AND SHAPE OF NET
Landing nets come in many shapes and sizes.The size of the net is determined by intended use and the size of fish you expect to catch.Smaller nets with shorter handles work well for wade fishing.Longer handles can be useful for float tubing. Large hoops and very long handles are best used from a canoe or boat.I prefer a somewhat teardrop shaped hoop and adjust the hoop size and handle length to the intended use.The final size of the net hoop will be determined by the size of the net bag.I recommend you get the net bag before constructing the bending frame and size the bending frame to fit the net bag.
NET BAGS
Net bags are available from a variety of sources.Many of the large mail order hunting and fishing catalogs offer replacement bags. I have also ordered them from different on-line sources.Some bags will come with the lacing cord, others do not.I have used a double strand of heavy nylon upholstery thread with good success.Leather supply shops will also have an assortment of cord.
MAKE THE BENDING FORM
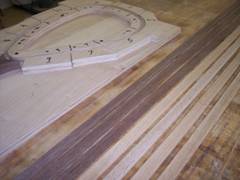
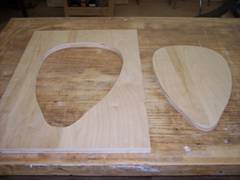 There are several ways to make the bending form.The easiest is to draw the shape onto ¾" plywood.This should match the inside dimensions of the net hoop.Cut around this pattern using a band saw or jig saw. Cut carefully as this will determine the final shape of your net.Once the form is cut out, cut out the inside of the form leaving a bending form about 1” wide.Attach this form to another piece of ¾” plywood that is a few inches larger than the bending form. (See picture.)
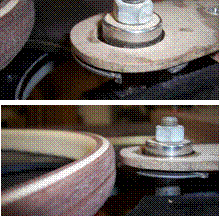
MAKE THE CLAMPING BLOCKS AND MOUNT THE BENDING FORM
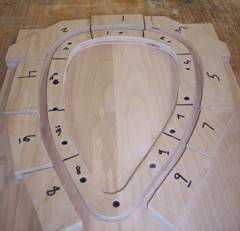 Some net makers prefer to clamp the wood strips to the bending frame without clamping blocks. I prefer to use the outside “waste” pieces from cutting out the form as clamping blocks.This provides even clamping pressure and protects the wood from damage caused by the clamps.The trick is to remove material equal to the total thickness of the wood strips from the inside of these “waste” blocks.If the net hoop will be ½” thick, exactly ½” of material must be removed from the clamping blocks.The blade of the band saw or jig saw used to cut out the form will have already removed a small amount of material.Be sure to take this in to account when removing additional material.Take the time to do this step very carefully.Once this material is removed, cut the blocks into manageable sizes, number the clamping blocks and the bending form so as to be able to match up the mating pieces during glue up.Securely mount the bending form onto a plywood base using glue and screws.
ALTERNATE WAY TO MAKE THE FORM
 You can also draw the net shape on a piece of ¼” plywood and cut this out with the band saw. Attach this template to the ¾” plywood and, using a router with ½” straight cutting bit and a guide bushing, cut around the template completely through the ¾” plywood. This results in a bending form and clamping blocks that are exactly the same shape with the ½” of material already removed.Also, you now have the ¼” plywood template if you need to make a new bending form at a later date.
MILL THE BENDING STRIPS
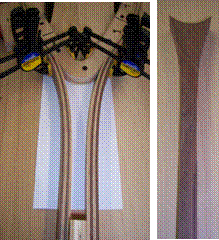
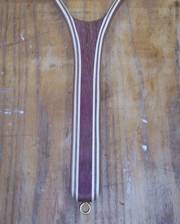
 I like to use 6 to 8 strips of contrasting woods that are between .0625” thick (1/16”) for an 8 strip hoop and .0833” thick (slightly more than 5/64”) for a 6 strip hoop to achieve my ½” thick net frame.These thin strips will usually bend around the form easily without breaking.Thicker strips will work fine but may require greater care (and perhaps steam bending) to get them to bend around the form.These strips should be from strong, straight-grained wood. I’ve had good luck with walnut, maple and ash.Cut these strips using a table saw or band saw.A light sanding, scraping or planing will remove saw marks and result in a better glue-up.The size of the hoop and the length of the handle will determine the length of these strips.The total number of strips you mill will allow you to experiment with different patterns of light and dark strips to achieve different looks.
MAKE THE HANDLE INSERT
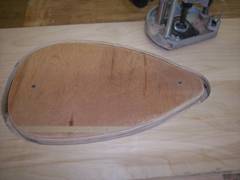
 Now make the handle insert.This is a good place to use that highly figured or exotic piece of wood that you’ve been saving for a special project.To make the first handle insert I like to temporarily clamp my bending strips in the form.Insert a small spacer block in the handle area.Slip a piece of paper under the strips and trace the outline of the handle.This will result in a handle that matches the shape of the hoop as it bends around the form.Transfer this pattern to a piece of ¼” material and save it for future nets. Trace this pattern and cut out using a band saw or jig saw.Sand carefully to the line.
GLUE-UP
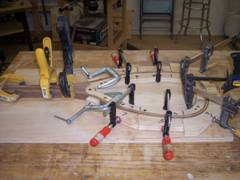 First, give the bending form and the clamping blocks a good coat of paste wax.This will keep the net from being glued to the form. Apply a thin coat of exterior wood glue to the mating surfaces of the wood strips and the handle insert. Don’t over apply glue, just a thin even coat.Start at the top of the hoop and work your way around the form applying even clamping pressure.Be sure the handle insert is in place before you get too far around the form. As you work your way around the form, use a block of wood and a hammer to tap the strips down to keep them firmly seated and lined up. Also, make sure the handle is in line with the center line of the hoop or you will end up with a crooked net, perfect for reaching around a rock to net your fish.(Don’t ask me how I know this!)
REMOVE FROM BENDING FORM
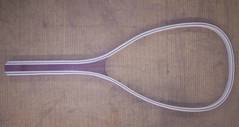 After the glue has completely cured, remove the net frame from the form.Any small gaps between the strips can be dealt with by forcing a small amount of glue into the gap and carefully applying a small clamp.Trim the handle to final length and give the entire net a good sanding to even out the strips and remove any glue squeeze-out.I like to round the end of the handle at this point as well.
ROUND OVER HOOP EDGES
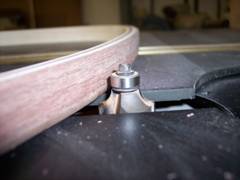 I use a ¼” round over bit and a table mounted router to round over the outside and inside edges of the net hoop.Of course, these edges could also be rounded over using sandpaper.
ROUND OVER HANDLE EDGES
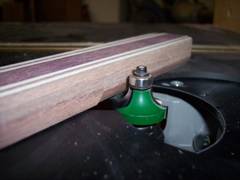 I now switch to a larger round over bit and round over the edges of the handle.I stop the handle round over just where the handle insert stops curving and becomes straight.The handle can also be sanded to the size and shape that feels best to you.A little more sanding will also allow you to blend the area where the hoop and handle were rounded over.
MILL A GROOVE IN HOOP
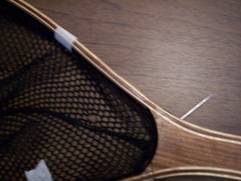
 Next, mill a shallow groove in the outside of the hoop for the net bag attachment cord.I use a 3/32” slot cutting bit in my table mounted router.This requires the use of a shop-made guide that allows the slot cutter to cut a groove about 3/32” deep.There probably are other ways to accomplish this as well.
DRILL HOLES FOR LACING ON THE NET BAG
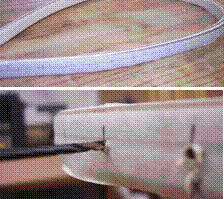 Drill a series of 3/32” holes through the hoop to use in lacing on your net bag.Some types of bags have loops at the top that determine the number of holes needed.Other bags are solid along the top.In this case I drill evenly spaced holes about 1” apart.An easy way to lay out the hole spacing is to mark the spacing on a piece of masking tape and apply the tape to the outside of the net hoop.An additional piece of tape on the inside of the hoop will minimize tear out as the drill bit exits the inside of the hoop.
FINAL SANDING
 It’s time for final sanding. Make adjustments to the shape of the handle with careful sanding.I sand through 220 grit sandpaper.At this point I also drill a pilot hole and install a brass screw eye in the end of the handle.For the time being, don’t screw the eye all the way in. Use this eye to hang the net frame after applying finish.
SOME THOUGHTS ON FINISH
There are several ways to finish your net.I’ve had good luck with spray finishes, both from aerosol cans and using spray equipment.My favorite finish is a 50/50 mixture of spar varnish and mineral spirits. Because this finish is quite thin it will take several coats to build up a durable finish.However, this finish dries very quickly so several coats can be applied in a day.I usually brush on several thin coats using a foam brush followed by a light sanding.Then 2 more coats of finish, lightly sand, 2 more coats, etc. until I reach the build-up of finish I am looking for.Because this finish goes on very thin I don’t like to sand between each coat.
ATTACHING THE NET BAG
 Temporarily attach the bag to the hoop using strips of masking tape or twist ties.Starting at the first hole on either side of the handle, securely tie the thread to the net bag and pass the needle through the first hole.Then go through the second hole, around the top of the net bag and back out through the same hole.Continue around the hoop and tie off the thread at the last hole.
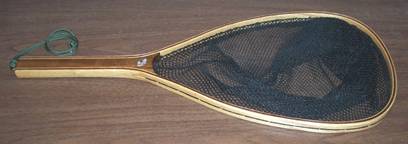
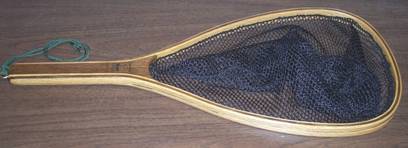
YOUR CUSTOM MADE NET IS COMPLETE
You will want to finish by attaching, at the very least, a wrist strap of some sort to the brass screw eye.There are also many kinds of snaps and/or magnetic net keepers available.Some of these attach to the handle, others to the top of the hoop.I prefer to use a magnetic release along with a tether cord that attaches from the screw eye to my vest.The first net I ever made for myself was lost when I was walking through heavy brush.I assume the net caught on some brush and pulled the magnetic release apart. Had I been using a tether along with my magnetic release I wouldn’t have lost my net.
[ HOME ]
[ Search ] [ Contact FAOL ] [ Media Kit ]