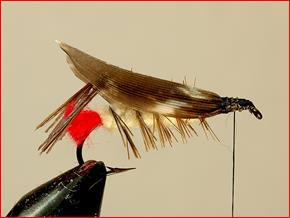
KAPOK HOPPER
Kapok is a natural fiber, similar to cotton. It comes from the fruit of the kapok tree (Ceiba pentandra), which is native to tropical environments. Kapok is extremely buoyant and for many years was used in life preservers.
I've always kept some natural kapok with my dubbing supplies. When I'm tying large, bushy patterns for use on rough water, I regularly use it as an underbody material. Kapok is naturally water resistant and immensely improves the floatability of most any fly pattern.

Materials:
- Hook: Mustad #R43-94831 3XL Size: 6-10
- Thread: Black, 6/0
- Tail: Red Yarn, cotton or wool
- Rib: Brown Hackle
- Body: Natural Kapok Dubbing
- Legs: Orvis Natural Pheasant Hopper Legs
- Wings: Mottled Turkey
- Hackle: Brown
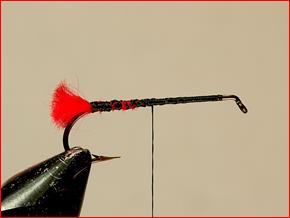 Lay in a good base of thread the full
length of the hook shank. Tie in the red
cotton or wool yarn and bob it short. There's room here for some experimentation if you like. You can vary the tail material or the color of the tail material to suit your own preferences.
Lay in a good base of thread the full
length of the hook shank. Tie in the red
cotton or wool yarn and bob it short. There's room here for some experimentation if you like. You can vary the tail material or the color of the tail material to suit your own preferences.
 I tie in the hackle that I'm going to use for
the rib. A little tip here --- once I have wrapped the hackle, I'm going to trim it short. So I select a very large hackle stem from the neck --- one that otherwise might never get used.
I tie in the hackle that I'm going to use for
the rib. A little tip here --- once I have wrapped the hackle, I'm going to trim it short. So I select a very large hackle stem from the neck --- one that otherwise might never get used.
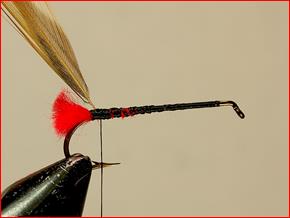
 Wrap forward the kapok dubbing, allowing
just a little extra room at the throat --- we have a lot of materials to tie in. Secure your thread.
Wrap forward the kapok dubbing, allowing
just a little extra room at the throat --- we have a lot of materials to tie in. Secure your thread.
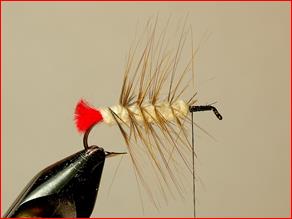 Palmer forward your hackle. Five or six well placed turns. Secure your thread. If you wrapped the dubbing in a clockwise manner then you should wrap the palmered hackle in a counter-clockwise manner. When ever you wrap one material over another it always best to wrap them in opposite directions. It makes for a stronger fly.
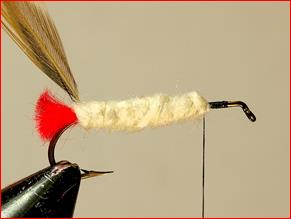
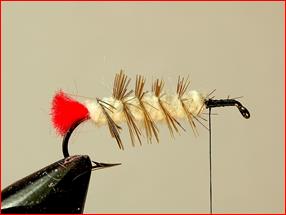 Once the hackle is palmered forward secure it with thread. Then trim the hackle short. Once again this pattern provides the tier with some experimental options. Depending on your preferences there is no reason why you can't change the color of the ribbing material to green or yellow or another choice.
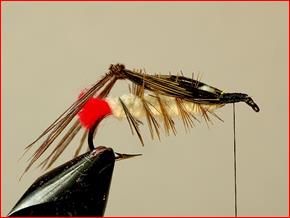 I'm now ready to tie in my hopper legs. I prefer to use the Orvis Natural Pheasant Hopper Legs. They come pre-knotted. You can knot your own pheasant tail fibers. But, buying them pre-knotted is a real time saver, epically if your tying up a lot of these. The legs can be tied in one at a time or both together, depending on your preference.
 Once the legs are tied in, secure them with thread. Trim off the legs to the desired length. I prefer a length of about half way through the bend of the hook.
 Tie in your mottled turkey wings. I pre-cut them to shape and 'Flexament' them for extra durability. I prefer to tie my wings in one at a time so that I can get perfect alignment. If you feel comfortable tying in both at the same time --- go for it! The wings can be shaped thin or wide depending on your preference.
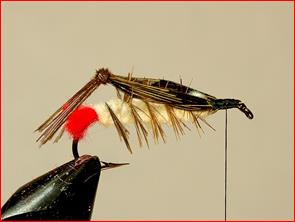
They should be tied tent style over the body and they should not extend beyond the bend of the hook.
Tie in your mottled turkey wings. I pre-cut them to shape and 'Flexament' them for extra durability. I prefer to tie my wings in one at a time so that I can get perfect alignment. If you feel comfortable tying in both at the same time --- go for it! The wings can be shaped thin or wide depending on your preference.
They should be tied tent style over the body and they should not extend beyond the bend of the hook.
 Tie in your brown hackles, at least two; the pattern should be tied heavy. Add a third hackle if you have room for it. The hackle selected should be one size larger then the hook. Finish your thread head by any method that your prefer. Be generous with head cement.
I've always wanted to develop a pattern that was basically unsinkable. The original idea came to me after noting that the color of natural kapok was the same color as the underbodies of some of the hoppers I found while fishing in Michigan Upper Peninsula. The pattern itself is a combination of features taken from many standard hopper patterns. It floats for a remarkably long period of time and the pattern itself generates some savage strikes during late summer and early fall hopper season.
See you on the water…..
Tom Deschaine ~www.michigandryflies.net~
For more great info, check out:
Beginning Fly Tying | Intermediate Fly Tying | Advanced Fly Tying.