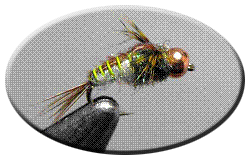
KG’s SOUTH FORK SPECIAL
This fly was developed as a result of a combination of triggers I have found on other flies over the years. It can resemble a mayfly, a caddis or just any old bug. Once again I use chartreuse wire for the ribbing as I have had much success with this over the past several years on many of my nymph ties. I also tie this fly with a fairly fat and squatty body which may be why it appeals to caddis feeders. All I know is this is a very effective pattern, but watch out, if there are whitefish in your waters this fly seems to be like candy to them – thus the name – South Fork Special where it is effective, too effective on the resident whitefish of that river.
Materials:
 Hook: Size #14 DaiRiki 125
 - Thread: Size 8/0 Uni, Olive Dun
- Bead: Size 3/32, Copper
- Weight: Optional – Lead-free Round Wire, Size .015 – two wraps
- Tail: 8-10 Natural Pheasant-tail fibers
- Abdomen: Ice Dub – pearl
- Rib: Size Small, UTC Ultra Wire, Chartreuse
- Thorax: Ice Dub – olive brown
- Wing case: Pheasant-tail fibers
- Wing/Legs: Olive mottled Hen Feather

Step 1
Slide Bead onto hook and secure hook in vise

Step 2
Take two wraps of lead-free round wire around hook shank, trim. Tuck wire wraps under bead. This is how one ties ‘Poor Man’s Tungsten’. This also serves to fill the gap under the bead without a lot of extra thread wraps.

Step 3
Attach thread and wrap behind wire to secure it under the bead. Wrap thread down past hook bend.

Step 4
Tie in Pheasant-tail fibers for tail – adjust to length. I like a short tail on this fly.

Step 5
Bind down length of wire on near side of hook. Make sure to attach wire along entire length of abdomen for a smooth body later.

Step 6
Dub a fat abdomen with pearl Ice Dub up two-thirds of hook.

Step 7
Pull Pheasant-tail fibers over top of abdomen and bind down with two loose wraps of tying thread – this is temporary in order to hold in place while ribbing.

Step 8
Rib abdomen with wire in even segmenting wraps – 5 or 6. Un-wrap tying thread holding Pheasant-tail material, bind down wire and trim.

Step 9
Dub a thick thorax with olive brown Ice Dub up to bead.

Step 10
The next series of photos deal with selecting a Hen feather for a wing/legs, and then the preparation of that feather for use. This is unique in that it solves the problem of stripping hackle fibers and tying them in under the thorax beard-style and makes for a much more natural looking finished product with the legs on the sides of the bug. Just personal preference I guess, but it gives me a lot more confidence in what the fish see as I present the fly.

Step 11
Holding the feather by the tip, pull/stroke the remaining fibers back towards base of stem, as pictured above.

Step 12
Cut off the tip of feather and then stroke an even number of fibers back to their normal forward position as shown above. This process leaves you with an “X”, which ‘marks the spot’ where you now tie in the feather.

Step 13
Now reverse the feather with the ‘tip’ laying over the back of the fly and tie in the feather directly behind the bead at the ‘X’ with two loose wraps of tying thread – as pictured above.

Step 14
This step is very critical to the success of your final outcome. Not pictured is how you place your left thumb (right-handed tiers) over the top of the fibers facing over the back of the hook and, while pulling gently and slowly with your right hand on the hackle stem, guide the fibers until you have the length of the legs desired for the fly. The tendency is to pull too far and the legs turn out too short. Also, fish don’t count the number of legs so make sure you start out with a fair amount to pull through. Once you reach the desired length and tweak for even lengths on both sides, move on to the next step.

Step 15
Pull the Pheasant-tail material over the legs and bind down firmly, trim excess materials. Take several more good wraps through butts of trimmed materials.

Step 16
This is a good picture to show how everything should line up across the back and top of the fly prior to trimming. Also, after binding down the materials solidly, then stroke the legs forward to spread them apart to resemble the legs of the natural. After trimming, dub a very sparse amount of thorax dubbing over the final wraps and material butts, whip finish and cement.

KG’s South Fork Special
This fly is most effectively fished dead-drift as a dropper fly under a larger weighted nymph to get them down to the level the fish are holding.
About the Author
My name is Kelly Glissmeyer (kglissmeyer); I live in Rigby, Idaho, right in the heart of the Greater Yellowstone area of trout fishing heaven. I have been fishing most of my life and fly fishing for more than 40 years. I have been tying flies for the past 26 years and participate in a variety of tying expos and shows in Idaho, Montana, and Utah and am looking forward to tying this next year in Washington and Colorado. I tie flies, build rods, and spend time on the water in excess of 50 days per year along with maintaining a full-time career and spending time with my wife and two older sons, who also fish with me.
Kelly G. Glissmeyer
4208 E. 410 N.
Rigby, ID 83442
kggliss@hotmail.com
For more great info, check out:
Beginning Fly Tying | Intermediate Fly Tying | Advanced Fly Tying.