We are going to start painting eyes on our streamers so that they will really look back at you!
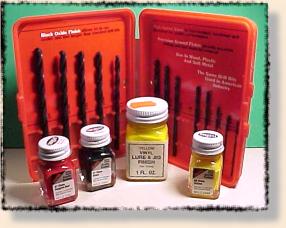
You will need a few simple materials. An assortment of drill bits, (this set was a buck or so at the
Dollar Store) and some model, or jig and lure paints. The model paints flow a bit nicer, but use
what you have.
As to paint colors, Lefty Kreh insists that red eyes really work better than yellow. He reports that he
has tested both extensively and red won hands down. I will defer to him on that one. I use both Red
and Yellow for eyes depending as much on my whim at the time as anything.
If you are tying an imitative fly, by all means imitate. If you are tying attractor patterns, experiment at will.
Now the only other thing you will need is a piece of paper. Illustrated is a small notebook, which we will
explain later. It really is sort of a "Tying Tip" within a tip.
OK lets paint a perfect eye!
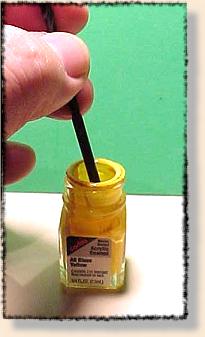
Take two drill bits, one larger and one about half of its size. Now touch the larger drill bit butt into the paint
(red or yellow) so that a small, sort of half round droplet clings to it. Too much or too little will yield poor
results, hence the paper.
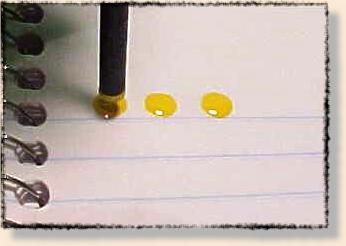
Now gently with the bit perfectly vertical, touch the paint droplet to your paper. Do not touch the paper
with the bit itself, just with the paint droplet. Lift the bit and you should see deposited on your paper a
nice very round yellow or red dot.
Do a series of the round dots in this size until you are comfortable with how much paint to pick up
and touching it to the paper.
Set the dots aside to dry completely, perhaps an hour or so.
OK all dry? Good, now to finish the eye.
Take the smaller drill bit, about ˝ the diameter of the first, and touch it to the black paint. You should
have a feel for how to touch the paint to get the right amount on the bit, as this remains somewhat
constant.
Now, carefully deposit the black paint as before right in the center of the red or yellow dots on your paper.
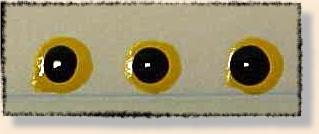
You should have a perfect eye looking back at you. Do the rest of your paper eyes.
Now the notebook will give you a reference as to which bits make the best proportioned eyes for a
particular size fly, but you have to set down and record various sizes in order to establish which
ones suit you best.
This week we have homework. Practice your eyes in various sizes, and colors if you like, and make up
a sample page showing various sizes and mark each with the bit size that you used for both parts of the
eye. Inner and outer size should be recorded.
Now you have practiced the technique and have a record of which bits make the best eyes for you
particular needs.
Next week, we will put our first eyes on our flies. Resist the temptation to jump ahead however, there
is some minor preparation to the head to be done first, which we will cover next week also.
If you have any tips or techniques, send them along, most of this
material has been stolen from somebody, might as well steal your ideas
too! ~ George E. Emanuel
(Chat Room Host Muddler)
|