Dick Clark, a longtime friend and pupil of James Leisenring,
developed a spinning block that simplifies creating the dubbing loop.
The Clark spinning block is made from hardwood and while the block
is not commercially available in fly shops, it can be built with
minimal effort. The advantage of the spinning block is an easier
dubbing method because the thread is held under tension by the block
leaving the hands free to apply the fur and spin the thread. The
dubbing block offers the fly tiers more control over the amount
of materials and where they are placed on the thread. It's also
easier to add more than one type of material to the dubbing loop
be it a fur or synthetic when the thread is laid out for you. Pete
Hidy used a piece of leather, white on one side and black on the
other, placed underneath the fur to allow the tier to better
visualize the taper he was creating with the fur. A leather strip
or any piece of material that has texture to it can be used.
However the wood surface of the block itself is suitable for placing
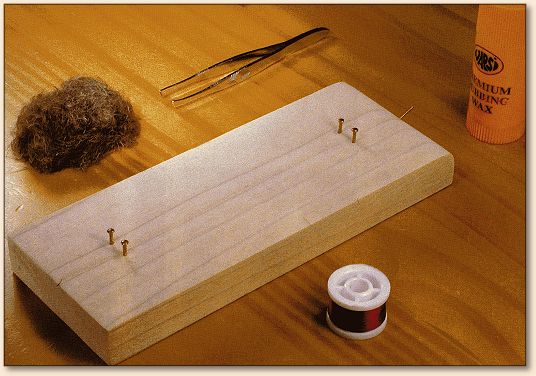
the fur on the thread. In order to build a spinning block buy a
5.5" x 3" x 1" piece of wood. Poplar is a widely available wood that
is easy to sand and can be stained if you wish. You will also need
fine brass nails and a piece of suede or leather to be used as the
block's background if you want.
After the wood is cut to size, rough out the beveled top edge with
a wood plane. Then sand the bevel until it's smooth and even. Next
drive a brass nail into the beveled end and cut the nail's head off
with linesman pliers. Sand the remaining nail to make it smooth.
Then take four brass nails and drive them into the block about 1"
from each end and 1/2" apart. If you want to use the leather
background cut the leather out using a template and use a hole punch
to cut the holes. The leather background is held in place with the
nails on the blocks surface. Finally cut a small notch in the end
of the block and another one on the side with a razor blade. The
bottom end notch should be directly in line with the brass nail
post at the top of the block.

1. Attach the waxed Pearsall's silk thread on the dubbing block.
First hook the thread in the notch at the bottom of the block. Then
run the thread up the block inside the brass nail posts, around the
brass nail post at the top, and then hook the thread into the notch
on the side of the block.
2. Apply the fur to the waxed thread to achieve a tapered segment.
Tweezers make the job easier. To make a tapered body apply a little
more fur to the center of the thread than to the ends.
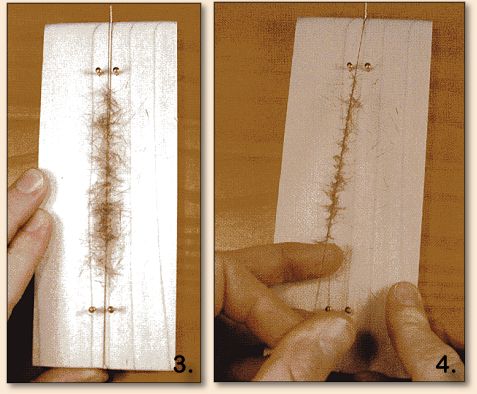
3. Unhook the side-notched thread and place it on top of the dubbed
thread so that you trap the fur inside the loop. Then secure both
threads in the bottom notch.
4. Remove both tag ends together and spin them in one direction only.
Spin the loop about four or five times by rolling the thread ends between
your thumb and index finger. Keep spinning the thread until a tight
dubbing rope has been formed.
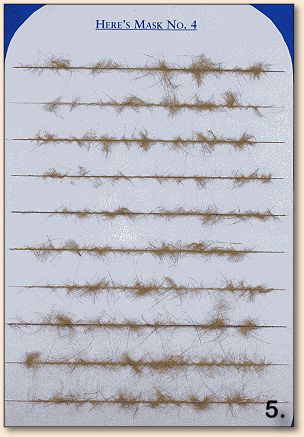
5. Remove the dubbed loop from the spinning block and place the loop in a notched card. Label the card with the fur used.
~ Allen McGee
Credit: The Clark Dubbing Block is one of three methods used to
produce dubbing shown in Allen McGee's book, Tying & Fishing Soft-Hackled
Nymphs. This excellent book is published by Frank Amato Publications.
Please check out the Fly Tying Section, on the Bulletin Board here at FAOL too.
If you have any questions, tips, or techniques; send them to
publisher@flyanglersonline.com
|