"Do you really tie your own flies on THAT?
When I demonstrate fly tying on my
extremely-low-budget and easy-to-build
fly tying vises at public fly fishing
gatherings that question is often directed
towards me. The answer is yes.
"Why would you do that?" is a frequent follow-up
question. I have led Boy Scouts and 4-H youth
in introductory fly tying lessons. These sessions
in fly tying have begun with vise building. When
students build their own vise they invest their
sweat in the finished product. This sweat equity
instills a sense of ownership in the finished product.
There is also the benefit that the student can
tie flies when the course is completed without
the need to immediately invest in equipment.
Young people are very quick to ask if this "thing"
that they are building will really work or if it
is just some "hair brained" idea. The best way
that I know to convince them is to look them
straight in the eye and say, "I tie on a vise
like this all of the time, now sit down and I
will lead you through the steps so that you can
tie your first fly."
Another reason that I tie all of my flies on
homemade vises is that I can use my tying
experience to improve the design of such a
vise and to explore its strengths and limitations.
One of the strengths of this vise is that the
X-acto knife handle can be removed from the
vise with the nearly finished fly still attached.
You can then inspect the fly and make final
adjustments to the fly such as trimming of
flash and rubber hackles, or paint eyes on
the fly while you view the fly from a variety
of angles. I tie flies on hooks that range
from size 20 to 1/0. However, this vise is
at its best for hook sizes 18 to 4. This vise
is named in honor of a friend who suggested that
one of my earlier vise designs might be difficult
for many to construct. His comment prodded me to
develop this vise.
In addition to tying flies on the vise shown
here, I also construct fly tying vises with
bases from unusual items. They include recycled
barn door hinges, frying pans, a telephone, copper
pipes with attached valves, and half of a bowling
ball. They do attract onlookers at fly fishing
and fly tying events. I haven't made one from a
kitchen sink...well not yet anyway.
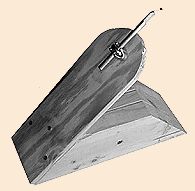
The critical component in a vise is the
mechanism that actually holds the hook.
For this vise, an X-acto knife handle
holds the hook for tying. It is held to
the piece of plywood with a 5/16 wire rope
clip (also known as a cable clamp). The
wire rope clip is held in place by a wing
nut and a flat washer on one side of the clip.
(The other side of the wire rope clip is left
without a nut). The plywood is attached to
three pieces of 2 X 4 to provide a stable base.
Nails and glue or screws and glue can be used
to attach the wood pieces together.
Follow these steps to place a hook in the
vise. As with any tool, there is a learning
curve before mastery is achieved. By following
this sequence you can become comfortable with
this vise after just a few tries.
1. Loosen the knurled sleeve on the vise.
(Loosen just until you can squeeze a hook
into the jaws of the knife handle.)
2. Position the hook so that the angle formed
by the hook shank and the centerline of the
knife handle is approximately 45 degrees.
3. Tighten the hook by pulling the knurled
sleeve towards the hook while rotating the
knurled sleeve. (Remember Righty - Tighty!)
4. After the hook is sufficiently tightened,
position the hook in the vertical plane by
inserting the knife handle in the wire rope
clip and tightening the wing-nut on the wire
rope clip.
Construction Notes:
A rectangle of 3/8 plywood is much stronger
when the direction of the grain of the top
and bottom plies runs parallel to the longer
sides of the rectangle.
A piece of non-slip rug cushion or non-slip
shelf liner attached to the bottom of the vise
will keep the vise from sliding on a smooth
surface.
To locate the holes in the plywood measure
the wire rope clip to determine the distance
between the legs of the threaded "U" rod.
(There may be variation between different
manufacturers and styles of wire rope clips.)
Center the wire rope clip holes 1 ˝ inches
from the rounded end of the plywood.
Happy tying.
Steve's Vise Parts List
1 X-acto knife handle - Type A handle
(5/16 handle diameter)
1 5/16" wire rope clip
1 5/16" flat washer
1 5/16" wing nut
1 3/8" plywood 4 ˝" X 12"
3 12" pieces of 2 X 4 lumber
1 4" X 11" rubberized cushion or liner
1 wood glue
9 10d box nails (2 ˝" screws can be substituted)
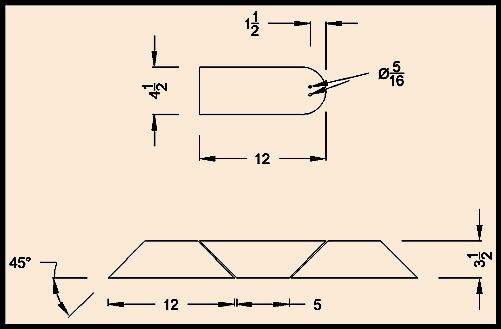
Figure 2. The layout of the pieces is shown
above. The piece shown on top is drilled with
two 5/16" diameter holes to receive the wire
rope clip which holds the X-acto knife handle.
The lower drawing shows the layout of the pieces
of a 2 X 4 for the base of the vise.
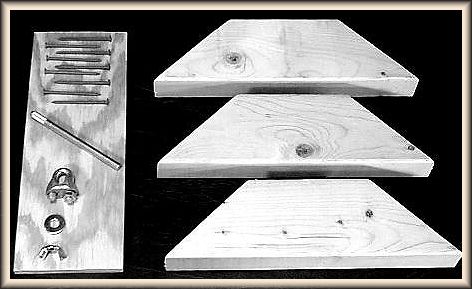
Figure 3. The essential parts of "Steve's Vise"
are shown above ready for assembly. ~ Ed Engelman
Please check out the Fly Tying Section, on the Bulletin Board, here at FAOL too.
If you have any questions, tips, or techniques; send them to
publisher@flyanglersonline.com
|