My workstation is not a dedicated area. Our family
desk must share multi-tasking with domestic business
and my model railroading. Tidiness and portability
are paramount. To improve the utility and portability
of my workstation over the years my ideal has evolved.
I can set up more quickly at home and find it a great
aid in transporting to the classes I teach at the
local school. I'm not suggesting that these ideas
are the best for all folks but just things to consider
as options.
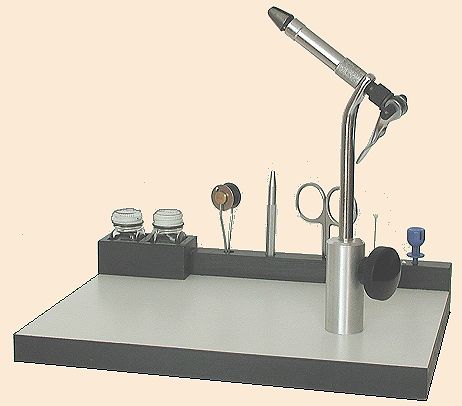
1. I replaced the platform part of my metal pedestal base
with a 8' x 11' piece of 3/4" plywood that is covered
with WHITE MATTE Formica. This greatly improves
visibility and poses no problem in stability with rubber
buttons on the underside. (The Formica covered wood was
a cutout from a kitchen countertop shop.) An outstanding
advantage of the Formica, or equivalent material, is that
it is immune to lacquer thinner that can be used
for cleanup of paint and cement drips etc.
2. Along the back edge I have attached a strip of wood into which I have
drilled holes to support the basic tools. At the end of this strip I've
included two small square "wells" to hold small square bottles of head
cement and dry fly silicone. (The square config. allows the bottle caps to
be removed with one hand and they can't be tipped over.) The bottles I use
are the small Testor's paint bottles that allow me to replace them with
color paints for poppers or eyes.
3. I cut about one inch off the vise column so I can rest my elbows on the
desktop. This relieves muscular tension in back and arms as well as
steadying my hands since tying motions are now hand motions and not arm
motions.
You will note that the bobbin is a Materelli mini-bobbin. For the sake of
compactness and portability to classes I use sewing machine bobbins for
thread and floss which allows me to carry 8 thread and 8 floss colors. All
material for immediate use, except for hackles, I carry in a small 12 drawer
plastic parts box.
The pedestal base you see here was made of aluminum by a class member who
has a shop. My original was a Thompson but he made one like this for each
class member.
The nearly invisible item between the scissors and the "electronic clip"
hackle pliers is an oversized corsage pin that replaces a bodkin. For
beginners I promote triple half-hitches and cement. We use good old Sally
Hansen's slightly diluted to get better penetration.
My teaching motto is, "Keep it simple and cheap but
do your homework."
In my town, this year, the Park & Recreation agreed to
purchase 12 sets of really basic tools so they could be
taken home for practice (after a $25 deposit).
Our fee is $50 for 5 sessions and includes all material
and a copy of Dave Hughes Fly Tying Manual.
(By asking around I also got a 30% discount on supplies.)
WHAT A GREAT PAIR OF BREAKTHROUGHS FOR RUNNING A CLASS.
After 5 (2 1/2 hr.) sessions for beginners with 10 people,
8 asked if we could keep going for another 5 sessions.
My learning experience was that beginners must be able
to practice at home. ~ Ray
Please check out the Fly Tying Section, on the Bulletin Board, here at FAOL too.
If you have any questions, tips, or techniques; send them to
publisher@flyanglersonline.com
|