When we tie a fly, we start off selecting a hook on to which
we tie material to create the fly pattern. This is no different
when building a car, you have a car frame onto which will go
all the components of the car, and the body which will cover
the assembly.
As you tie flies on your vice, have you ever given thought to
the anatomy of the hook that you are using? Your recipe for
the fly pattern may call for a Hook Model Number, by a
Specific Manufacturer. It may give you the range of hook
sizes the fly can be tied with. But have you given further
thought to the components, that make up the hooks shape
and design?
This information is helpful when selecting the size thread you
will use, the amount of materials you will apply to the fly, and
the placement of the material. In short, how are you going to
get all the stuff on the hook and have an end result that looks
like the fly pattern you are tying!
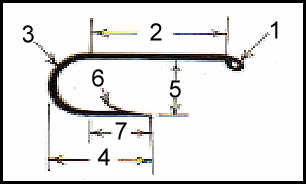
First thing we have to do is have a basic terminology. The
basic hook is made up of 7 components:
1. Eye
2. Shank Length
3. Bend
4. Throat
5. Gap Width
6. Barb
7. Point
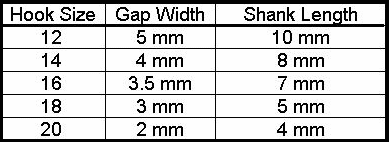
Hooks are sold by Manufacturer Brand Name, Hook Model
Number, and Size of Hooks Gap. As the size of the Hook Gap
decreases, the Shank Length also decreases. This means that you
will need to use a smaller size thread, use less material, and adjust
size of the different parts of the fly's construction.
Here is an example of how the Standard Dry Fly (Mustad
80010BR) Shank Length changes as the size of the Hook
Gap decreases. As you can see everything is not proportional,
as the size decreases.
Please check out the Fly Tying Section, on the
Bulletin Board, on FAOL too.
If you have any questions, tips, or techniques; send them along.
Someone else thought up most of this material before we did,
they just forgot to tell anyone about it. Or else we just
forgot about it, while learning something else. Let us
share with each other, all the things we know!
~ Steven H.
McGarthwaite (Chat Room AKA Parnelli)
|