This technique was suggested by Steven Delaney, who has submitted
his own original patterns using this technique.
Steve, got the idea for these flies from an article he read. The
article was about how a fly angler, would collect spent bodies of
hatched flies, take them home and slide them over
hollow quills, and then tie them onto a hook. But it
seems these were very fragile, and only would survive
one hook up.
So, instead of using real spent bodies, Steve decided to create fly
patterns which incorporate the hollow quills as bodies and tails to make
good use of the floating capabilities of the hollow quills.
Here is how Steve does it. Steve coats the quills
with Dave's Flexament to keep them from cracking and
to preserve their color. Steve says,
"It's a good idea to add some extra glue at the end of the
quill so that water doesn't find a way into the quill.
When tying the fly, be careful not to apply too much
pressure, because you could crush the quill and cause
it to deform.
The only place THAT you can apply VERY MUCH pressure,
is at the end, where it has been cut OFF, since this
is usually easier to compress than ANY OTHER
PART OF THE QUILL.
It is best to add steady pressure over the whole body
than a lot of pressure in one spot."
Here are some patterns and pictures to give you some ideas.
GRASSHOPPER
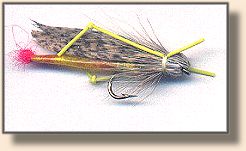
Hook: Mustad 3399, Size 8.
Thread: Light Cahill, 8/0.
Body: Goose Quill (dyed yellow).
Tail: Red Wool, inserted AND GLUED
into the end of the quill.
Wing: Mottled Turkey.
Head: Natural Dear Body Hair, tied
in pointing forward then pulled back and tied down.
(Similar to a Thunder Creek Streamer).
Legs: Round Chartreuse Rubber Legs.
CRICKET

Hook: VMC 9148, Size 6.
Thread: Black 8/0.
Body: Goose Quill (dyed Black).
Wing: 4 Black feathers strips, from
Goose Shoulder Quill.
Legs: 2 stiff Black Saddle Hackles, with
the barbules trimmed short and the stem knotted.
Collar: Black hackle.
Head: Black Deer Hair, cut to shape.
WHITE MAYFLY
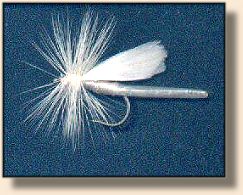
Hook: Partridge (Capt Hamilton) Size 14 (dry fly hook).
Thread: Monofilament thread (Clear).
Body: Goose Quill.
Wings: 2 Hen Hackle tips, cemented together.
Hackle: White Rooster Hackle.
HORNET (or Wasp)
Hook: Mustad 3399, Size 8.
Thread: Black Thread 8/0.
Body: Yellow Goose Quill, use black marker
to make stripes.
Hackle: Black Chinese Cock neck hackle,
tied down to represent legs.
Wings: White filler inside "Mylar" tubing,
similar to "Z-lon."
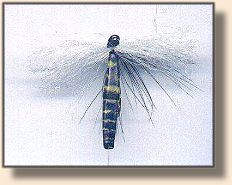
DAMSELFLY
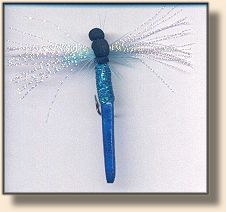
Hook: VMC 9148, Size 4.
Thread: Black 8/0.
Tail: Blue hollow quill from Goose
Shoulder Quill (Black Marking can be added for more realism).
Body: Blue Krystal Flash.
Collar: Light Blue Hackle.
Wing: Pearlescent Krystal Flash (White
Deer Hair, or some other suitable material.)
Head: Black foam, (ant body technique).
Tying Instructions for Damselfly
1. Start tying in the quill down from the hooks eye,
so that you have enough space to tie on your wings later on.
(The quill should be twice the length of the hook.)
2. Put maximum pressure at the starting point, then
gradually decrease pressure heading towards the tail.
After the thread is securely holding the quill on, add
some glue.)
3. Tie in the Blue Krystal Flash, wrapping around body
until the thread is covered up and the body is tapered
properly.
4. Coat the body and tail with some Flexament to add
more durability.
5. Tie in the Blue Hackle collar, just in front of the body.
6. Tie in the Krystal Flash wings, (cut evenly to
a proper length.)
7. Using a narrow strip of black foam, tie in just
behind the eye, and extending over the eye of the hook
slightly. (hint, this is a good spot for a
couple of half-hitches).
8. Now carefully wrap the thread to the collar/wing
area, holding the foam up and out of the way, back to
the wing. Tie down rear end of Black Foam, doing a
double half-hitch, and tying off with a whip finish.
9. You now can trim the foam ahead of the eye (if you wish).
Other Tips on using quills from Steve Delaney:
"I buy the Goose Quills already dyed . . .Goose Quills take permanent
markers quite well. Do the marking after you have coated it with glue,
since it may bleed.
A key thing to remember, is that the thread will slip
very easily when securing the bodies onto the hook.
A good base of thread is important.
Good strong glue will also help. On some patterns you
can make a small split at the CUT END of the quill, to
make it easier to secure the quill to the hook.
When you add thread pressure to one part of the quill,
then the thread which is on either side will loosen and
slip off, so equal tying pressure is necessary.
The inside of the Quills can also be STUFFED with materials
to create many different body patterns. Stuffing bits of
red material, inside a quill can give a realistic bleeding
effect.
Monofilament thread is good to use, when tying in materials on lower
portions of the Quill, where an opaque thread would look unsightly."
~ Steve Delaney
Steve also has a Nymph and Minnow pattern on the planning board,
we'll be interested in seeing how those turn out. Thank you for a job well
done!
Please check out the Fly Tying Section, on the
Bulletin Board, on FAOL too.
If you have any questions, tips, or techniques; send them along.
Someone else thought up most of this material before we did,
they just forgot to tell anyone about it. Or else we just
forgot about it, while learning something else. Let us
share with each other, all the things we know!
~ Steven H.
McGarthwaite (Chat Room AKA Parnelli)
|