|
Trucos de montaje
Biot Bodies
By Ralph D'Andrea, (Rollo), Colorado, USA
|
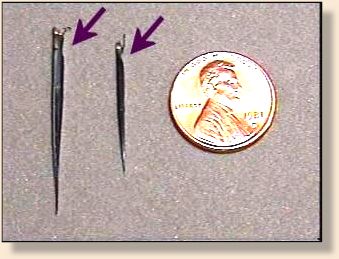 Figure 2 shows a turkey biot (left) and a goose biot (right). Goose biots tend to be shorter, narrower, and tougher than turkey biots. They work well on small flies. The extra length and translucence of turkey biots makes them wonderful to tie with--the material of choice for flies larger than about size 18.
PreparationTip 1: Prepare your materials ahead of time. Although goose biots are generally sold already stripped from the feather quill, turkey biots are often sold still attached to the flight feather. When you get a package of biots that is sold feather and all, use a single-edged razor blade, scalpel, or X-Acto knife to carefully split the quill down the middle. Peel the strip of biots (the short heavy barbs) away from the rest of the feather. The rest of the feather can either be discarded or used for wings or wingcases; the biots are easier to store and handle if separated from the feather.Tip 2: Use the right size biots for the job. Fan a strip of biots and you will note that they come in all different lengths, even on the same feather. They are typically longer in the middle of the strip, shorter at each end. Nothing is more frustrating than wrapping a body only to find out the biot you used was just a little too short to tie off where you needed to. Width is important as well, since a wider biot requires fewer wraps to cover the hook. It takes some experience to judge the "right" size, but too big is generally better than too small. The really short ones you can save and use as nymph tails. Tip 3: Pull the biots from the strip rather than cutting them. Biots are asymmetrical in cross section. Depending on whether you want to wrap a smooth body or a segmented body, you will find that biots have a "right" and a "wrong" side. One side of the biot (the concave side) has a ridge; if you want to wrap a segmented body, this ridge needs to be on the trailing edge of the biot so that it isn't covered over by the next wrap. Fortunately, the biot itself will tell you which side is which without too much examination, but only if you pulled it from the strip. The biots in Figure 2 were each pulled from their respective strips. The arrows point toward a small notch in the base of each biot. When you want to take advantage of the ridge to achieve segmentation, this notch needs to be oriented toward the eye end of the fly when you tie in the biot. (More on this later.) If you cut the biot instead of pulling it, this notch will be lost and you'll spend all day peering at biots through your reading glasses trying to figure out which is the convex side and which is the concave side.
 Tip 4: Always tie with moist biots. Dyed biots tend to be very brittle when dry, and can split or peel unexpectedly. Soaking the biots makes them unbelievably tough and resilient. I was teaching some of these techniques to a friend; he went to tear the biot off after wrapping it and ended up breaking the hook. So much for the idea that biots are fragile. That's pretty tough material. A.K. Best suggests dampening a paper towel and laying a number of biots on it when you are first sitting down to tie (Figure 3 above). The towel doesn't have to be dripping wet, just good and moist. Fold it over the biots and let them soak for 10 or 15 minutes or so while you are rounding up the rest of your materials. When you get ready to tie in a biot, just open the folded towel, take one out, and re-fold to keep the rest of the biots moist. Just remember not to put excess biots away wet, as they may get moldy.
Tying Technique
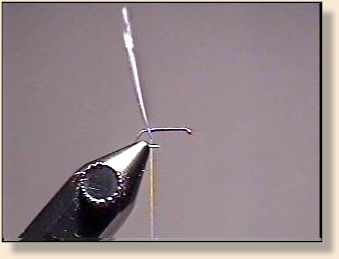
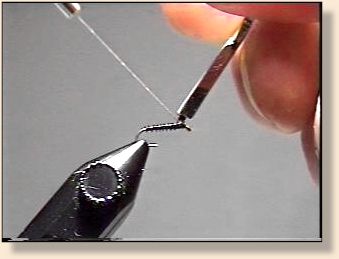
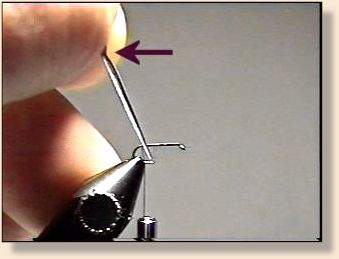 Step 1: Wrap a good thread base to the zero point of the hook. If your fly needs a tail, tie it in, wrap down the butts, and return the thread to the zero point. Orient the biot correctly before tying it in. We'll assume in each of these steps that you want a segmented body, so hold the biot on your side of the hook, point down, at about a 45 degree angle to the hook shank as shown in Figure 4. Note that the notch (pointed to by the arrow) is oriented toward the eye end of the hook. This is the correct orientation for a segmented body. For a smooth body, orient the notch toward the bend end of the hook.
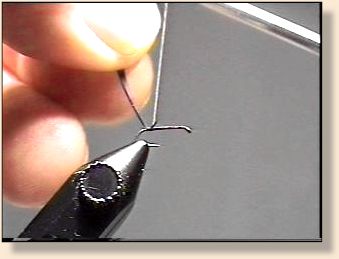
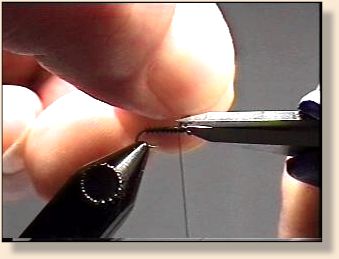
 Step 2: Take one soft wrap of thread around the hook, capturing the biot (Figure 5). If the point of the biot deforms, you have made too tight a wrap.
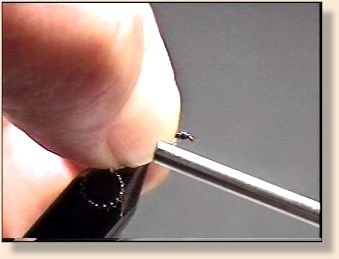
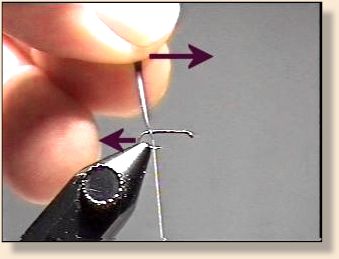 Step 3: Take hold of the butt end of the biot with your fingers and rotate it carefully till it is perpendicular to the hook shank (Figure 6). Use only enough thread tension to keep the biot from slipping out. The point of the biot should rotate a little in the opposite direction, as shown by the arrows. If it doesn't, you have held the biot down with too much thread tension. If the biot slips out, you have used too little tension.
 Step 4: Simultaneously pull the biot slightly away from you (around the hook a bit) and pull on the bobbin to tighten the single thread wrap you made in Step 2. This will start the biot around the hook in the proper orientation. The thread tension will deform the point of the biot toward the eye end of the hook (Figure 7), where it can be wrapped down. Wrap down the point and continue building a thread base with a flattened thread till you get to the place where you want the body to end. A smooth base is essential to getting good, even wraps that go where you want them to go. Bumps in the thread base can deform the biot as it is wrapped, leading to a sloppy body, or worse yet, a torn biot. When you're done wrapping the thread forward, leave the bobbin hanging. This will be the biot tie-off point.
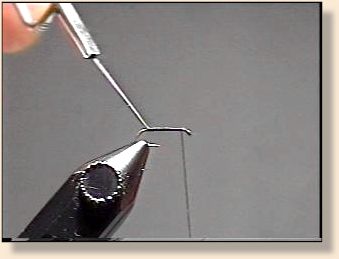 Step 5: Grasp the butt end of the biot in your hackle pliers and begin wrapping (Figure 8). The first wrap is the most important. Make sure you maintain the correct orientation of the notch and don't twist the biot the first time around. If the notch is still pointed forward when you come up to the top of the hook after the first wrap, you've done everything right. Continue wrapping to the tie-off point, covering the leading edge of the previous wrap with each new wrap. Adjust the width of your wraps to achieve the desired segment width, but always make sure your wraps overlap. Don't be afraid to use plenty of tension.
 Step 6: When you get to the tie-off point, make an additional wrap that pushes the thread ahead of the biot a bit. Biots require a wide tie-off area, so you will have to make the first tie-off wrap diagonal to the biot as shown in Figure 9. Cinch this first wrap tight and remove the hackle pliers.
 Step 7: Make another 2 or 3 tight thread wraps to secure the biot, then clip off the excess (Figure 10). Be careful not to cut the thread-it will be mixed up with biot edges and will be hard to see. I cut the thread less often if I make my 2 or 3 tie-down wraps toward the rear of the fly, away from the leading edge of the biot. You can also tear off the biot by rocking it back and forth until your securing thread wraps cut through it. Try it either way and pick the method that works best for you.
 Step 8: Wrap down the rough edges, and continue with the rest of the materials as necessary (Figure 11). You will build up less thread bulk if you cheat a bit and push down any edges with your thumbnail, as shown in the figure.
|