Welcome to Intermediate Fly Tying

Part Fourty-four


Intermediate Fly Tying:

Hair Mouse

Hair Mouse

By Al Campbell


Although trout aren't always subject to the "bigger fish want bigger meals" theory, bass, pike and many other predator fish are often strict adherents to the rule. After they reach a certain size, trout also start looking for a bigger plate of meat at lunchtime. I guess that's why big trout frequently turn to eating meat in the form of minnows, frogs and any other sizable meal that will quench their growing appetite.

Mice are often menu items in the meal plans of predatory fish. And, it's not just mice, but a variety of small rodents about the size of mice seem to frequently find themselves in the water and in harm's way. Predatory fish don't seem to be too picky; if it looks like a mouse, it must be mealtime.

Folks who live near the northern rivers of Alaska and northern Canada know the value of mice to the big trout that haunt those river systems. Field mice, lemmings and a host of other small rodents spend their summers on the banks of fast flowing rivers. It only takes a sudden gust of wind or a slip of foot to plunge these tiny rodents into the jaws of death. And death it is if a big trout is holding near the bank waiting for just that opportunity. It happens often enough that mouse patterns are common tools to catch the monster trout of the north.

In lakes a bit farther south, pike and bass also know the value of a mouse meal. One common method used to catch large pike where I grew up in Montana was to run a hook through the skin on the back of a live mouse and launch it on a stick or board into a lake. After the mouse had drifted in the wind to a distance of about 50 feet from shore, it was yanked off the stick and allowed to swim. I've watched as some huge pike were fooled by this trick. Largemouth bass are also suckers for mice.

Live mice are difficult to catch, they bite real hard and they only work for one fish before you need to capture another mouse. That, coupled with some valid concern about cruelty to small fuzzy critters was probably the main reason mouse flies were developed. After all, why would you load a bunch of unhappy rodents into your vest pocket and risk the possibility of a nasty bite if you could fill your vest with imitations that work just as well as the original?

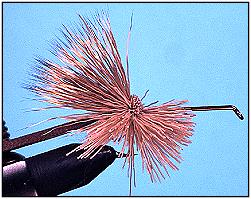
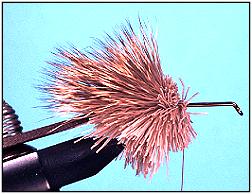
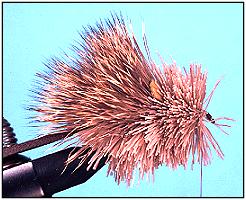
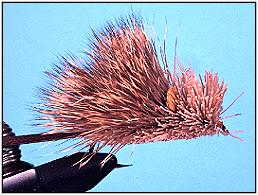
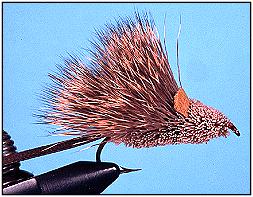
There are a lot of imitations of mice that will do the job. Some are tied with rabbit strips, some with other furs and synthetics, and some with deer hair. Many are merely spun deer hair that has been carefully clipped to the shape of a mouse, but perhaps the most misunderstood pattern is Dave Whitlock's Mouserat and its variations. I think the Mouserat is probably the best and most productive mouse pattern of all time, and if you know how to tie it, you'll have one great giant fish catcher.

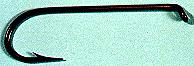
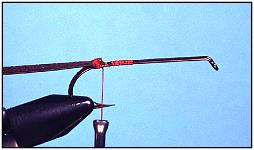
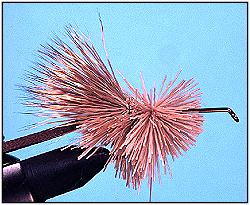
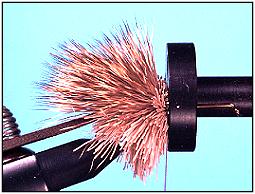
If you've followed this series to this point, the Mouserat should be easy for you to learn. If you've been skipping around, I suggest you review the steps and techniques for stacking hair shown in the diver flies if you want to keep up with the mouserat steps.

I don't tie my mouserat imitation exactly the same way Dave Whitlock ties his, but I think the results are close enough to fool the fish. Actually, I've never seen any two people tie the mouserat the same, but the results are nearly always the same if you abide by the same simple techniques.

List of materials: Whit's Mouserat

  • Hook: Mustad 9672, or any 2Xlong streamer hook. Sizes 2/0 to 10.

  • Thread: Kevlar.

  • Body: Coarse deer hair, natural colored or black. Some folks tie the bottom white, but I tie it natural.

  • Tail: Strip of chamois or leather shoe lace.

  • Ears: Chamois or any other thin, tan leather.

  • Whiskers: Moose hair or black horse mane hair.

  • Eyes: Black marker, painted on.

  • Tying steps:

  • 1.Cut a thin strip of chamois or a shoe lace about 4 inches long and tie in at the bend of the hook. Some folks like to use a thin strip of rabbit fur for a tail, and that adds some very nice effects. Be sure to trim the tail to a point. I add a drop of super glue to the point where the tail is tied to the hook to secure it firmly in place.

  • 2.Select a small bunch of deer hair, remove the fuzz with a comb, and trim the tips with your scissors. I trim the tips to shorten the length of the hair so it won't catch on everything. Stack the hair on the bottom of the hook. If you forgot how to stack hair, retreat back to the diving bugs in of this series to refresh your memory.

  • 3. Select another small bunch of hair, remove the fuzz, and even the tips of the hair in a hair stacker. Measure the hair for length (about the length of the hook shank) and trim the butts of the hair at that point. Make two wraps of thread over the hair just behind the butts (just enough hair sticking out that the thread will catch all the hairs), and cinch the thread while holding the hair firmly on top of the hook. In other words, stack a bunch of hair by the butts of the hair, on the top of the hook.

  • 4. Stack another bunch of hair (tips trimmed) on the bottom of the hook immediately in front of the last hair you stacked.

  • 5. Stack another bunch of hair (tips evened, measured for length and butts trimmed) on top of the hook.

  • 6. Compress the hair with a hair packer to keep the body dense and tight. Repeat these steps (stacking and packing the hair) until you've covered about 2/3 to 3/4 of the hook shank.

  • 7. Clip a set of small Mickey Mouse ears from a piece of chamois or an old pair of pigskin gloves (that's what I use since I wear so many out at the finger tips). Tie the ears to the top of the hook with figure 8 wraps and secure with a drop of super glue.

  • 8. Spin several more bunches of deer hair in front of the ears all the way to the eye of the hook. (I usually clip the tips of the hair before I spin it for the head). Whip finish and trim the thread.

  • 9. Use a razor blade to trim the hair flat on the bottom of the hook.

  • 10. Shape the head and trim up the sides of the body a little with your scissors.

  • 11. Color in the eyes with a waterproof marker. Start the thread again (make sure it's black thread this time) and tie in the whiskers on each side of the head. Whip finish and trim the thread.

  • 12. Cement the thread and the bottom of the body with a liberal dose of thin head cement. Your fly should look similar to this from the front.

    Until next week my friends, practice and have fun. See ya next week - Remember, I'm always happy to answer your questions, feel free to email me. ~ Al Campbell

    Fly Tying Archives