Welcome to Intermediate Fly Tying

Part Thirty-four


Intermediate Fly Tying:

Simple Deer Hair Bass Bug


By Al Campbell


It's finally time to move out of trout flies for a while and work on flies that catch other fish. Much of this country and the world for that matter, spend their time chasing fish other than trout. Of those "other" fish, the bass seems to be one of the most popular.

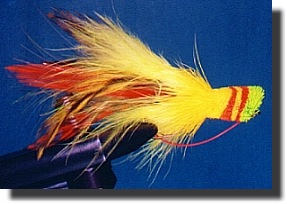
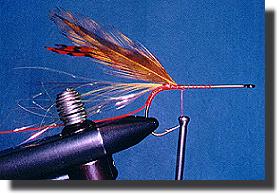
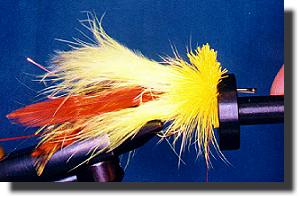
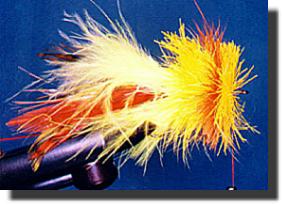
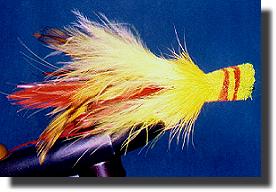
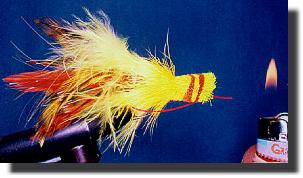
Although there are many materials used in bass flies, deer hair is one of the most commonly used materials of all. However, bass flies don't usually try to imitate a specific insect found on or near the water. Instead, they are often tied with wild and crazy colors and materials to look like nothing found in the natural world. I guess it doesn't have to look natural if it catches fish, and these wild looking creations do catch fish.

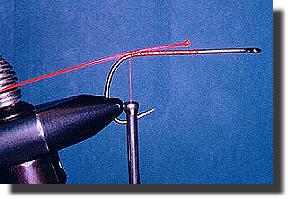
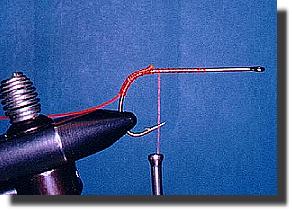
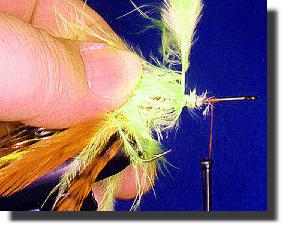
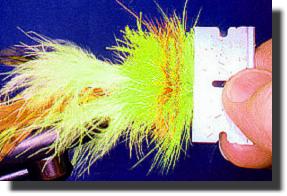
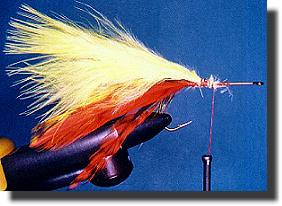
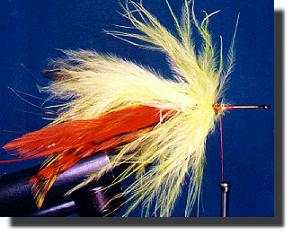
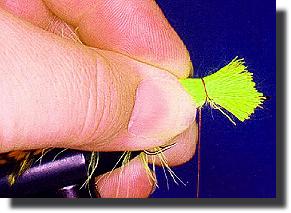
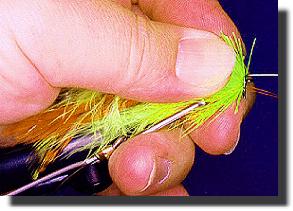
In this first bass fly, we'll concentrate on getting the deer hair to do what we want it to do. Although traditional deer hair bass flies have eyes and rubber legs, I'll omit them for this first fly to concentrate on getting the hair to spin right and trimming the head to the right shape. Don't worry, we'll have plenty of opportunity to add legs and eyes later.

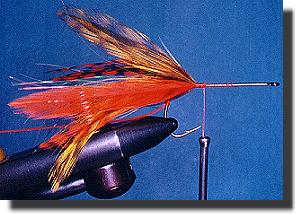
Another thing I've noticed about bass bugs is there seems to be a lot of room for variation between styles and methods. One tyer will use marabou and the next one won't on the same pattern. One tyer will tie the marabou on before the hackle; the next will tie it in reverse. And, they'll both label their flies with the same name. For some reason, the bass don't seem to mind very much.

If you don't have a lot of bright colored deer hair, you'll need to spend a few bucks to get some. Buy the coarse kind of hair designed to be used on bass bugs. (There is a difference.) You won't need all the colors, but you should have at least three bright colors and black in your inventory. You'll also need a hair packer if you want your deer hair heads to turn out compact and sturdy. You'll need as many colors of 
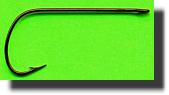
marabou and hackle as you have colors of hair. A couple of big hooks and some heavy monofilament are a necessity. If you want to be consistent with traditional bass flies, you'll need some 3mm or 4mm doll eyes and some multi-colored rubber leg material. The final item you need you should already have, and that is a few sharp razor blades.

If you don't have the same colors I use, don't quit. I'm probably using an odd color combination anyway. Like I said before, my goal is to teach you the methods, not the patterns. You can pick up any bass fly pattern, and if you know the methods, all you need to do is purchase the right materials and the fly will be yours to tie. Knowing how to perform the steps is the key here. If your color combinations are different than mine, who cares? The fish certainly don't.

Our goal with this week's task is to learn how to spin multiple colors of deer hair and to trim them into a popper shaped head. If you want to use purple and pink, be my guest. Just try to match some of the head colors with similar colors in the tail. If you want to add eyes and rubber legs, I'll pass on how it's done so you can do it.

Enough of that, let's tie a fly.

List of materials: Simple Deer Hair Bass Bug

  • Hook: Wide gap bass bug hook. Mustad 37187, Tiemco 8089 or equivalent. Size: 1 to 10.

  • Thread: Red, olive, yellow, brown or black kevlar.

  • Tail: Traditionally a mix or marabou, crystal flash or flashabou and saddle or neck hackle. Bright colors are common. (Any number of materials will make a suitable tail, including synthetic hair, rubber leg materials and other common feathers.) Hackle feathers usually consist of three to six pairs of bright colored hackles. These are usually several colors and separated into two identical piles with the butts of the feathers aligned with each other, one bunch tied on each side of the hook.

  • Body: None. (Tinsel if desired.)

  • Hackle: none. (Rubber hackle is often sewn through the hair head after the fly is finished.)

  • Weed guard: Hard Mason monofilament. (Traditionally clear, but red used here to be visible.)

  • Eyes: None. (Traditionally small 3mm or 4mm doll eyes or hard prismatic eyes.)

  • Head: Several colors of coarse deer hair, spun and trimmed.

  • Legs: None. (Some tyers use a sewing needle to add rubber hackle to the head.)

  • Tying steps:

  • 1. Use a lighter to melt the end of a piece of heavy monofilament creating a bump in the end of the monofilament. Tie the monofilament to the back of the hook.

  • 2. Continue wrapping the monofilament down around the bend of the hook with the thread. Return the thread to the starting point.

  • 3. Tie in some flashy material (crystal flash or flashabou) and one pile of the hackles. You should tie the hackle on the far side of the hook so that the curvature faces out. Two loose wraps of thread should be taken first, then cinch the thread while holding the hackle tight to the hook. This will prevent the hackle from turning around the hook. Marabou is usually tied in before the flashy material, but this time we'll do it differently to show a different effect.

  • 4. Tie in the other bunch of hackle feathers on the near side of the hook, again, with the curvature facing out.

  • 5. Tie in a marabou feather similar in color to one of the colors used in the tail and head.

  • 6. Wrap the marabou around the hook, pulling the fibers back toward the bend with your free hand as you wrap. This is very similar to many of the hackle and feather wraps used in soft hackle flies, steelhead flies and a host of salmon flies.

  • 7. After a few wraps of marabou, tie the rest off and fold it back over the tail.

  • 8. Select a small bunch of one color of deer hair; prepare it and spin it like you did in the other deer hair flies we've tied.

  • 9. Compress the hair back with a hair packer. (It helps to pinch the hair on the back of the head to prevent it from slipping toward the back of the hook.) Spin another bunch of hair the same color as the first one and compress that bunch. After each bunch of hair, make a few wraps of thread around the hook to secure the thread in place, then slide the thread into the base of the hair you just compressed.

  • 10. Spin a bunch of hair of a different color on the hook. Begin alternating the colors as desired until you reach the head. Be sure to compress each bunch of hair and make the thread wraps after each bunch of hair is compressed. This will result in a compact head that holds its shape well and won't fall apart. The amount of hair you use in each bunch will determine how thick each band of color will be.

  • 11. When you have filled the hook with compressed hair, tie the thread off, whip finish and trim the thread. Don't worry about the weed guard just yet, we'll tie it in behind the hook eye in a little while.

  • 12. Using a razor and scissors, start shaping the head. It's easier to remove the fly from the vise and hold it in you hand as you shape it. The bottom of the head should be cut flat and close to the hook. The top of the head should be rounded and tapered down toward the tail of the fly.

  • 13. Try to keep the taper consistent and smooth.

  • 14. When you have the head shaped the way you want it, start the thread behind the hook eye again. Bring the weed guard up under the fly and tie it off at the hook eye. Trim the weed guard to the approximate length, whip finish the thread behind the hook eye, and trim the thread. Now measure the weed guard again to make sure it is the right length to protect the point of the hook, mark it, push it forward through the thread wraps and trim it a little long. Melt the end of the weed guard with a lighter to form a bump in the monofilament, then pull it back snug against the thread at the hook eye.

  • 15. Trim any stray hairs, align the weed guard with the bottom of the head and cement the thread and bottom of the head liberally. Shoving a bodkin through the hook eye until the glue dries will keep the eye open.

  • If you wish to add rubber legs to the head, sew them in with a large needle before you cement the head. Doll eyes can be glued on with epoxy if desired. You can make an indent for the eyes with a soldering iron if you like. It allows the eyes to sink back into the head for a more natural look. Prismatic eyes are also common on this fly.

    Dave Whitlock gets the credit for designing this fly. It's probably the most popular hair head bass fly of all time. Even the fish like it.

    Tie up a few of these gems in a variety of colors. You never know when it will be a different color combination that matches the "hatch". Don't worry, the bass will let you know when you get the right combination.

    Until next week my friends, practice and have fun. See ya next week - Remember, I'm always happy to answer your questions, feel free to email me. ~ Al Campbell

    Fly Tying Archives