Welcome to Intermediate Fly Tying

Part Thirty-one


Intermediate Fly Tying:

Dave's Hopper


By Al Campbell


You're not in the wrong place. This series crossed the line from 'beginning' to 'intermediate' a while back. By naming it more correctly I hope more tiers will jump in and join us.

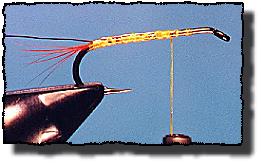
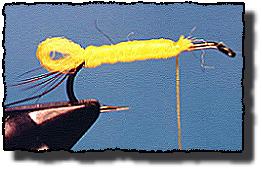
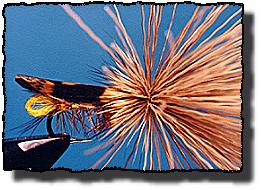
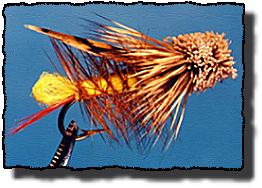
Something old, something new. That's what this week offers. For the old, it's deer hair heads and palmer wrapped hackle. For the new it's a 
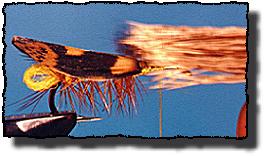
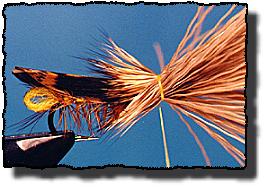
slightly different wing and body. Dave's hopper doesn't offer any real exciting new challenges, nor is it so easy to tie that it should be bypassed.

What it offers the fisherman is a hopper pattern that's caught more trout than any other hopper pattern I know of with the possible exception of Joe's hopper. Hmmm, so many hoppers, so many first names. I wonder if that's some sort of tradition or something?

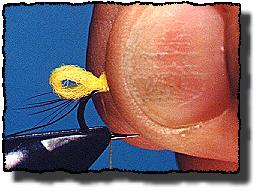
Dave's hopper is a tradition to many western flyfishers. It's the first hopper pattern I had consistent success with. Once you master spinning deer hair, it will be one of the easiest hopper patterns you tie. I suppose that's reason enough to learn how to tie it.

Fly fishermen (and women) owe a debt of gratitude to Dave Whitlock. Not only did he design Dave's Hopper, he designed a lot of other flies we fish with as well. If you've seen the Matuka, the Mouse Rat or any of several dozen bass and saltwater patterns (Redhead flies for instance), you've looked at some of his contributions to the fly fishing world. His nymph and streamer patterns are standards at most fly shops. In fact, his contributions to fly fishing in terms of patterns, are broader and more numerous than the contributions of Lee Wulff.

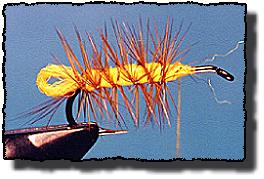
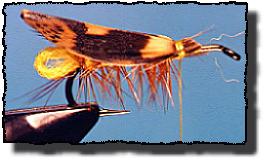
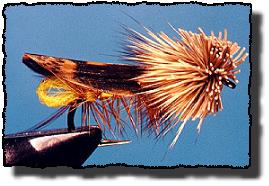
One interesting note, Dave's hopper can be tied with all-black materials to create a cricket, or stonefly colors to imitate any of the stoneflies that inhabit our mountain streams. The possible variations of this one fly are endless, and even though I've studied several dozen variations, I'm sure I've just scratched the surface of the pile. Do you have cicadas where you live? If so, a variation of this pattern will work to imitate them as well.

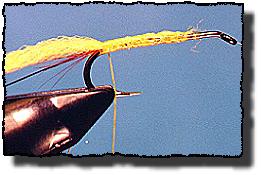
The original Dave's Hopper was tied with trimmed hackle legs that were knotted and bent to shape. Later variations of this pattern used knotted pheasant tail fibers, rubber hackle and hair for legs. Unless I'm tying this pattern for sale, I don't add legs. After years of fishing legged and leg-less versions of this pattern, I found that the only thing it catches better with legs is fishermen. They're a nice touch, and if you 
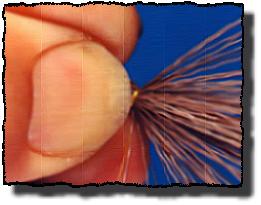
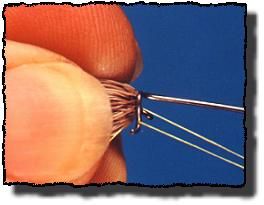
wish to add them you can, but I haven't shown them here. For now, just concentrate on creating a nice looking body and head.

The version of Dave's Hopper you are about to see is my own, and has several changes from the original. In fact, if you pick up several dozen pattern books, you'll likely see a dozen variations of this pattern. I'll try to point out the differences as we go along, but please don't get the idea that I'm the authoritative expert who must be followed on this or any other pattern. I expect that in time, you too will have variations of many original patterns you learn to tie, even patterns of my design. Hey, that's what this tying thing is all about.

Artistic expression is one of the main draws to fly tying. It certainly isn't saving or making money. I'll bet you've figured that one out by now. But if you can express yourself through personalizing your patterns, you will gain a whole new enjoyment of this sport and the art of fly tying.

List of materials: Dave's Hopper

  • Hook: Hook - 2X or 3X long. Tiemco 5263, Mustad 9672 or equivalent. Size: 4 to 14.

  • Thread: Yellow or olive kevlar.

  • Tail: Dyed red deer hair, dyed red elk hair, or red hackle fibers.

  • Body: Yellow polypropylene yarn,tied with a loop at the hook bend.

  • Hackle: Brown saddle hackle, tied dry palmer style. (traditionally clipped).

  • Rib: Copper wire.

  • Wing: Grouse feather, cemented liberally to make it firm. The traditional wing is a piece of mottled oak turkey wing feather that has been cemented and trimmed to shape.

  • Legs: Omitted here, but traditionally dyed yellow grizzly hackle that has been trimmed and knotted to look like a hopper leg. Since I don't clip the palmer hackle and don't trim the hair head as tight as the original, I usually omit the legs.

  • Head: Deer hair, spun and clipped.

  • Tying steps:

  • 1. Tie a short tail of red hackle fibers or dyed red hair at the hook bend. Tie in a copper ribbing wire.

  • 2. Tie in a strand of yellow polypropylene yarn.

  • 3. Make a small loop in the yarn at the hook bend and tie it down with a few wraps of thread.

  • 4. Wrap the yarn forward to create a smooth body.

  • 5. Tie the yarn off and trim. Leave plenty of room for the wing and head.

  • 6. Palmer a hackle (dry style) over the body and secure it with the copper ribbing wire. For those who forgot how to do this, go back and look at the elk hair caddis, stimulator and wooly worm.

  • 7. Select a mottled grouse feather and coat it with flexible head cement. (Yellow vinyl jig head paint that has been thinned works great and adds color too. Apply it to the underside of the wing.) The traditional method uses a section of mottled oak turkey wing feather that has been cemented and trimmed, but any mottled feather will work.

  • 8. Wrap the feather over the top of the hook to form a rounded tent style wing and tie down. The wing should extend over the looped tail. If you need to, round the end of the wing with scissors. Trim the feather at the tie down point and wrap the loose fibers down.

  • 9. Select a bunch of deer hair (same as you did with Al's hopper), and measure for length. The hair should extend about 1/3 the length of the wing. Once you have the hair measured for length, slip it down over the front of the hook. Try to keep the amount of hair even on both sides and the top and bottom of the hook.

  • 10. Hold the hair in place with one hand while you make two loose wraps of thread with the other hand. Be sure to keep the thread around the hook too, not in front of the hook.

  • 11. While holding the hair, make another wrap of thread and pull. The hair will start to flare.

  • 12. Make another wrap of thread and release the hair as you pull on the thread. The hair will start to spin around the hook and flare even more.

  • 13. Make one more wrap of thread and pull a little harder. You don't want to pull hard enough to cut the hair, but enough to make it flare fully. If you're not using kevlar thread, your thread might break at this point.

  • 14. Pull the hair back with your hand while keeping tension on the thread. Work the thread through the hair to the hook eye and take a few wraps of thread around the hook just behind the hook eye as shown.

  • 15. Whip finish behind the hook eye. I like to use the Thompson style whip finisher here because it works so well in tight places. If you need a refresher on the use of this whip finisher, go back to part 6 in the archives for a view of the procedures. A hackle guard is handy to keep the hair back and out of the way of the whip finisher.

  • 16. Begin shaping the hair head with your scissors. Start by squaring it out, trimming the top, then the bottom, then the sides. Leave the hair a little long; you'll create the final shape with a razor blade next. Trim only the butt ends of the hair, leaving the tip ends to sweep back over the wing and front part of the body.

  • 17. When you have the head roughly shaped to the right proportions, use a razor blade to refine the proportions of the head to the right size and shape. Use a sharp blade for this task, but be careful you don't refine the shape of your fingers during the process. Razor shaping creates a nice, smooth head that looks great and tends to hold up better under stress than scissors shaping does.

  • 18. When you've finished refining the shape of the hair head, your fly should look like this. Apply a liberal amount of head cement to the thread behind the hook eye and the base of the hair head. Let the cement soak into the hair thoroughly so the head won't work loose with use.

    Try a couple of these in colors to match stoneflies and crickets. For the cricket, use a standard dry fly hook, black yarn and dyed black hair. You'll find this pattern floats great and the hair head looks more natural to the fish than hackle does.

    After a week of practice, you should be getting good at hair heads. Now is a good time to experiment a little. Who knows, you might find a better way of doing it.

    Until next week my friends, practice and have fun. See ya next week - Remember, I'm always happy to answer your questions, feel free to email me. ~ Al Campbell

    Fly Tying Archives