Welcome to Intermediate Fly Tying

Part Thirty


Intermediate Fly Tying:

Al's Hopper


By Al Campbell


There are a lot of great fly tyers in this world, but when it comes to dry flies, except for a few of my own patterns, I usually tie on a Mike Lawson, Craig Mathews or Randy Kaufmann creation. That's not saying anything bad about the rest, it's just saying that Randy, Craig and Mike have developed more of the dry fly patterns I like to use than any of the rest.

Of course, I tend to modify their patterns once in a while. This week we'll look at one of those modifications. A few weeks ago we tied a few Stimulators, one of Randy Kaufmann's creations. It's a good hopper imitation in the right colors, but I decided to modify it a little, and feel I now have a great hopper pattern.

I doubt I'm the first person to tie this pattern, but I'm the first one I know of, and in the five years I've been tying it I haven't seen another one like it, so I get to name it. I named it Al's Hopper. It isn't uncommon for a fly to be named after its creator.

Al's Hopper is a combination of a Stimulator and a hair head hopper pattern like the Dave's Hopper. In fact, if Dave's Hoppers and Stimulators were to mate in my fly box, I believe this is the pattern that would result from that encounter.

Although some of the steps in this pattern are familiar to you if you've been following this series, there is a new twist. This week we learn how to spin deer hair. Spinning hair isn't hard if you know how to do it, and use the right materials. The hair must be hollow, and coarse hair spins better than fine hair. It's also important to use strong thread. I use kevlar thread because it's strong and is fine enough to do a good job of spinning hair.

I chose to use a spun deer hair head for this fly because it can be shaped easily, and hollow hair like deer hair floats well, keeping this hopper pattern on the surface of the water where it belongs. If you wish, you can purchase deer hair in colors like yellow or olive to give this fly a hopper colored touch. Of course, tan is also a hopper color, and tan is the natural color of deer hair, so if you use natural deer hair you won't be hurting your chances for success.

Late summer in the western states is prime hopper time. Some years, the hoppers get so thick, the fish will occasionally ignore hatches of aquatic insects to concentrate on the larger meal hoppers provide. This is especially true on windy days when large numbers of grasshoppers are blown into the water. No self-respecting fish would ignore such a large meal when it is so easily provided to them.

If you want some exciting action, tie up a few of these flies and cast them near a grassy stream bank on a windy day in August. I've watched trout leap completely out of the water to dive on a properly presented hopper pattern. That will get your circulation going for a while. Al's Hopper is well suited to fast water; it floats like a cork.

Are you ready for a new adventure? Good. Let's tie up a few of my favorite hoppers.

List of materials: Al's Hopper

Tiemco 2302
  • Hook: Light wire terrestrial hook. Tiemco 2302 or equivalent. Size 4 to 12.

  • Thread: Yellow or olive kevlar.

  • Tail: Elk hair, tied like the tail of a Stimulator.

  • Body: Yellow polypropylene yarn.

  • Hackle: Brown saddle hackle, tied dry palmer style.

  • Rib: Copper wire.

  • Wing: Tan elk hair, tied like the wing of a Stimulator.

  • Head: Deer hair, spun and clipped.

  • Tying steps:

  • 1. Tie a short tail of elk hair, flared slightly, at the hook bend. Use the same procedure used for the stimulator.

  • 2. Tie in a copper ribbing wire as shown.

  • 3. Wrap a body of polypropylene yarn as shown. Leave plenty of room for the wing and hair head.

  • 4. Wrap a hackle, dry palmer style, and rib it down with the copper wire. Use the same steps you used for the stimulator body.

  • 5. Tie in an elk hair wing to extend to the tail, as shown. A drop or two of head cement applied to the base of the wing is a wise idea.

  • 6. Select a bunch of deer hair (about 3 times as much hair as you used for the wing), and measure for length. The hair should extend slightly past the base of the wing. Once you have the hair measured for length, slip it down over the front of the hook. Try to keep the amount of hair even on both sides and the top and bottom of the hook.

  • 7. Hold the hair in place with one hand while you make two loose wraps of thread with the other hand. Be sure to keep the thread around the hook too, not in front of the hook.

  • 8. While holding the hair, make another wrap of thread and pull. The hair will start to flare.

  • 9. Make another wrap of thread and release the hair as you pull on the thread. The hair will start to spin around the hook and flare even more.

  • 10. Make one more wrap of thread and pull a little harder. You don't want to pull hard enough to cut the hair, but enough to make it flare fully. If you decided to do this without buying kevlar thread, your thread will probably break at this point.

  • 11. Pull the hair back with your hand while keeping tension on the thread. Work the thread through the hair to the hook eye and take a few wraps of thread around the hook just behind the hook eye as shown.

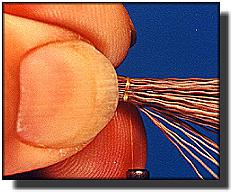
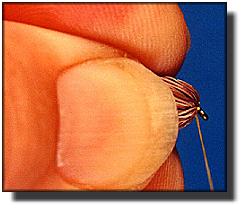
  • 12. Whip finish behind the hook eye. I like to use the Thompson style whip finisher here because it works so well in tight places. If you need a refresher on the use of this whip finisher, go back to part 6 in the archives for a view of the procedures.

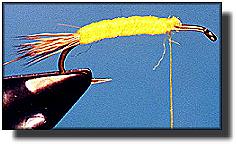
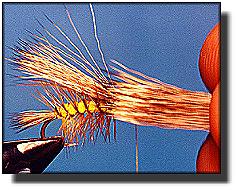
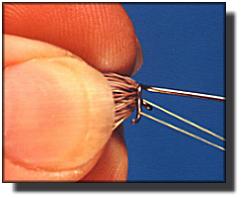
  • 13. Begin shaping the hair head with your scissors. Start by squaring it out, trimming the top, then the bottom, then the sides. Leave the hair a little long; you'll create the final shape with a razor blade next. Trim only the butt ends of the hair, leaving the tip ends to sweep back over the wing and front part of the body.

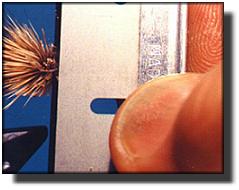
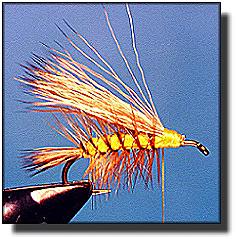
  • 14. When you have the head roughly shaped to the right proportions, use a razor to refine the proportions of the head to the right size and shape. Use a sharp razor for this task, but be careful you don't refine the shape of your fingers during the process. Razor shaping gives you a nice, smooth head that looks nice and tends to hold up better under stress than scissors shaping does.

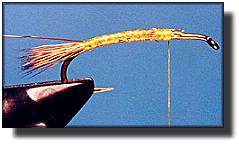
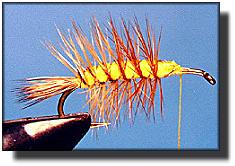
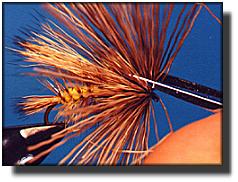
  • 15. When you've finished refining the shape of the hair head, your fly should look like this. Apply a liberal amount of head cement to the thread behind the hook eye and the base of the hair head. Let the cement soak into the hair thoroughly so the head won't loosen up with use.

    I also tie this pattern in colors to match stoneflies and crickets. For the cricket, I use a standard dry fly hook and dyed black hair. You'll find this pattern floats great and the hair head looks more natural to the fish than a hackle head does. Panfish addicts will enjoy the fast action Al's Cricket produces in their local lake, and fast water addicts will enjoy the floatation of Al's Stone.

    If your first flies don't look as nice as you'd like, don't throw them away, just practice a little more. For some reason, the fish don't mind flies that don't look perfect nearly as much as us fishermen do. Keep your first attempts at this fly and fish them. If you're like me, you'll probably lose them to the grass or brush anyway, and if not, the fish usually won't care. After all, pretty flies are for fishermen, but this fly is for the fish.

    Until next week my friends, practice and have fun. See ya next week - Remember, I'm always happy to answer your questions, feel free to email me. ~ Al Campbell

    Fly Tying Archives