
| Previous Flies |
| Fly Tying Terms |
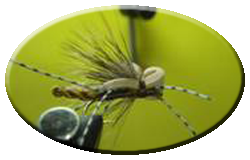
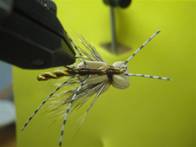
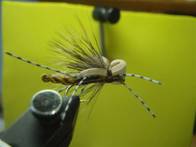
FEB (Furled Extended Body) Hopper
This fly evolved from the JC Salmonfly and LF Golden Stone dry flies that are based on a furled extended body incorporating the tails. Those flies proved quite successful on a number of well known rivers in SE Idaho and Western Montana this past summer during the salmon fly and golden stone hatches, so I decided to scale down to an early summer hopper size and give it a go. While the flies fished to date have been sizes 12 and 10, the pattern should size up to an 8 or 6 with no problem.
The FEB Hopper has proven itself over the past month on so for browns, bows, brookies and cutts on half a dozen Idaho and Montana rivers and streams. The trout have routinely hit this hopper with gusto, and even when they decide to refuse it, they get quite close before turning away. This is a relatively simple fly to tie, it is very effective, and it is durable. Once you develop your own approach to tying it, and you fish it, you will very much enjoy it.
Before getting to the materials and tying sequence, I would like to give credit to Tom Banyas, one of our outstanding SE Idaho fly tiers, for introducing me to the furled antron extended body technique several years ago, and to the FAOL BB's "Ducksterman" who inspired me to try the "off the hook" method of furling extended bodies last summer. This is actually the fifth or sixth f.e.b. pattern that I have developed. They have all fished successfully. Once you try the technique, you will undoubtedly find other applications for it.
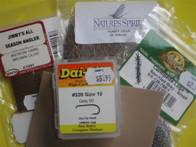
Materials
Method
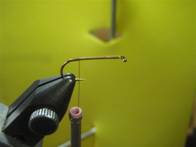
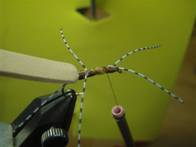
Wrap a thread base to bend of hook and back to point just above barb.
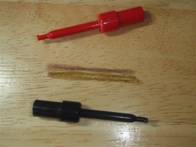
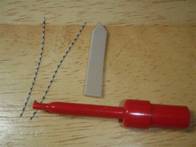
Furl strands of antron yarn. For the size 12, I use two strands. For the size 10, three strands. For larger hoppers, you might want to go up to four strands. (The more strands of yarn you use, the harder it is to get a tight furl. Think “less is more.”) Mix and match the colors of antron yarn to get the effect you want. Electrician’s clips make great furling tools. Twist the electrician’s clips in opposite directions five or six turns. When the antron wants to furl, hold both clips in one hand and pull on the center of the twisted antron releasing the tension on it at the same time.
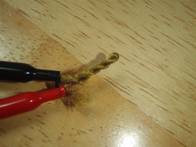
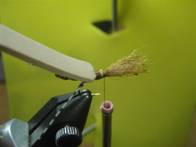
Remove the f.e.b. from the clips and twist in the direction it furled. Tie in the furled antron extended body at the point just over the barb. Make the f.e.b. as long or short as appropriate for the size hopper you are tying. I like to take several wraps over the f.e.b. forward of the tie in point, then a couple wraps in front of the f.e.b. and then a few more back toward the tie in point to make sure it is secured to the shank.
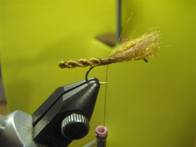
Tie in the rear legs. I like to loop the legging material around the tying thread then wrap the thread over the top of the hook shank. When the legs are in place on top of the shank take a couple more wraps to secure them. Then spread them down and to the sides and wrap toward the back of the hook to place and flare them. Trim to desired length. I go about two times the f.e.b. length.
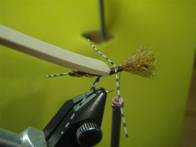
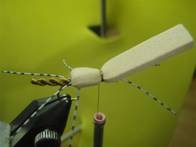
Cut a foam strip wide enough for the size hopper you are tying and long enough to easily handle it during the tying sequence. Trim the tie in end to a shallow “V”. Tie in the foam strip.
Wrap the tying thread forward ahead of the tie in point for the middle legs. I like to build up the body with a number of layers of tying thread before tying in the middle legs. Use the same method for the middle legs as for the rear legs. Trim to desired length. I make the middle legs about two thirds as long as the rear legs.
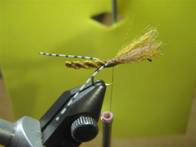
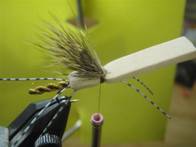
Wrap the tying thread forward to a couple hook eye widths behind the eye of the hook. Pull the tag ends of the furled antron strands forward and tie down. Trim the excess antron material.
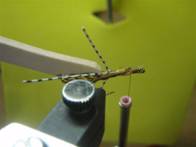
Tie in the front legs using the same method described above, but pulling them forward out beyond the eye of the hook. Trim them to length, about one third the length of the rear legs.
Wrap the tying thread back to about midway between the middle and front legs. This will pretty well ensure that you do not crowd the eye of the hook during the remaining steps. Bring the foam strip forward and tie it securely. I like to use the technique of a number of wraps over the foam, then a couple in front of it, then a few more over it and then a couple more in front of it, and finally a couple more at the tie in point.
Cut, comb out, stack and trim a bundle of deer or elk hair for the wing. The wing should extend beyond the bend of the hook. It should flare some when you tie it in. Tie it in at the tie in point for the foam strip. Wrap through the ends of the hair a good number of times to ensure it stays in place. I like to apply a healthy amount of fly tying cement to the place where the deer hair is tied in.
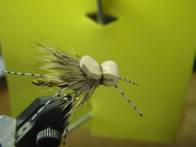
Form a bullet head with the foam strip, pull it back over the hair tie in point, and tie it down. Again, I like to use the technique of several wraps over the foam, a couple wraps in front of it (being careful to not alter the tie in of the front legs), a few more over the foam then a couple more in front of it and a couple on top of it before completing the tie in with a whip finish.

After whip finishing, trim the tag end of the foam to desired length and shape. Apply a liberal amount of head cement to the final tie in point, both on top and underneath the hopper.
Fly of the week Archives
For more great flies, check out: Beginning Fly Tying, Intermediate Fly Tying and Advanced Fly Tying.
[ HOME ]
[ Search ] [ Contact FAOL ] [ Media Kit ]