For those of you who haven't yet tried dyeing your own
materials, you're missing a wonderful aspect of fly tying.
Granted, it's not an everyday activity, but once or twice a
year I need some special shade or color of material that the
tying suppliers just don't have. It also provides a great feeling
of satisfaction. It's fun and it's simple to do.
I'm not writing this article to be a comprehensive piece on dyeing,
but rather to get the beginner interested in trying it for the first time.
For the experienced dyer I'm offering a new technique and a short
cut that I think you'll find valuable.
I'm going to discuss two different types of dyeing in this article;
Kool-Aid dyeing and Rit dyeing. There are many other
commercial and non-commercial dyes available, but for the
sake of brevity that's all we'll be discussing.
 Kool-Aid Dyeing: I know that sounds funny, but it not only
really works, it's inexpensive, fun and much safer to use then some of
the commercial dyes. The only problem I've encountered with Kool-Aid
dyeing is that when you are trying to mix different colors to achieve a
certain shade or color, Kool-Aid doesn't always follow the color wheel
rules that we're use to so be sure that you experiment before you start
using expensive necks. Actually you can use any of the drink powders.
I've tried several and have had reasonably good luck with all of them.
I must also admit that I've never used the pre-sweetened ones. I stick
with the unsweetened mixes, so I can't comment on how the others will
work. When using Kool-Aid, my formula is one package (6.2 grams)
per one cup of water.
Kool-Aid Dyeing: I know that sounds funny, but it not only
really works, it's inexpensive, fun and much safer to use then some of
the commercial dyes. The only problem I've encountered with Kool-Aid
dyeing is that when you are trying to mix different colors to achieve a
certain shade or color, Kool-Aid doesn't always follow the color wheel
rules that we're use to so be sure that you experiment before you start
using expensive necks. Actually you can use any of the drink powders.
I've tried several and have had reasonably good luck with all of them.
I must also admit that I've never used the pre-sweetened ones. I stick
with the unsweetened mixes, so I can't comment on how the others will
work. When using Kool-Aid, my formula is one package (6.2 grams)
per one cup of water.
 Rit Dyeing: For those who dye on a regular basis this is an
old friend. For those of you who are new to the dyeing experience
you'll find this a very predictable and dependable product. One word
of caution, this is a commercial dye and it will do it's job. Please be
careful if you're a first timer --- this product will dye most everything it
touches. I use only glass or enamel pans when working with Rit. When
mixing colors (shades) you'll find that Rit follows the color rules very well.
You can even go on line at: www.ritdye.com and find a color mixing chart.
When using Rit dye, my formula is frac14; teaspoon per one quart of water.
Rit Dyeing: For those who dye on a regular basis this is an
old friend. For those of you who are new to the dyeing experience
you'll find this a very predictable and dependable product. One word
of caution, this is a commercial dye and it will do it's job. Please be
careful if you're a first timer --- this product will dye most everything it
touches. I use only glass or enamel pans when working with Rit. When
mixing colors (shades) you'll find that Rit follows the color rules very well.
You can even go on line at: www.ritdye.com and find a color mixing chart.
When using Rit dye, my formula is frac14; teaspoon per one quart of water.
Let's start the dyeing experience. You will be using the very same
technique for both dyes. The only difference will be the mixing of
the dyes with the proper amount of water (see above formulas).
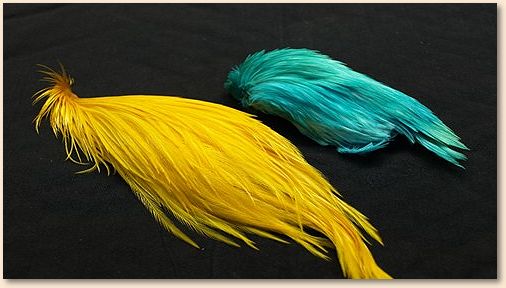
I need a special shade of light blue for a series of dry flies that I'm
in the process of developing. I do not anticipate tying many since
they're nothing but an experiment. So I have decided to use an Indian
Neck and 'Ice Blue Raspberry Lemonade' Kool-Aid.
I also need a bright yellow general purpose dry fly hackle. I use
a moderate amount of this so I've decided to use ½ of a grade
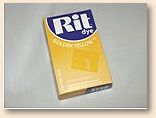
#1 neck and 'Golden Yellow' Rit dye.
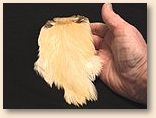 Before we proceed any further let's talk about dyeing hackle in
general. Each process that you place fur and feathers through
places a strain on the material. So rather then to bleach out my
hackle I choose to use either cream or white. Quality hackle is
expensive. So if you only require small amounts of a particular
hackle, I prefer an Indian Neck. (shown at left.)
Before we proceed any further let's talk about dyeing hackle in
general. Each process that you place fur and feathers through
places a strain on the material. So rather then to bleach out my
hackle I choose to use either cream or white. Quality hackle is
expensive. So if you only require small amounts of a particular
hackle, I prefer an Indian Neck. (shown at left.)
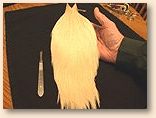 For hackle that I require large quantities of I'll use a half or whole
neck. Once again I stay with white or cream and let your wallet
dictate what quality to use. In this case I have chosen to use half
of the neck. A simple procedure is all that's needed. Turn the
neck over and cut down the middle with a scalpel or razor blade.
(Also shown at the left.)
For hackle that I require large quantities of I'll use a half or whole
neck. Once again I stay with white or cream and let your wallet
dictate what quality to use. In this case I have chosen to use half
of the neck. A simple procedure is all that's needed. Turn the
neck over and cut down the middle with a scalpel or razor blade.
(Also shown at the left.)
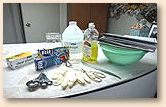 Step #1 Gather all the tools and equipment you'll need. Mason jars
or glass or enamel pots and pans, tongs, measuring spoons, dyes,
dishwashing soap, vinegar, plastic wrap, stirring spoons, a colander
and some old newspapers.
Step #1 Gather all the tools and equipment you'll need. Mason jars
or glass or enamel pots and pans, tongs, measuring spoons, dyes,
dishwashing soap, vinegar, plastic wrap, stirring spoons, a colander
and some old newspapers.
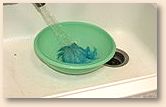
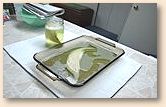 Step #2 Any materials to be dyed must be soaked in a soapy
warm water. This allows the material to be softened, to better
absorb the dye and it also serves to remove any dirt and/or grease
from the material. Do not skip this stage --- or you're asking for
disaster! I use about 2 tablespoons of dishwashing soap per quart
of water. Let the material soak for about 2 hours.
Step #2 Any materials to be dyed must be soaked in a soapy
warm water. This allows the material to be softened, to better
absorb the dye and it also serves to remove any dirt and/or grease
from the material. Do not skip this stage --- or you're asking for
disaster! I use about 2 tablespoons of dishwashing soap per quart
of water. Let the material soak for about 2 hours.
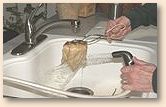 Step #3 Remove the neck from the dish water solution and
rinse it well. All the soap must be removed. I'll usually let it
soak in clear water while I'm preparing my dye mixture.
Step #3 Remove the neck from the dish water solution and
rinse it well. All the soap must be removed. I'll usually let it
soak in clear water while I'm preparing my dye mixture.
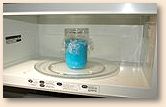 Step #4 Prepare your die mixture, add enough to a
mason jar (or container of your preference) to cover the material.
Cover with plastic wrap, secure with a rubber band. Using a
toothpick poke a hole in the plastic wrap. Microwave on high
for one minute. Remove from microwave, add one tablespoon
of vinegar and stir. Vinegar is used as a 'fixer' which burns the
color into the material and makes it 'color fast'.
Step #4 Prepare your die mixture, add enough to a
mason jar (or container of your preference) to cover the material.
Cover with plastic wrap, secure with a rubber band. Using a
toothpick poke a hole in the plastic wrap. Microwave on high
for one minute. Remove from microwave, add one tablespoon
of vinegar and stir. Vinegar is used as a 'fixer' which burns the
color into the material and makes it 'color fast'.
 Step #5 Now place the dry fly neck into the solution.
Replace the plastic wrap, place in the microwave for one minute
on high. Remove and rinse. If it is not the desired color, place
the neck back into the solution and nuke for another minute.
Repeat again for up to a total of four times. By the end of the
fourth time maximum color will have been absorbed.
Step #5 Now place the dry fly neck into the solution.
Replace the plastic wrap, place in the microwave for one minute
on high. Remove and rinse. If it is not the desired color, place
the neck back into the solution and nuke for another minute.
Repeat again for up to a total of four times. By the end of the
fourth time maximum color will have been absorbed.
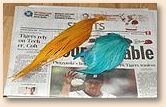 Step #6 Rinse one final time and place it on newspaper
to dry, remembering that when your necks are finally dried they
will be one shade lighter then it now appears. You can speed up
the process by using a hair dryer if you choose. The neck will still
take a couple of days to thoroughly dry.
Step #6 Rinse one final time and place it on newspaper
to dry, remembering that when your necks are finally dried they
will be one shade lighter then it now appears. You can speed up
the process by using a hair dryer if you choose. The neck will still
take a couple of days to thoroughly dry.
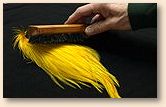 Step #7 When the necks are finally dry I brush them out
gently with an old hair brush that I have reserved just for that purpose.
Step #7 When the necks are finally dry I brush them out
gently with an old hair brush that I have reserved just for that purpose.
Experimentation with different materials and dyes will provide you
with many hours of pleasurable fun and adventure. You'll be proud
of your finished product.