Wet Flies

Maxwell's Purple Matuku

Lesson 6 - Wet Flies
Tying Maxwell's Purple Matuku (Matuka)u
Tied by Ronn Lucas, Sr.

Before we start this pattern, I'd like to point out that to the best of my knowledge, the term "Matuka" is not the correct one. Some time ago, a friend from New Zealand told me that the term originated there and was inspired by a local fish called the Matuku. I will leave it to the reader to determine which to use.

This brings up a point that not many realize. Often a name or term will be used that is not what the originator intended but, once popularized, it is near impossible to correct. The feather known as a filoplume is another example of a wrongly named feather. What has become known as the filoplume is actually the aftershaft feather and is located at the base of many feathers. It looks similar to a small marabou feather. The filoplume feather is an entirely different feather that is distributed throughout the bird's body among other feathers. It is a hair-like feather with only a shaft and small tuft of about six tiny barbs at the tip. It is generally almost clear and is easy to miss. I doubt that this mistake will be corrected though since the feather that we use (the aftershaft feather) has become known as filoplume.

There are other examples in tying that we will never know. For another example, I have had some of my patterns in books and magazines and the names of some were changed! Is all this a big deal? I guess not but, for me at least, I now question what I read.

Let's get to tying.

Maxwell's Purple Matuku (Matuka)
Tied by Ronn Lucas, Sr.

    Hook: Partridge Bartleet CS10/1.

    Thread: Black.

    Tag: Flat silver tinsel.

    Body: Black Iridescent Dubbing, original calls for black Seal or substitute.

    Rib: Silver oval UNI-Tinsel.

    Wing: Two broad purple hackles tied matuku/a style.

    Collar: Purple hackle.

    Head: Black, Original calls for gray.

    1. Taper the flat tinsel tag. Flat mylar tinsel can be cut at an angle to provide a small tie in area and that works well enough. There is another method for achieving much the same thing. Pinch the flat mylar tinsel with the thumbs and index fingers held together close as you can get them. Stretch and break the mylar. This will give you a tiny tapered bit of tinsel to tie in as shown. The further away your fingers are, the longer the tapered end will be.

    2. Apply the tinsel tag.

    3. Tie in the rib at about 5:30. Since we are doing a dubbing body, you can trim the waste.

    4. Dub the body ending well behind the eye.

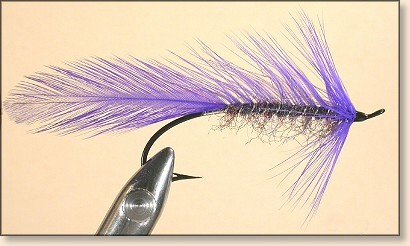
    5. Select two matching hackles either from the middle of a cape or, one from each side. Place the feathers concave sides together and strip the bottom of them for the area that will be resting on the body as shown. Cut the feathers to length and cut the barbs at the tie in area. This helps with the tie in. Tie in the wings well behind the eye as shown.

    6. Wrap the rib through the wings as shown. Use a bodkin to move the barbs apart when you put each turn of the rib down. Cut the waste end of the rib.

    7. Fold a hackle and tie in by it's tip as shown.

    8. Take three to five turns of hackle while pulling each turn back. A folded hackle will usually lay with the barbs facing rearward. Tie off the hackle with two turns and cut waste end.

    9. Apply head and finish the fly.


As always, I am happy to answer any questions you might have about these patterns. You can reach me at rlucas@cybcon.com or 503-654-0466.

Also, I will be happy to accept any flies you would like to tie and send to me for inclusion in this series. I will need the fly, it's recipe, any pattern info and, a short personal bio. I will try to include every fly we get in the appropriate section. The only limitation is that the patterns used must be for Salmon and/or Steelhead. This includes the display flies too.

Happy Trails! ~ Ronn Lucas, Sr.

Back to Index