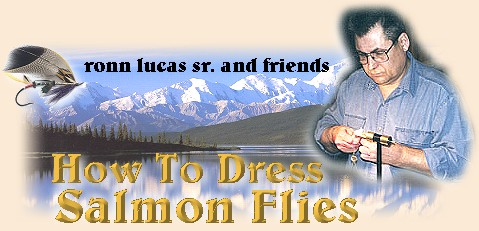
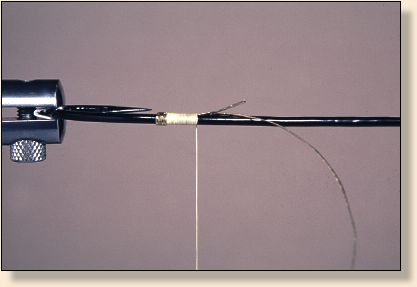
1.Attach the thread at the tag location with two flat
turns of thread.
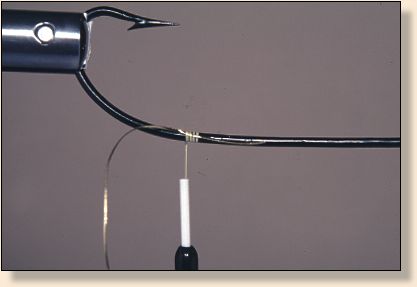
2.Secure the tinsel to the rear side of the hook with two
close turns of thread and, one back to the start and two
or three more.
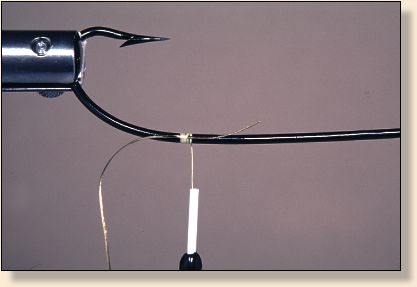
3.Wrap the number of turns of tinsel and, take a turn or
two to secure the end of the tinsel under the first end
on the rear of the hook. Do not cut the tag ends of the
tinsel at this point.
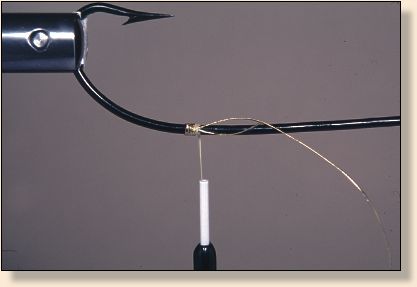
4.Advance flat wraps of thread forward, side by side as
shown, to the start of the floss while binding the tinsel
to the rear of the hook.
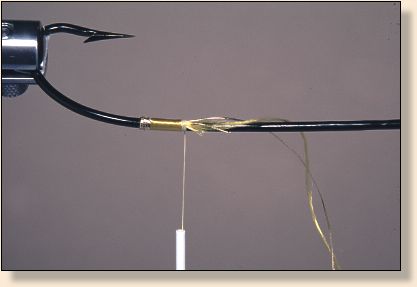
5.Tie in the floss on the rear of the hook, untwist the
floss and wrap back in flat turns to the tinsel and back
to the starting point. Tie off at the rear of the hook
below the tie in area. Do not cut the waste ends yet. At
this point, you can tie in the tail and/or tag veilings
and the butt before cutting the waste ends of all of these
components. I like the single strand UNI-Floss for most of
my tying. It is strong and bright. If you choose to use a
multi strand floss, just use one of the strands. If you use
more than one strand, you will likely have lumpy results.
NOTE:
Floss can be difficult to use for a variety
of reasons, not the least of which is how it tends to flair
out when it is being applied. When the floss has been tied in,
flatten it by untwisting as shown and, while maintaining
constant tension, stroke the floss to align all the filaments
all the way to the other end (you have sanded your thumb and
index fingers and washed your hands by now haven't you!).
The further away from the hook while you wrap the floss,
the more it will try to splay out. So, holding the floss
as close as conveniently possible, take a turn or two. As
soon, or if a filament goes out of place such as making a
small bump or loop, again stroke the filaments to the other
end. You want to keep the filaments parallel at all times.
Again, do not let up the tension. If you do, the floss will
become a nightmare and, unusable at worst. When you get to the
butt or the area where you change directions or want to end
the floss, make sure you do not build up any extra bulk with
extra or unneeded turns. Do not wrap the floss too loose or,
too tight. Only practice will help you learn what these
parameters are. If you are tying on a in line rotary vise, get
used to applying floss with the rotary function of the vise.
Floss is tough to do well so, practice it and don't let yourself
be frustrated. Remember what works and repeat that. Remember
what doesn't work and don't repeat that. Keep focused during
your tying and, you will be fine.
IMPORTANT NOTE:
Every uneven area under floss will show up like a neon light!
Great care should be taken to make sure the "bed" is flat and
smooth so the floss will be flat and smooth too. Experienced
Tyers look at the floss and ribbing first and whether these
are done with care, will influence the opinion of the overall
quality of the fly. Does this mean anything or, should it be
a concern of yours? Only you can determine that. Does it mean
someone else's work is better than someone another's just
because the floss is smooth or the ribbing is even? That's
really subjective and in my mind, if the Tyer is happy with
his/her work, that's all that really matters. If we are tying
for fishing only, none of this would really matter at all. The
fact is that we don't just tie to fish so, we tie to the standards
we set for ourselves. Just tie to the best of your abilities
and enjoy the process.
-
Happy Trails! Ronn Lucas, Sr. ~ rlucas@cybcon.com