Lesson 7 - Demon Rangeley Style
Streamers is a term applied to a great many different
styles of flies. Since it is loosely applied, we will
cover a couple styles first and return to this lesson
in the future to add new types of streamers.
The first type I will introduce you to is the Rangeley style
which was popularized by Carrie Stevens and is a distinctive
and very elegant looking pattern. They are typically tied
with four or six full feathers for wings although; some are
tied with bucktail too. These flies were designed to look
like bait fish. One wonders why a fish would mistake some
of the flies for food which often times use very bright,
bold colors. Ours is not to question why though. If they do,
that's enough for me.
These flies in smaller sizes can often be cast but, many,
if not most are trolled. However they are fished, they are
effective and worth consideration for our fly boxes.
I have found that the most difficult part of tying the
Rangeley style streamers is finding the right feathers for
the wings. Otherwise, tying these Streamers is fairly
straightforward and not too difficult. Some of the
techniques are the same with slight modifications as
techniques used in tying the full dressed Atlantic
Salmon Flies. Ribbing, full feather wings, floss, the
use of shoulders, cheeks and tinsel tags are all similar
to the Atlantics.
The typical feathers used in the Rangeley style flies are
either saddle or neck hackles. The problem with the modern
so called genetic hackles is that the feathers have an
entirely different shape than the feathers Carrie used.
The old feathers were somewhat shorter and had rounded tips.
The modern hackles have long slender feathers that tend to
be very pointed on their tips. Also, the modern saddle hackles
have very fine shafts which can be problematic when using
them for these flies. I will describe the selection process
for these feathers a little later.

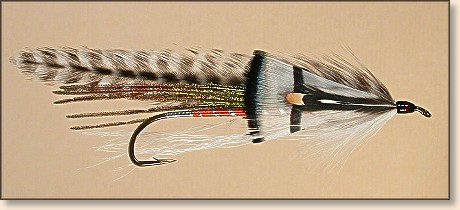
Rapid River tied by Carrie Stevens
There are two fairly new books that detail Carrie Stevens'
life and flies that are worth adding to your library if you
have an interest in streamers, Forgotten Flies,
published by The Complete Sportsman that is not only a work of art, it
is a treasure trove of patterns and recipes not only of the
Carrie Steven and her works but literally hundreds of other
contemporary and older streamers. The book also covers other
styles of flies which I am sure we will highlight at more
length later in this series. This book is a must have for
Tyers of Salmon and Steelhead flies. Heck, it is a must have
just about anyone interested in flies.
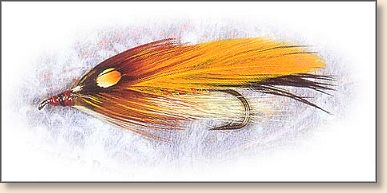
Roosters Regret tied by Carrie Stevens
The other book is titled Carrie Stevens, Maker of Rangeley
Favorite Trout and Salmon Flies by Graydon Hilyard and
his son, Leslie Hilyard, published by Stackpole Books. This book
has a little more on the life of Carrie Stevens than
Forgotten Flies but, either book in your
library will give you a very good grasp of Carrie and her flies.
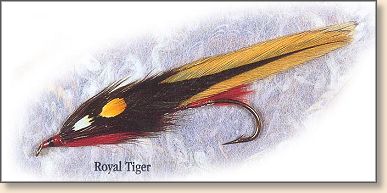
Royal Tiger tied by Carrie Stevens
It is interesting to note some perhaps not so minor
disagreements regarding a couple of Carrie's patterns
with one in particular being significant at least in
my view. It centers on two patterns, the Demon and the
Golden Witch Special. Forgotten Flies has
the recipe for the Demon as follows:
Demon
Tag: Flat silver tinsel.
Body: Orange silk.
Rib: Flat silver tinsel.
Throat: White bucktail (equal to length of the wing)
under which is a bunch of grizzly hackle fibers.
Wing: Six to eight strands of bronze Peacock herl
over which are four grizzly hackles.
Shoulder: Silver Pheasant body feather 1/3 the length
of the wing.
Cheeks: Jungle Cock.
Head: Black with red center band.
Source: Carrie Stevens' personal notes; private collection.
Hillyard has the Demon as follows:
Demon
Tag: Flat silver tinsel.
Body: Orange floss.
Rib: Flat silver tinsel.
Underbelly: White bucktail.
Throat: White hackle fibers.
Wing: Four to six strands of Peacock herl;
four natural grizzly hackles.
Shoulder: A Lady Amherst Pheasant tippet feather.
Cheeks: Jungle Cock.
Head: Black with orange band.
The major difference here is of course the shoulder and
throat hackle fibers color. In fact, the recipe given in
the Hilyard book is for the pattern listed in Forgotten
Flies as the Golden Witch Special. The Golden Witch
Special is not even listed in the Hilyard book.
To be honest, I chose to do the Demon as shown in Forgotten
Flies as our demonstration pattern before I got a copy of
the Hilyard book. The fly and step photos were "in the can" as
the saying goes. When I noticed this potential problem, I
contacted a few friends who have more experience in the
Rangeley style flies and asked them for some answers. There
was no clear consensus on resolving the difference in the
two books by any of them.
I also contacted Paul Schmookler, the co-author of Forgotten
Flies to see if he could shed some light on the subject.
Paul sent me a note explaining his showing the Demon and Golden
Witch Special as he did in Forgotten Flies.
Paul writes:
"The Demon, the Golden Witch and the Golden Witch Special
are three distinctly different flies, all designed by Carrie
Stevens. The Demon is a well-known pattern that has been
published many times and differs from the two GW patterns
by its cheek (silver pheasant), our dressing was verified
in the notes of the angling historian, Austin Hogan, that
are in the American Museum of Fly Fishing. There are two
Golden Witch Special flies photographed (tied with Lady
Amherst cheeks, pictured on the gatefold page 331 of FF)
that come from a private collection currently owned by
Don Palmer of the Rangeley Region Museum, formerly owned by
Marty Keane. (note: I saw these before Palmer purchased the
collection from Keane) They came in an original package,
labeled by Carrie Stevens personally...The original Golden Witch,
tied with a golden pheasant cheek, packaged in an original
celophane envelope and labeled by Carrie Stevens, is from
my own collection. Furthermore, we have over 100 additional
patterns tied by Carrie Stevens (some of which were shown on
pp 536-537 of FF), many of which share similar repetitive
characteristics to dozens of other original patterns. These
flies come from the oldest known personal collection of
Carrie Stevens and are unknown and unnamed...
I hope this has been of some help. Paul"
I then contacted Graydon Hilyard, author of the other book to
ask him for his input into this discussion. His explanation of
his rationale for crediting and attributing a pattern to the
known list of Carrie's patterns was more convincing to me so,
I will credit his listing for the Demon as the correct one.
I will leave your choice to you however. His rationale for
authenticating a Carrie Stevens fly is in his book for those
who are interested.
There are a few other differences in some of the patterns but,
they appear to be minor in comparison to the Demon and Golden
Witch Special.
In reading the Stevens chapter in Forgotten Flies,
I found several things of interest that I think you might also
find interesting. Carrie tied her early flies in a more
traditional method than she did when her tying business
grew. When she began, she mounted the wings, shoulders
and cheeks without glue. That is, like the classic Atlantic
Salmon flies were tied. At least, as the classics were tied
by most Tyers. I am sure that then, as now, there was more
glue used than will be admitted to. Later, she used cement
to stick the feathers of each side together and tied them
on as a unit. Some say that the reason she developed the
glued wings was for the action of the finished fly and
thers that this method made it easier for her production
tying. There are many current Tyers and authors who use this
method for tying the Rangeley style streamers. I would like
you to get use to tying these flies sans glue if at all
possible. This is how I will tie them in the lessons and
is how I tie them for my personal use or framing. We may
find some instance when a dab of adhesive will tame an
unruly part into submission and, we will do what we must.
My point is that I would like you to become as proficient
at tying your flies without glue as is possible. When you
have a problem mounting a part, keep at it until you either
succeed without glue or, become so despondent that suicide
seems a reasonable solution. In the case of the later,
glue is preferable! Believe me when I say that these flies
will be relatively easy to master.
Another interesting item in the Forgotten Flies
book was that in Carrie's later years, her eyesight was failing
which is not uncommon to many of us as we age, myself included.
Her late flies were apparently prone to coming apart. At least,
the wings could come undone. When we look at the construction
of these flies, we can see that the wing attachment is a
relatively small area and, if care is not exercised there
will be little to hold them on. I will address this in the
lesson in more detail. The bucktail that is often used is
another potential weak spot and deserves close attention too,
which we will do.
Whenever a group of Tyers assemble to discuss and tie historical
patterns, there will be disagreement either to dressings, methods
or, both. Such is the case regarding the Stevens' patterns and
techniques. There is a school that adheres to the practice of
tying the wings on the side of the flies almost to the exclusion
of any other method. History shows that Carrie herself changed
the way she tied her patterns as time progressed. While I don't
have a problem with tying streamers either way, I generally
prefer the top mounted wings mostly because the fly shows all
of the parts whereas the side mounted wings cover most of them
up. Rational arguments can be made for both camps as is also
the case with the argument for and against gluing the wings
together. Since I am neither a historian nor the keeper of
truth, I will let the individual decide which method suits
him/her best.
For those readers/Tyers who want more of the historical
information on this subject, I strongly suggest reading
both of these books and other writings about Carrie Stevens
and her flies so that you can better understand this somewhat
controversial subject.
With all of this in mind, I will present the Demon as our
tying example for the Rangeley style streamers.
This pattern will highlight the use of the various materials
and parts need to tie the majority of these streamers. While
the hackles used for the wings are fairly specialized, the
feathers and materials for the rest of the flies can be
almost anything you have. A huge number of feathers are
useful for shoulders, Peacock herl is in just about every
Tyer's kit and tinsel and yarn is too. Many of the flies
used silk floss for the bodies but feel free to substitute.
In fact, I find UNI-Stretch and similar materials preferable
to silk or even rayon floss on the long bodied flies. It
is easier to use, is stronger and less susceptible to fraying.
I use a material similar to UNI-Stretch that is called Woolley
Nylon and it can be found in fabric stores on large spools
for not much money. I also tend to prefer the flat UNI-Tinsel
to some of the others because it is much thicker so, it is
stronger. Being thicker and stronger, it allows you to wrap
the tinsel tighter which will keep it in place better. The
added thickness of the flat UNI-Tinsel will also stand up
to more abuse from fishes' teeth.
There is one feather that just has no substitute and of course,
I am referring to the venerable Jungle Cock (Grey Junglefowl
Gallus sonnerati). These feathers have been
used to simulate eyes on flies since the early explorers
first sent specimens back from "new" lands in Asia. Jungle
Cock has always been scarce and expensive and finding
feathers in unsplit condition was sometimes not easy to
do. We now have Jungle Cock in pretty good supply in several
grades yet, it is still on the spendy side. For flies that
are to be fished, lower grade necks may be more appropriate
while the display flies demand the highest grade possible.
The good news is that there are other feathers that can
simulate eyes although they don't look anything like the JC.
I gave some ideas along these lines in the "Cheap Atlantics"
lesson. You can also repair split JC nails with a dab of hot
glue on the back side of the nail.
You folks who use Jungle Cock feathers on your flies have lamented the cost
as relates to un-split nails per neck and the cost of each as well. Since it
is rare to find a neck with near 100% un-splits, when one is found, the cost
is high. So we buy necks with a number of damaged feathers that increases as
the grade goes down. The options for those damaged feathers were limited to
"fishing" flies or gluing. Like you, I tried any manner of head cement,
super glue and recently, hot glue. The head cements and super glues tend to
soak through the feather and it's not difficult to tell if these methods
have been used on a fly. The hot glue is different. If you heat a flattened
and pointed piece of wire just hot enough to pick up some glue and, transfer
this to the back of the "eye" part of the feather, you can almost not detect
a repaired feather. The important preparation is to align the feather barbs
and the "eyed" section and pinching the tip of the feather to keep it
aligned while applying the glue.
Using this method will make almost every feather on even the lowest grade
neck usable at the least great fishing flies and display flies as well.
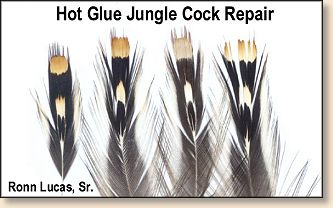
Here is an unretouched picture of four feathers. The one on
the far left is a natural un-split feather; the one on the
far right is how the two in the center started out. The two
in the middle show the good side (left) and back (right) for a
comparison. The three tricks (that aren't hard, just important)
is to align the fibers so that all of the barbs are touching
in the "eye" area and hold them until the hot glue hardens.
The other point is the instrument to use on them. You can
either use a piece if wire that has one end flattened and
somewhat sharpened to a point. I use a Dental tool and, you
may be able to get a used one from a Dentist. The third and,
maybe most important trick is to get the glue just hot enough
to transfer some onto the wire and, then to
the back of the feather. Use a lighter to heat the glue.
If the glue is too hot, it will flow through the feather
to the good side.
If you are tying a fly for display, you might consider using
a good, unsplit nail on the front of the fly and a repaired
one on the far side. Since the fly will be in a frame, the far
side won't show.
As I said earlier, finding the right feathers for these streamers
can be somewhat difficult. I use feathers from Conranch Hackles
in Washington State for much of my general tying because their
skins are so good and the price is reasonable. I have found
some suitable feathers on their necks for these streamers.
You buy direct and I have listed them in the
Suppliers Section
of this series. Tell Denny Conrad what you are looking for
and he will try to select what you need.
His grizzly necks and saddles are some of the very best I
have seen with bright white and dark blacks.
Some of the Chinese necks and saddles can have some good
feathers. I haven't found that the upper end of the so called
genetic necks and saddles of the major brands today to be too
useful for these flies. I have some early Hoffman necks that
are good but of course, these are no longer available. Whiting
Farms is supposed to have some feathers suitable for these
streamers but, I have not used them so, cannot comment on them.
The genetic saddles that I have seen are just not suited to
these flies.
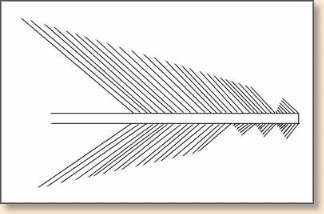
The feathers used for streamer wings should generally have
a fairly wide base with barbs in that area that are more
perpendicular than lying at a close angle to the shaft.
This will help keep and define the head area of the
streamer when in the water. The barbs should be fairly
long with medium web and have round tips. Keep in mind
that these flies are supposed to resemble forage fish.
Once you have found a neck or saddle that has feathers of
the right shape and make up, you need to pluck "matching"
feathers for your wings. By that I mean one feather from
the exact location of the other on the opposite side.
Feathers have a "spine" that is formed as the feathers
grow much like branches on a tree. The feathers, like
the branches droop on the sides. If you try to bend a
branch or feather the opposite direction of the normal
droop, it will be difficult since the structure itself
has its cell structure arranged to give strength in the
drooping attitude. What does this mean to a streamer's
wing? Take your matched pair of feathers and put them
together with the concave (under side) sides together.
Now, hold them in one hand with the feathers barbs
vertically and the shafts horizontally. Notice how much
the feathers droop and then turn the feathers the opposite
direction and compare that to the first. One attitude
should droop less than the other unless they come from
the center of the skin. It is this attitude that you want
when setting the wings.
I find it helpful to select the two or three feathers for
each side of the wing from next to each other on the neck
or saddle. If you are using strung hackles for your wings,
you will need to go through a lot of them until you find
close enough matches to make your streamer wings.
One thing that we often strive to achieve in our other tying
is small neat heads. When tying the various streamers
(Rangeley style included), the accepted norm is large heads!
Sometimes the size of the head will be influenced by the
materials used in the fly in particular the use of bucktail.
Hair generally requires more turns of thread to secure than
feathers. This is mostly true of solid hair rather than
hollow hair. In either case though, very tight turns of
the tying thread are required to make a durable fly. I
will describe how this is done when we first use hair
for our streamers.
The first streamer pattern I will demonstrate is what
would be described as a combination streamer since it
uses both the full feather wing and bucktail.
Demon by Carrie Stevens - tied by Ronn Lucas, Sr.
Hook: Very long shank such as the Heritage Allcock
Streamer hook or, as in this case, the Partridge CS15, Carrie
Stevens 10XL H/W Streamer
Tag: Flat UNI-Tinsel.
Body: Orange UNI-Floss.
Rib: Flat UNI-Tinsel.
Throat: White bucktail over which is a bunch
of grizzly hackle barbs.
Wing: Six to eight bronze Peacock herl over
which are four grizzly hackles.
Shoulder: Silver Pheasant feather 1/3 the wing length.
Cheeks: Jungle Cock.
Head: Black with a red stripe, Finish the head and
attach the red thread and make one whip finish prior to
applying clear head cement.
Note: The use of a black head with a red stripe in the
middle is a Carrie Stevens trade mark. This was the usual
color scheme but she did use a couple others on a few of
her patterns.
Instructions: Demon
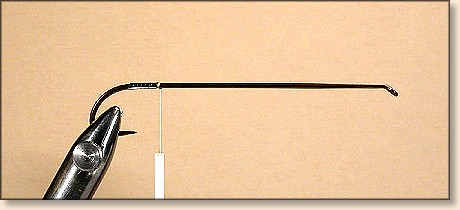
1. Use white tying thread until the body is complete, then
change to black. Apply the tag.
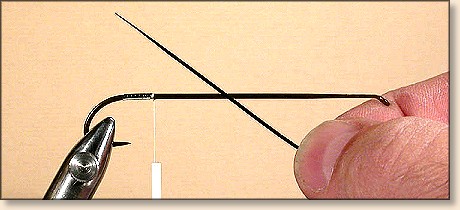
2. I like to taper the first couple of turns of the flat
tinsel just for the way it looks. I began to do this to
my ribbing after seeing the masterful work of Marcelo
Morales in Forgotten Flies.
3. Attach the rib and advance the thread in flat, close
turns to the floss tie in area.
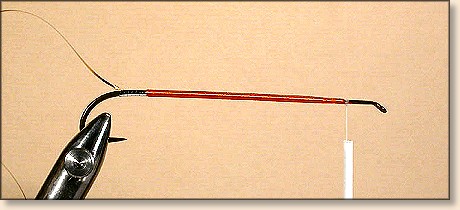
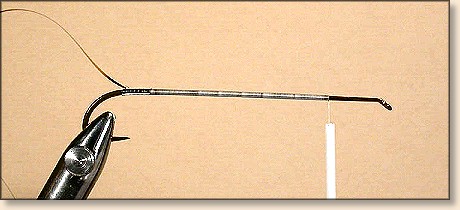
4. Attach the floss somewhat behind of where you want
the body to end. This will give you a tapered area at
the wing tie in area so there isn't a bump to kick the
wing up. With a body not using an underbody to build bulk,
this isn't quite as important but, it is a good habit to
get into. Apply the floss body and tie off & trim the waste.

5. Apply the rib in even turns. There really isn't any set
norm for the number of turns on these flies so, use the number
that pleases your eye. I tend to go with fairly close turns to
better simulate scales on a bait fish.

6. Select a fairly small bunch of bucktail or other white
hair. You do not want to use too much hair so that it won't
foul the gape. Also, use it slightly beyond the bend. The
selection of the hair is important. The hair at the base of
the tail is hollow like it's body hair counterpart. This hair
is not what you want to use for these flies since it will flair
when tied in and this is undesirable. The hair on about the top
2/3 is solid and does not flair. Select tails that have long,
straight hair in this area for best results.
In his book, Flies, pub. by Barnes & Company, J.
Edson Leonard describes the tie in method for buck tail as
follows:
"...Construct the body according to the description
for making the feather streamer and apply the kind of hackle
you prefer. Cement the windings and, while waiting for the
cement to become tacky, snip sufficient hair to make the wing."
In this case, the throat. "...from the tail. Coat the butts of
the hair with cement and place the hair over the body after
gauging the exact location of the wing. Wind two or three loose
turns of thread over the base of the hair wing...Apply a little
more cement between the wing and body, and then draw the working
silk tight, while at the same time holding the wing between the
thumb and forefinger of the left hand. Wind the working silk
around the head until all spaces are closed..."
I do a little variation of this as follows: I stack the hair
and hold it against the fly with the tips extending slightly
beyond the bend of the hook. I then cut the butts of the hair
exactly at the tie in area so there will not be any need of
trimming waste later. I place a tiny drop of cement on the butts
which will "wick" into the hair at the tie in area. Hold the
hair with your thumb and forefinger VERY tight with the tips
of your fingers pressing the hair and body of the fly. Take
the three light turns Leonard described, pull tight and fill
the spaces with VERY tight turns all the while not releasing
the pressure of your fingers. This action will not allow the
hair to roll off the back side of the hook and it will be
exactly on top or on bottom of the fly depending on the
location you are working on. I don't bother with the second
application of cement that Leonard specified but, it certainly
couldn't hurt the durability of the fly if you choose to do so.
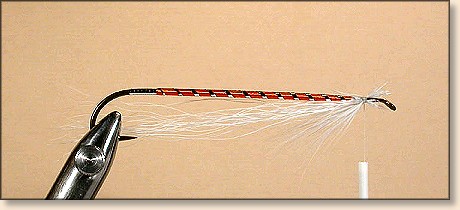
7. You can tie in the herl or the hackle barbs at this step.
I choose to tie the hackle barbs as shown. Tie in the hackle
barbs a little ahead of the tie in area for the bucktail. This
will prevent buildup in this area. Tie in the hackle barbs in
three bunches. This pic shows the bottom and far side tied in.
The sides should be tied in so they cover the tie in area of
the bucktail.
8. Hold the wing feathers up to see about how long they will
be so you can better judge how long the herl underwing should be.
9. Tie in the herl. I select the barbs and hold them together
so they are aligned and then cut them from the feather shaft.
Hold them in place while still aligned and tie in tightly as
the bucktail.

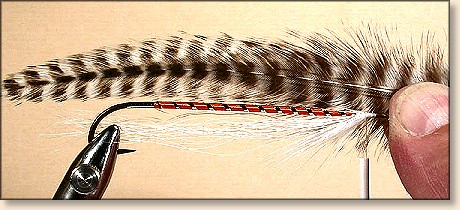
10. Hold the wing above the hook to determine the length.
This is another area where there is no clear rule. The
generally accepted norm is to have the feather wing extend
about 1/3 its length beyond the bend. This will usually keep
the wing from fouling the gape. Grasp the wing in the left
hand after you have it placed where you want it and cut all
four or six feathers at the same time. Then cut the barbs as
shown in the following illustration. Some Tyers strip the
barbs off but, I find that leaving them on top and bottom makes
a wing that is more stable and the barbs help secure the wing.

Here is a photo of the area that glue would be applied if
you were using the glued wing & shoulder method. I used black
paint to have the area show up better. Hot glue, fabric glue
or other thick adhesives work better than thin runny ones.
If you were going to apply glue to the shoulder as well as
the hackles, put glue only under the area that will be covered
by the JC eyes in case the glue runs through. I stripped off
the bases of the hackles for the photo but once glued, they
can be prepared like the cut barb and shaft method described.
 Put the cement on the top of the innermost feather and place
the next one straight down onto the feather and press lightly.
Set it aside to dry and do the same for the other wing. If
you are going to glue the shoulders and sides on, repeat
the process.
Put the cement on the top of the innermost feather and place
the next one straight down onto the feather and press lightly.
Set it aside to dry and do the same for the other wing. If
you are going to glue the shoulders and sides on, repeat
the process.
Be sure no hackle shafts are crossed when they are tied in.
Take the tying thread and make a couple turns through the cut
barbs while trying to trap the thread under as many as possible.
This will lock the wing in place much better than on a stripped
feather wing.
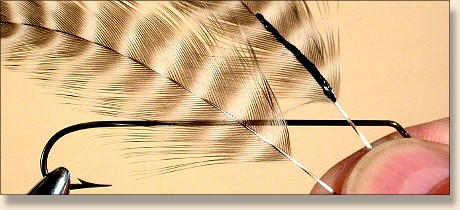
11. Select the feathers for the shoulders and trim them as
shown in the illustration below. Trimming the base of the
feather rather than stripping it will aid in setting the
feather in place and hold it better too. Tie in the feather
a little way up the untrimmed barbs as shown. Some feathers
work better than others with this method and it is generally
the feathers that have the most barbules and marrying
capabilities than weak barbed feathers which separate
when tied in. If you are using tippets for the shoulders,
you may have to flatten and/or twist the shaft so it lays
flat against the tie in area. Gluing the wings and shoulders
when using tippets can be easier.


12. Trim and tie in the cheek feathers the same way as the shoulders.
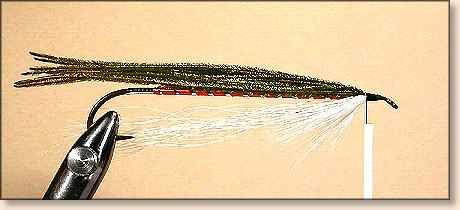
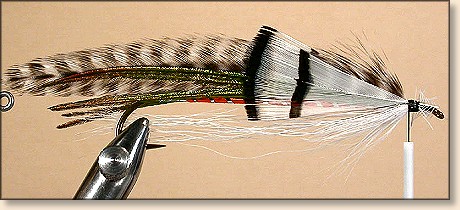
13. The finished fly.

Grey Ghost tied by Marcelo Morales
As always, I am happy to answer any questions you might have
about these patterns. You can reach me at
rlucas@cybcon.com or 503-654-0466.
Also, I will be happy to accept any flies you would like to tie
and send to me for inclusion in this series. I will need the
fly, it's recipe, any pattern info and, a short personal bio.
I will try to include every fly we get in the appropriate
section. The only limitation is that the patterns used must
be for Salmon and/or Steelhead. This includes the display
flies too.
Happy Trails! ~ Ronn Lucas, Sr.
Note: The photos of the Morales and Stevens flies by
permission of Forgotten Flies
by Paul Schmookler & Ingrid Sils.
Back to Index
|