Materials, tools and other stuff
You have more than likely heard that tying the fully
dressed Atlantic Salmon Flies costs both arms, legs
and, your first born child. That is not necessarily
true although, if you find that you like tying these
flies, the chances are that you will invest fairly to
very substantial amounts of money over time. To begin
though, modest investments are all that are required.
Actually, you may already have materials to tie decent
Atlantic Salmon Flies! For all but the Fully dressed
flies, simple and, readily available materials will do.
A great number of common materials will be useful like,
Bucktail dyed & natural, Fox tail dyed and natural, Squirrel
tail of various types, Bear, Coyote, Wolf, Fox, Deer, Elk,
Moose, Badger and so on. Useful feathers in addition to some
of the standard capes and saddles used in our other tying
include schlapen, cheap necks & saddles, Ostrich dyed and
natural, Ringneck, Golden and Amherst Pheasant, Ruffed Grouse,
Sharp Tailed Grouse, any number of Ducks, Quail, Partridge,
Starling, dyed Goose shoulders, burned Goose, Peafowl, Turkey
and, so on.
Then, there are the more exotic materials. It is impossible
to list or describe all of the feathers and furs that are
fair game for tying. Some of these can literally be worth
many their times their weight in gold. Some feathers that
were used in the past simply aren't available at any price
so, for those, we must use substitutes. Just a tiny number
of different exotic birds and mammals that provide wonderful
tying materials include, Monkey, Wolverine, Baboon, Polar
Bear, Penguin, Lilac Breasted Roller, Kingfisher, Heron,
Bitterns, Storks, Ibis, Vultures, Eagles, Swan, Black Francolin,
Grey and Green Junglefowl, Vulturine Guineafowl, various Bustards,
Parrots, Trogons, Toucans, Contingas, Pittas, Minivets, Birds of
Paradise, Eurasian Jay and, on and on. Some of these birds and
mammals are now illegal or so rare as to be not available at any
price.
You can occasionally find wonderful feathers and fur from old
clothing at second hand stores, antique shops, garage sales,
estate sales and through your friends. I can't begin to list
all of the great and sometimes very rare materials I have found
through these avenues at very little cost. Let your friends and
relatives know that you are always looking for unusual (and,
not so unusual) feathers and fur. If they hunt or have pet
birds and, don't tie, they would welcome someone taking the
feathers and fur that otherwise would have been thrown away.
Keep in mind that the early Tyers of the Classic Atlantic
Salmon Flies used available materials. It was during a time
when explorers were sending countless numbers of newly discovered
life forms from new countries back to England. I have no doubt
that they would have not hesitated to substitute and use available
materials we now have. This is particularly true since even the
most complicated and exotic of Salmon flies were tied to use for
fishing. In fact, many of the early authors of the day, suggested
alternative materials on many of their flies. Of course now, with
the costs of some of the materials, most of our fully dressed flies
are destined to be for display only. Having said that, there are a
few souls tying these flies to fish and, I save my poorly tied flies
for that purpose as well.
One thing I have found to be true for tying these flies is that
there is nothing like using the very best quality fur and especially,
feathers you can find. Trying to make substandard materials behave
can be frustrating at best and, impossible at worst. Buying low
quality materials will only result in a collection of a lot of
unusable stuff. I recommend looking at as many materials as
possible to select the best you can find and your budget will
allow. If it isn't possible to hand select materials, tell
the shop what your requirements are so they can select for
that purpose.
I will try to give suggestions for alternate materials when
individual patterns are covered in detail.
 Once you begin to collect rare feathers and fur, you will need
to protect them from insect damage. I have seen boxes of what
had been wonderful Parrot feathers reduced to dust by bug
infestations. You must be disciplined in your bug prevention
when you have potentially thousands of dollars worth of expensive
materials. I follow a ritual almost religiously, that includes
regular bug bombings every couple of months. I never mix new stuff
with my inventory until it has been in quarantine for at least a
month with bug spray and moth crystals (the kind that kills rather
than repels. Make sure it contains Paradichlorobenzene. I do also
use the moth balls that repel. You can't be too careful). Other
methods for bug protection are used by some Tyers. These include
flea collars, Cedar chips, freezing and microwaving. I personally
would not rely on those methods particularly the latter three.
Freezing and/or microwaving is no guarantee that it will kill
insect eggs. In fact, the microwave can have no effect on adult
insects if they are small enough! I know insect spray and the
Paradichlorobenzene moth crystals will kill the material eating
insects so, that is why I use what I do. Everything is in zip
loc-bags and the bags in clear plastic boxes that have some of
the moth crystals in them. I have the boxes segregated by type
of material and the contents on the box. My Parrot feathers for
example are listed by color and are segregated by size in the
bags. I keep all of my materials in one room and have the bulk
of the stuff in large boxes and smaller "working" size pieces
in the smaller boxes. For instance, when I get a whole skin say
of a Deer, I will cut small pieces from all of the different
areas of the hide. When I pluck a bird skin, I will match all
of the potential feathers that could be used for full featherwings,
sides or cheeks on flies. I will pluck Golden Pheasant crests and
segregate them by size. I spend countless hours with material prep
but, when I sit down to tie something, I can go to the exact box
where the material I need is and, it is usually ready to use. That
means, the feathers are likely cleaned by a good washing. I have
a couple boxes that contain thousands of pairs of feathers that
are clean, straight, matched and, ready to tie on a fly.
Once you begin to collect rare feathers and fur, you will need
to protect them from insect damage. I have seen boxes of what
had been wonderful Parrot feathers reduced to dust by bug
infestations. You must be disciplined in your bug prevention
when you have potentially thousands of dollars worth of expensive
materials. I follow a ritual almost religiously, that includes
regular bug bombings every couple of months. I never mix new stuff
with my inventory until it has been in quarantine for at least a
month with bug spray and moth crystals (the kind that kills rather
than repels. Make sure it contains Paradichlorobenzene. I do also
use the moth balls that repel. You can't be too careful). Other
methods for bug protection are used by some Tyers. These include
flea collars, Cedar chips, freezing and microwaving. I personally
would not rely on those methods particularly the latter three.
Freezing and/or microwaving is no guarantee that it will kill
insect eggs. In fact, the microwave can have no effect on adult
insects if they are small enough! I know insect spray and the
Paradichlorobenzene moth crystals will kill the material eating
insects so, that is why I use what I do. Everything is in zip
loc-bags and the bags in clear plastic boxes that have some of
the moth crystals in them. I have the boxes segregated by type
of material and the contents on the box. My Parrot feathers for
example are listed by color and are segregated by size in the
bags. I keep all of my materials in one room and have the bulk
of the stuff in large boxes and smaller "working" size pieces
in the smaller boxes. For instance, when I get a whole skin say
of a Deer, I will cut small pieces from all of the different
areas of the hide. When I pluck a bird skin, I will match all
of the potential feathers that could be used for full featherwings,
sides or cheeks on flies. I will pluck Golden Pheasant crests and
segregate them by size. I spend countless hours with material prep
but, when I sit down to tie something, I can go to the exact box
where the material I need is and, it is usually ready to use. That
means, the feathers are likely cleaned by a good washing. I have
a couple boxes that contain thousands of pairs of feathers that
are clean, straight, matched and, ready to tie on a fly.

I realize to many, this kind of organization may seem unnecessary
or even sick. Be that as it may, the time I spend cleaning,
sorting and preparing my materials, makes my time at the vise
enjoyable.
I mentioned washing earlier, 99.9% of the feathers and fur will
be improved by a good washing in a warm soapy bath. You may
think you have gone off the deep end and ruined a bird skin
by washing but, once it is dry, you will be pleasantly rewarded.
Just a quick wash will do. I dry the skin with a hair dryer
usually. Sometimes though, I will lay them on screens in
front of a large box fan. A Pheasant skin will dry this
way in less than an hour.
A note on feather durability. A bird's feathers must be strong,
resilient and, durable in order for the bird to live a normal
lifetime. Neither water or, crumpling the feathers can do
permanent damage or, that individual will be a genetic dead
end. Most of us know that steaming a ruffled fly can "refresh"
it. What some of you may not realize is that badly soiled or
crumpled feathers can be restored to new or, near new condition
simply by soaking them in water for a minute or two.
A few years ago, I was given a bunch of Macaw tail feathers
that had been really banged up by rubbing against the bird's
cage. A few of them looked for all purposes to be beyond use.
Before I tossed them out, I figured I would throw them in a
warm soapy bath along with the good feathers. To my delight,
once they came out of the bath and dried, they looked perfect!
Two things to remember about feathers, are that the damaged
and/or twisted feather will try to return to it's undamaged
state when wet and, when wet, a feather's web looses most of
it's strength. Do this little experiment. Take most any feather
and crumple it between your hands. Now, put it into or, under
warm running water and watch what happens by the time it dries.
Tools:
Some tools I find helpful for tying are as follows:
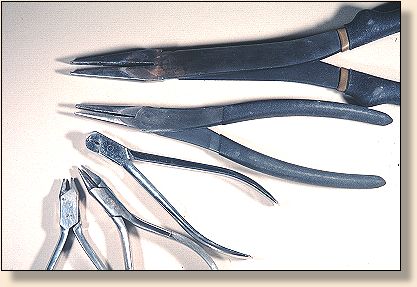
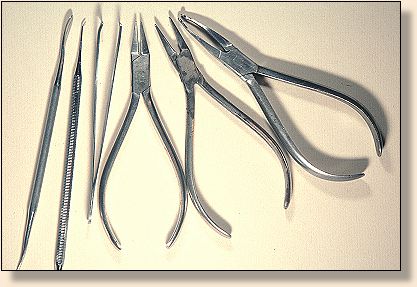
Various pliers used for making hooks. Top to bottom, two large pairs
of smooth faced (except the very tips) pliers I found at Sears,
bottom three are different shapes of Dental wire bending pliers.
Pliers I use several different pliers for different
uses. I will endeavor to explain the different uses when they
are used the first time for a new pattern. Many of my pliers
are originally Dental tools. Mostly, you will want smooth face
pliers so you don't damage materials.
Floss Burnisher Several different materials can be
used to fashion a burnisher. I made one from a Dental tool and
is of polished stainless steel. You can find burnishers at art
supply stores as well.
Left to right, floss burnisher made from a Dental tool, fine dental
pic shaped to use as a hot glue tool. tweezers shaped to slightly
bend feather barb, three smooth faced Dental pliers I use for smashing
bumps in bodies and feather shafts.
Nor-Automatic Bobbin This is one of the best tools
I own. In fact, I have three on my bench loaded with different
threads. If you use a rotary vise and a bobbin cradle, you no
doubt have thought it would be nice not to have to spend all
the time rewinding the thread after every step. The Nor-Automatic
Bobbin rewinds the thread for you! I'd be lost without mine.
Nor-Vise Not all vises are created equal. It is
true that most vises available to us today are quality tools.
It is also true that we could adapt to using just about any
vise. There are no perfect vises on the market, the Nor-Vise
included. Every vise design has it's strong points and, weak
ones. It is a matter of compromise like most things in life.
The Nor-Vise works much like a lathe. The hook rotates on the
hook shank axis like any number of other rotary vises. It does
one thing the others don't. It spins! It can be spun fast which
allows the Tyer to do several things on this vise that either
can't be done on others or is impossibly difficult. Dubbing is
one of those things that the Nor-Vise does that is amazing. With
the spinning action, you place the bobbin in the cradle and catch
a couple fibers between the thread and hook shank. The turning
thread/hook then twists the dubbing around the thread without
your fingers ever touching the thread. It is best seen and hard
to describe.
 Floss work is also a breeze with the Nor-Vise or, I expect with
most rotary vises because you don't have to let go of the
floss or, change hands as you wrap it. This minimizes the
chance of fraying the fragile floss and, help make smoother
floss bodies. Ribbing is also easier to make it even for the
same reasons.
Floss work is also a breeze with the Nor-Vise or, I expect with
most rotary vises because you don't have to let go of the
floss or, change hands as you wrap it. This minimizes the
chance of fraying the fragile floss and, help make smoother
floss bodies. Ribbing is also easier to make it even for the
same reasons.
The bottom line on what kind of vise will be best is that
you will adapt to just about any of the current well-made
rotary vises. If you are thinking about getting a new vise,
try as many as you can find in local shops and talk to others
to see what their views are.
Lighting Good strong lighting will help you tie
better and do so with less stress to your eyes. I use a 100W
Halogen flexible arm light over my vise. It throws out an
amazing amount of light that allows it to be moved far enough
away so the heat isn't a problem. It also lights a large area
on my tying bench.
Good seating is another good tool that will help you
tie in comfort for extended periods of time. I use a well padded
office chair that has adjustable arm rests and adjustable seat
and back. You can change the various angles you sit at to minimize
back pain. I also find the arm rests extremely useful for resting
my elbows on to take pressure off my shoulder and neck muscles.
Music is also a relaxing addition to my tying but
it is a personal thing. I like hard pounding blues best but,
most any music will do.
Sandpaper I use a medium grit sanding pad to smooth
the tips of my fingers when doing floss work. My hands are
pretty rough from work and floss will fray with little effort.
So, I sand the tips of my fingers and then wash them. Any oils
on your hands will instantly be picked up by the floss and ruin
it's sheen. You can also use a cuttle stone or other abrasive
surface. Cotton or Silk gloves are also used by some Tyers but,
I find them distracting and unnecessary if I follow my routine
of sanding and washing. If you are looking for the gloves, try
a well stocked photography store that caters to the more
professional photographers.
Small fairly stiff paint brushes You can use these
to move parts on the fly like to remarry barbs that may have come
apart and, other such things. Sizes I find useful are a tiny
#00000 and #2.
Dental picks can be useful and modified to suit
different uses. I took one double sided tool and flattened
and bent the tips to use for applying hot glue to very small
areas with precise control.
Tweezers are essential tools on my bench. I have
several different ones for different uses. You want some that
are fairly fine tipped. I have some VERY fine tipped tweezers
for plucking barbs and loose strands of floss or thread. I also
have a pair that have wide tips that I modified by filing a
groove on one face that the opposite face goes very slightly
into so, a material that is inserted will be very slightly
bent. This is useful for bending hair or feather barbs when
they are slightly out of line.
Scissors are an essential part of a Tyer's tying
kit but, you already knew that. What you may find is that
your standard scissors while just fine for cutting most of
your materials, they may not do a good job on some of the
materials we will use on some of the materials on Atlantic
Salmon flies. The area of tying you will need VERY sharp
scissors for is trimming feathers for full feather wing
Atlantics. In the Cheap Atlantics section I detail how
to trim these feathers and rather than cover it here, I
suggest you go there.
Most scissors made for tying are pretty good for most uses.
In fact, I have been using a cheap $5.00 pair for many years
that were made in Pakistan which is where a large number of
scissors are made. I have dressed the cutting surfaces a
couple times and they are finally showing signs of the
end of their useful life. They will still function well
for cutting tinsel, wire and lead though.
I recently went to a hair salon supply house with a friend
who is a hair dresser. To see what they had in the way of
really good scissors. What a shock. They ranged from about
$10.00 to over $400.00! I guess $400.00 scissors wouldn't
be bad if you were making a living with them but, I am not
so, rationalizing any even near that amount is a hard sell.

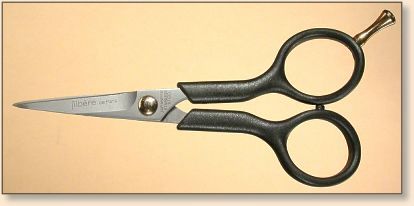
Mid price salon scissors with adjustable tension and replaceable blades
Something that sets the hair dressers scissors apart from
most tying scissors is the shape of the cutting edges. They
are more like knife blades than other tying scissors which
I have found have more blunt edges.
The hair scissors cut the areas of the full feather wing
feathers with much less chance of the cutting edges pushing
the barbs ahead which results in an uneven edge. What I
did buy were a pair that retails for about $20.00 less my
friends discount made them $10.00. They are surgical steel
and really very smooth cutting. They have one serrated edge
and cut hair and feathers with ease. Surprisingly, one
thing they don't cut well at all is the fluff at the base
of feathers. Must have something to do with the serrations.
I also bought a pair that retails for about $60.00 which
has replaceable blades and, unserrated edges that are hollow
ground. These cut silky smooth even through the feather
fluff! With her discount the price was $40.00. I reserve
these for trimming feathers only!
Low price salon scissors with adjustable tension and serrated blades
If you get into tying the full feather wing flies, a good
pair of scissors is worth consideration. Most beauty supply
stores do not sell to the public so, you may have to see
if your hair dresser will go with you to pick some up.
It is worth the hassle.
Update 8.03
We have all seen the name Dr. Slick in advertising and
fly shops and they have been around for a good length
of time. I have been seeing one of their latest ads for
the new "Razor Scissors" for awhile so, I decided to
contact them for more information since they look much
like the salon scissors I use.
I received two pair of scissors, one the 5" straight
Razor Scissors, part #SR5G and a pair of "5 adjustable
Tension Scissor, part #ST5G. Both pair have large finger
holes which is a plus for guys with big fingers. Some of
my scissors have holes so small that you almost consider
using soap to remove them! Another feature is that both
have a little rubber nub in the handles which cushions
them when cutting. Both pair also have extremely fine
tips so trimming very close is possible. I used to
routinely grind down the tips of my other scissors
including the salon pairs but these are fine enough
that I will not need to.
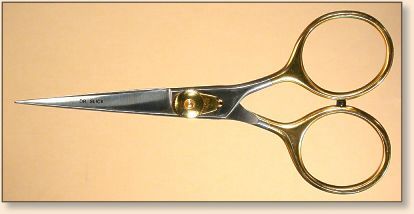
Dr. Slick 5" Razor Scissors with adjustable tension blades
Immediately I went to my tying room and broke out the
Razor Scissor, picked up a feather and trimmed it. The
good news is that you needn't go to a beauty supply
store to get ultra sharp scissors to trim feathers for
full feather wings. These scissors have almost knife
edge cutting surfaces that are smooth. They also have
an adjustable tension feature which allows for buttery
smooth cutting found on the higher end hair cutting
scissors that hair dressers use. Dr. Slick also has
the same scissor in a 4" size. This size may be better
used for general tying than the 5" but, for trimming
feathers for full feather wing flies, I suggest the
larger pair.
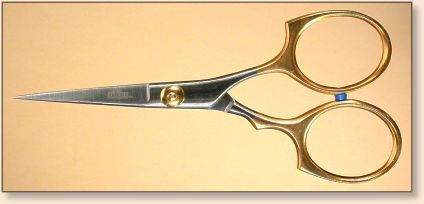
Dr. Slick 5" adjustable blade scissors
The part #ST5G has lightly serrated blades that aren't
quite as knife edge but are very sharp. They will
also trim feathers well but may leave very slightly
feathered edges. Even so, they will work very well
for all around scissors and you could trim feathers
for full feather wings as long as they are kept
sharp. These scissors also have an adjustment
feature which allows almost the same buttery
smooth cutting. As with the Razor Scissors, you
may want the 4" for general use and the 5" for
trimming feathers.
The bottom line is that both of these scissors will
give you many years of reliable service whether you
save them for delicate work or use them for your
general tying.
I will be adding to this list of tools as time goes on. When
I use a new tool on a particular fly, I will describe it here
and reference it when tying the fly. So, you might want to
check back here from time to time.
Tinsel, Floss, Thread
Tinsel is a very important material when it comes to these flies.
It can represent segmentation, just add some flash or, add
character to a fly. When it comes to the fully dressed flies,
tinsel isn't a minor component. It is integrated into a pattern
with care and thought. There are those rules that traditionally
govern the use of tinsel. Even though I personally push tradition
whenever I get the chance, I do try to maintain the link to the
past when possible. One of the rules is to use only five turns
of tinsel on a body. If you feel like putting six, go ahead. If
it's three, same thing. All I say is maintaining a resemblance
to the flies of old gives the tying craft continuation and, the
traditions continue to evolve. Another tinsel rule is to follow
an oval tinsel with a body hackle. This is a good rule. The
tinsel will help protect the hackle. Counter wrapping with
another tinsel or wire rib will also protect the hackle. When
I use Spey Hackles that have been stripped from the feather
shaft, I always counter rib the flies. More on that later though.
There are many tinsels available to us today. There is mylar and
metallic tinsels. Round, flat, oval, flat oval, round, twist,
embossed, holographic, red, green, blue and on and on. There are
tinsels from France, India, Canada, Germany and, on and on.
I guess if Tyers were polled as to the best tinsels, the ones
made in France by Lagartun would likely win. My choice for most
of my tinsel is from UNI-Products in Canada. They are an innovative
company, are responsive to Tyers needs and, their selection is
good and fairly priced.
One last thing about tinsels. I know just about every Tyer ends up
at a craft store at some time in his/her tying career. You will be
tempted to buy the various craft tinsels thinking you can save some
money. So did I. Overall, a very high percentage of the stuff I
have gotten at craft stores ends up being substandard and useless.
Particularly if you tie presentation flies, the craft tinsel will
not work. The problem with most of it is that once it is wrapped,
the metallic outer shell separates and the thread core will show
through. It will happen even with the best tinsels but, since they
have been created for our tying specifically, they do it less.
Floss
Like every other material for tying, we have many choices with floss
too. The traditional floss was and, still is for that matter, Silk.
Silk was favored originally because there weren't synthetics in
those days and Silk was available in any number of colors. There
is no denying that Silk is a beautiful material to tie with but,
I prefer to use single strand UNI-Floss for most of my floss work.
It is a synthetic so, it is strong, is very shiny (which I like),
has a very good range of colors and, is less likely to fray when
using it. A little tip for adding brightness to light colored
flosses is to lay down a bed of flat silver tinsel prior to
applying your floss. Flat mylar tinsel is very thin so, little
bulk is added by addition of the tinsel. The first photo below
shows a black hook with yelow floss with a combination of white
thread, no thread and, flat silver tinsel under the floss. Notice
the rear 1/3 where the thite thread base makes the floss a little
brighter than the middle 1/3 which has nothing but the yellow floss over
the black hook (The same as if the base were black thres) but, not
as bright as the front 1/3 which is yellow floss over the flat silver
tinsel. The second photo shows the yellow floss over the black
hook with the front 1/2 which has been clear coated to show the
effect water has on it. What I want you to be aware of is that
the color of many of the materials we put on our flies do not remain
the same in the water. If you are tying for display, that is one thing.
If you are tying to fish, it is entirely a different matter. Take
some time to look at various materials in the water so when you are
tying to match the hatch, or just replicate some other pattern, you
need to know and figure in the effect water will have on your finished
flies.
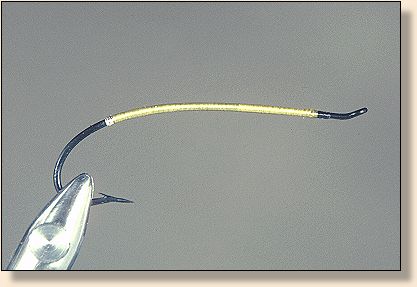
The above photo shows a black hook with yellow floss with a combination
of white thread, no thread and flat silver tinsel under the floss.
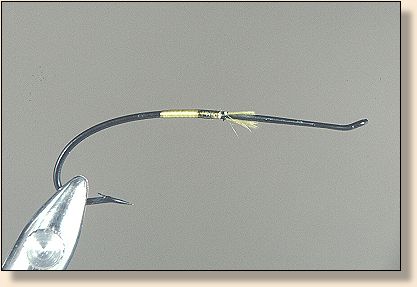
Yellow floss over the black hook with the front 1/2 which has been clear
coated to show the effect water has on it.
Using floss can drive a Tyer mad. It seems like it frays before
you even touch it! As I mentioned in the tools section, you can
wear gloves or at least sand and wash your hands first. The best
trick for relatively trouble free floss is to use a rotary vise.
When you use the rotary feature, all you do is hold the floss and
revolve the hook while you guide the floss on. The old way was to
turn the floss around the hook which means, you are constantly
changing hands. Changing hands exposes the floss to more chance
of breaking filaments due to changing tension, rubbing against
rough spots on fingers or, more chance for oil transfer.
When using any multi strand floss, use only one of the strands.
If you try using a bundle of strands, your floss will be lumpy
and uneven. Not a real problem with fishing flies but terrible
on presentation flies. If you are using a floss that is one
strand but very thick, remove some of the filaments. It is easier
to get a smooth floss body with a small floss rather than a big
one. The guys at UNI-Products have just about the right number
of filaments in their floss so, use it right off the spool.
 You may find a rayon floss made by DMC in craft or fabric stores
and, it is pretty good too. It is a braided, multi strand floss
so, you will have to separate the strands to use. Just make sure
you get the rayon, not the cotton. Not every store carries the
rayon so, you may have to look for it. YLI also makes a nice
rayon multi strand floss that is in some fabric shops. It comes
on 150 yard spools and has some nice colors. I have even used
the rayon floss that curtain tassels are made from.
You may find a rayon floss made by DMC in craft or fabric stores
and, it is pretty good too. It is a braided, multi strand floss
so, you will have to separate the strands to use. Just make sure
you get the rayon, not the cotton. Not every store carries the
rayon so, you may have to look for it. YLI also makes a nice
rayon multi strand floss that is in some fabric shops. It comes
on 150 yard spools and has some nice colors. I have even used
the rayon floss that curtain tassels are made from.
Whatever floss you use, just follow the cautions I gave you and
you will be fine.
Thread
The traditional thread that was used for Atlantic Salmon Flies
was Silk. For those who tie the classic patterns in the traditional
ways and with traditional methods, Silk is the only thread to use.
I don't generally tie to those standards so, I use modern threads.
For most of my tying I use UNI-Thread 8/0. I find it to be strong
and that with a little effort, it flattens out nicely. Every thread
available to us is different and, like anything else Tyers grow to
prefer one thread or another for their own reasons. Some threads
behave different than others so, one may be better suited to lay
flat or, another's strength may allow a tighter turn around a
material.
One thing we will want to control while tying especially the
fully dressed patterns is bulk and bumps. We try to tie these
flies with a minimum number of turns and to keep the turns
smooth. When using the larger Silk threads, the number of
turns becomes critical to keep the bulk down. Keep in mind
that we may be tying a dozen, two dozen or, more individual
materials on at the head alone! You can see that thrifty use of
turns becomes very important. That is one reason I prefer to
use the 8/0 thread, I can secure the materials with multiple
turns without adding bulk.
I also usually use white thread when I am tying a pattern that
incorporates a floss element. The floss will tend to be a little
brighter and help them retain the color better when fished.
Dubbing
Dubbings were usually Seal, Pig's wool, Sheep wool and a few
more mundane natural furs. Here again, choices are many.
Unfortunately here in the States, Seal, one of the early
dubbings, is not legal but, there are good substitutes so,
no real loss here.
Toppings
CASCADING CRESTS:
Yes, curved Golden Pheasant crests are hard to come by.
The more pronounced the natural curve, the rarer they are.
I would guess, out of 100 +- GP heads, half or less are curved
enough to be used on full feather wing flies. Out of all that
I have ever seen, I have found only one head that has feathers
that actually curve back on itself! I am saving those for the
right flies. These figures are based on Golden Pheasant heads
that I get that have already been selected especially for the
Atlantics so, all are better than what most are in fly shops
usually. The cascading crests are becoming very rare since they
are from older birds. Most Goldens that I have seen have crests
that tend to be straighter than curved. You can uncurve a feather
and, make it cascade by knicking the shaft slightly but, it
doesn't seem to work when you try to curve a straight crest.
You will end up with a curved shaft but straight barbs (not
a desirable look). Also, the graceful curves of the cascading
barbs we all like are not the norm either. The barbs lengthen
with the birds age.
You can see that there are a lot of factors that determine the
"perfect" crest. Usually, on married wing flies, the wings are
shaped such that you can use crests that are straighter. The p
roblem with the full featherwing flies is that some of the feathers
aren't pointed on the ends so, If you want a topping and tail to
meet, you must go well beyond the end of the wing with straighter
crests than if you have curved ones.
For some of my full featherwing flies that have feathers that
simply won't be accommodated by the toppings at hand, I simply
don't use a traditional topping! I will use a very short one
just on the leading edge of the wing or, leave it off entirely.
Sometimes, tying these types of flies, we have to let the feathers
dictate some of the look of the fly rather than fighting it's
properties.
Golden Pheasant heads/crests will almost certainly will come
flat and, twisted. Wash them in warm soapy water and, let soak
for half an hour, then dry with a hair dryer. You will be
amazed at how much better they look and, how straight the
crests will be.
Head Cement
For my fishing flies, I generally don't use head cement. I
use two whip finishes that are carefully laid down with five
or more turns, side by side like wrapping a rod's eyes and,
one whip finish on top of the other. This traps the tag end
under a broad base of thread. Of course, on small flies, five
turns may be too many so, do as many as the head will permit.
There are many cements on the market. For fishing flies that
I do cement, I use either water based polyurethane or, fabric
glue. The polyurethane can be had at any paint store or department
for about ten dollars for a pint. Put some in your head cement
jar and store the unused portion in a glass jar, the can will
rust after opening. The fabric glue can be found in craft stores
and is equally inexpensive. Both can be thinned with water but
are waterproof when dry, the fabric glue is also flexible.
On my display flies I usually use fingernail polish. I mostly
use black, one or two thin coats followed with one or two clear
coats.
Gut
The traditional blind eye hooks were used with a Silk Worm gut
eye. The gut was/is made up of three strands (usually, although
smaller flies can be two strand and large flies more than three)
of gut that is softened by soaking in water then, it is twisted
tightly and allowed to dry in it's twisted and straightened
shape. I use a variable speed drill to twist mine and tack
the twisted gut to a board to dry.
Gut eyes are not the strongest link to a fish so, Tyers today
who wish to use blind eye hooks, use a number of synthetic
materials such as Dacron fly line backing, twisted mono and
others. Using blind eye hooks is said to give the fly a more
"fluid" movement in the water. I don't doubt that but have
limited experience fishing blind eye flies so, any conclusion
would be just a guess.
You can buy gut either pre-twisted or, in single strand coils.
It is really easy to twist so, the single strand gut makes
more sense to me since it is generally cheaper per foot/inch.
To form a gut eye, take about 1 ˝" of gut and bend it around
the tube of a bobbin, crimp the gut with your fingernail to
make the gut look like a keyhole with an open end. Now, moisten
the very ends of the gut and slightly chew the very ends to
soften them and allow them to conform to the hook better
when attached. Cut the three ends on each side of the loop
at different lengths so when the eye is finished, the thread
will taper nicely. Lay down a TIGHT thread base with round
turns of thread (for a little better friction to hold the eye)
starting from the front. Return the thread in open turns to
just slightly behind the tip of the shank, hold the eye with
the softened ends to the shank and in close, flat and, TIGHT
turns of thread wrap to the rear of the gut eye. Tie off with
two or three half hitches and cut thread leaving a very short
tag end. Coat with head cement and, allow it to dry.
If you are going to fish a gut eye fly, I suggest leaving the
legs of the eye longer than I have described which is fine for
display flies.
Even on a thoroughly modern fly with a modern hook, a blind eye
is a visual link to the flies of old. I think the old masters
of the tying craft would like the fully dressed flies that
Tyers are creating today.
Happy Trails! ~ Ronn Lucas, Sr.
Next time, the Hooks.
Back to Index
|