Lesson 8 - Married Wings
Full Dress Flies
By Eric Austin
Marrying wings on wet flies and salmon flies has long
been treated by authors as a rather arcane art, one
filled with talk of barbules, rachis, barbicels and
hooklets. I hope to take some of the mystery and all
of the pseudo-science out of married wings in this
article, and give you a straightforward "how to" in
simple English, with pictures. Let's not make this
any harder than it really is.
What are we actually trying to do when we create a
married wing? We are trying to make one wing, for
either the near side or the far side of our fly, out
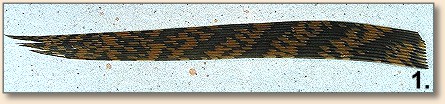
of slips cut from different feathers. When I say near
wing, I mean the one closest to the tier. For instance,
here is a piece cut from the left side of a turkey tail
feather that could be used as the near wing in a wet fly:
Here is that same turkey tail piece, married with a
couple of strips from the left side of a piece of
Amherst pheasant tail:
What did I do to combine these? I added the top strip
of Amherst pheasant to the turkey first, pushing the
edges of the feathers together starting from the tips.
When the feathers were together somewhat I then grasped
the butts in my right hand, and "zipped" the feathers
together with my left middle finger and thumb. The bottom
strip was then added the same way. There really is nothing
to it, these feathers WANT to marry, they HAVE to marry or
the bird couldn't fly. We don't actually care why this is,
just accept the fact that it is. But there are some hard
and fast rules that must be followed, or this marriage
will end in a quick divorce.
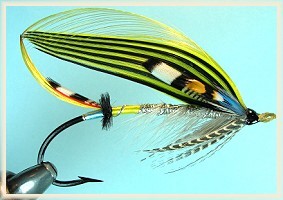
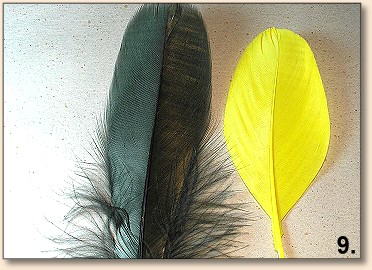
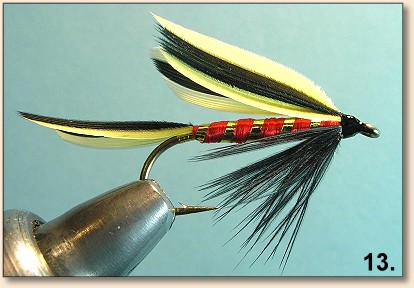
Let's look at a real-world example and I'll explain the
rules. We're going to tie a Ray Meade, a full dress salmon
fly that has wings with black and yellow stripes, and we're
going to do the married wing first. What I'm going to do
initially is lay out my feathers, getting my lefts and
rights together and straight so I don't get them mixed up.
Take a careful look at this picture:
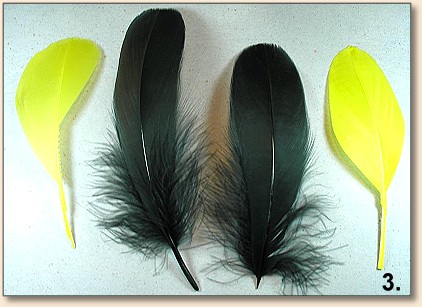
These are quasi "matched pairs" of feathers. We hope that
the feathers you use will be truly matched, one from each
side of the bird. As I look down at the top of these
feathers, you'll notice that the ones on the left curve
slightly to the right, and the ones on the right curve
slightly to the left. It's not extremely important that
your feathers do this, but it is a good way of keeping
your pairs straight. We will marry slips cut from the
left side of the left hand feathers together to make the
near wing, and then later, we will marry slips cut from
the right side of the right hand feathers to make the far
wing. Don't get these mixed up! Do one wing at a time,
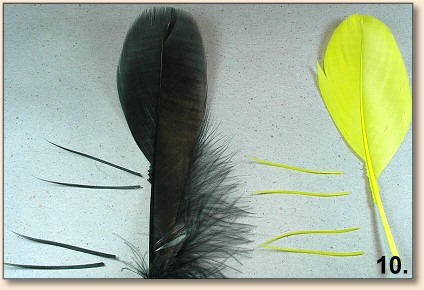
and put the other feathers aside. Here's a diagram showing
you what parts of what feathers to use, for which wing:
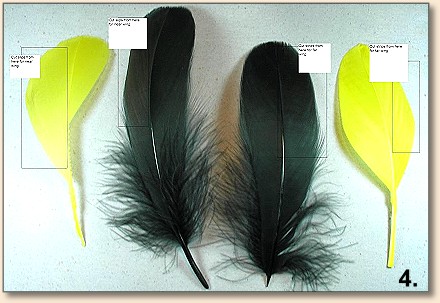
We are looking down on the top of the feathers, in other
words at the convex side if they are goose shoulders,
with the stem toward us. On some feathers it's no so
easy to tell which side is the "top." Look for a
single stem, if the stem seems to have two sections
to it, you're looking at the bottom of the feather.
Orient your feathers this way every time. We are going
to make the near wing first, so we will use only the
two feathers on the left in our picture. Put the other
two feathers away. It's a good idea to wash dirty feathers
in Woolite, slowly dry them, and then steam them. They
will marry more easily. Prep the feathers, getting rid
of the bottom third of the fibers or so, which is just
fluff that will never marry anyway. Cut a strip three
strands wide from each feather. It will look like this:

Now cut three more from each feather, and lay them out
in order, just as they came off from bottom to top.
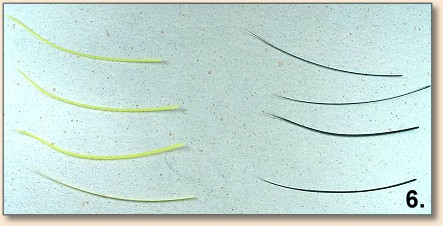
If any of the slips you cut is damaged or has intertwined
strands, discard it and cut another. You really need decent
slips to work with, or you have no chance. You may trim the
odd fiber sticking out of the tip, I won't tell. I've just
married these strips myself, starting with black on the
bottom, adding a strip at a time, going up. I found that
I hold the base strip in the middle of the strip with
the thumb and middle finger of my left hand, I then
take the strip I want to add with my right and match
its tip to the one I'm going to marry to (the one or
ones in my left hand ). I then pinch both with my left
hand, keeping them together, and push everything else
together with my right. Then I grab the butts of all
with my right, and "zip" with my left thumb and middle
finger, causing the feathers to marry completely. Be
careful when you're marrying strips to not get a strip
flipped over. The curvature of the strip you're marrying
must match the ones you've already done, or it won't marry.
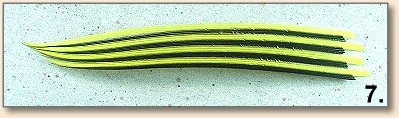
I like to stagger the slips slightly as I go up, so that
the resulting wing has a curvature similar to that of a
section of a feather. Lots of tiers do it this way, but
Ron Alcott likes to make all the tips even. Am I going to
argue with Ron Alcott? I think not. Do what you prefer.
When all is said and done it should look something like
this:
Boy that was easy. What could possibly go wrong here? Well,
lots of things could go wrong actually. I've already talked
about a strip getting "flipped", it'll never marry. To avoid
this happening you could cut a strip at a time from your
feathers, instead of cutting them all at once as I've done.
It might be a good idea to do them this way at first, so
you're less likely to flip a strip. You can actually get
a feather sometimes which is of such poor quality that it
won't even marry well to itself. Forget about that one,
even if you get it to marry, when you tie it in the wing
will fall apart. Make sure you've prepped your feathers,
washed them in Woolite, gently dried them, and then steamed
them. This will greatly help the ability of these feathers
to marry, especially if they're from the dreaded golden
pheasant tail. Some feathers are just tough to marry period,
and two that leap to mind are macaw and golden pheasant tail.
Of course, if you didn't follow my instructions and are
trying to marry lefts to rights, you're doomed. One other
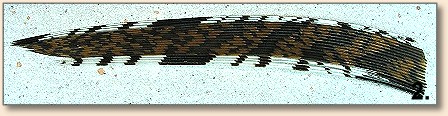
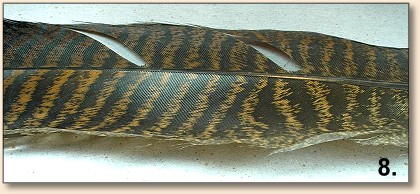
thing can happen, and you really need to watch for this.
Look out for "reverse curl" in your feather. You see a
lot of this with turkey. It's where the tips of the
feathers curl back up toward you as you look down on
the top of the feather. Here's a shot of a turkey tail
feather where the left side of the feather exhibits lots
of reverse curl.
Mallard primaries do this naturally, as do goose primaries.
It can be very frustrating to try to marry a left that has
a ton of reverse curl to a left that doesn't. It can be
done, but it might be best to try and straighten the feather
out first. If it's goose or swan, you can iron out the
reverse curl with an iron on very low heat with steam.
If it's turkey, you can't. With turkey you can wet the
feather and put the side of the feather where you want
less curl in between the pages of a book, then stack
more books on it. In about a month you should have a
usable feather. I don't go through these contortions
myself; I buy more feathers. That fits in with my life's
plan of spending every available financial resource at
my disposal on fly tying materials.
Can you marry lefts that have a lot of reverse curl to
other lefts that have a lot of reverse curl? Yes, no
problem. The Ray Meade shown at the top of the article
was done that way. I had yellow and black swan feathers
where the long sides had lots of reverse curl, so I went
ahead and used them. Tying them in was a bit more difficult
though than if I had been able to use the sides of the
feathers without the reverse curl. Of course, those sides
were too short.
So we've got our left wing completed, and now need to do
the right. In order that your marrying technique stays
consistent, it is a good idea to orient the feathers
with the concave or bottom sides up, so that the slips
you are going to cut, while still being rights, are
available to you on the left. It's just easier to cut
them off if you're right handed. So you'll start with
the feathers like this:
Now cut slips like this:
Marry them, keeping the concave or bottom sides of the
slips facing you, just as you would look at the far
wing on a fly if you tied it in alone. Again, start
with black on the bottom. It should wind up looking
like this:

Here are both married wings, ready to tie in:
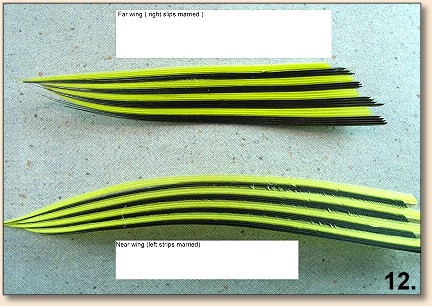
You'll notice that the right wing (far) is shorter
than the left. That's because my right feathers
didn't have enough strand length. It's a good idea
to measure your feathers for strand length before
you start. Measure your hook shank all the way to
the bend of the hook, then add Ľ" or so, and try
to get feathers with strands that are at least as
long as the total. For instance, if I'm going to
tie a 3/0 fly, and the shank length is 2", I'll
need at least 2 and Ľ" strand length on all my
feathers. You will spend your life trying to find
feathers with enough strand length.
Marrying Single Strands
Marrying single strands might seem difficult at first,
but there's a trick. Marry two or more strands of a
feather in, then cull out everything but one strand
with a bodkin or your scissors. If you plan correctly,
you can then take the fibers that were culled out and
use them as a group later. Let's say I want to marry
two strands of yellow, then one of red, then two strands
of yellow, then two of red. I'll start with three strands
of red, marry it to the two of yellow, cull out the extra
two strands of red, saving it for the two strands of red
needed later. Not so hard after all.
Married Wings - Wet Flies
Marrying wings on wet flies can be a little confusing.
You are generally using mallard quills here, as is
traditional. You can use goose shoulders, but it's
really not done much, and tends to get a little "wimpy."
Mallard quill has a lot of reverse curl in the feathers,
and because of that, if you use the techniques described
above, lefts for near wings, rights for far, you will
wind up with wings that have their tips out, pointing
away from each other, like this:
How big a problem is this really? Not a problem at all,
J. Edson Leonard liked his wet flies this way, and none
other than the great Pennsylvania tier Don Bastian agrees,
and now ties all his wet flies in this manner. It's great
because you don't have to do anything differently; the
wings are married and tied on just as you would full
dress wings, but now the tips point out due to the
reverse curl of the mallard quills. The "good" side
of the feather shows on the outside of the wing with
this method. Now let me throw in the monkey wrench. I
personally don't tie my wet flies this way. One look at
Trout by Ray Bergman will make my point.
The flies I remember from the '60s didn't have their
tips out, nor do the ones in Trout. But
there is more than one way to skin a cat, and Don's way
is certainly easier, and his results speak for themselves.
If you'd rather get the "tips together" look, it's easily
done. Once you've married the wings simply tie the "right"
married feather in on the side toward you, and the "left"
on the side away from you. In other words, reverse the
left and right wings. Note that the "good" side of the
feathers is now not showing. Now your fly will look like
this:
However you do it, marrying wings on wet flies is a
great way to get your feet wet with marrying wings
in general. You're typically marrying only three
slips, and if you use Don's method (tips out), it
will lead directly toward full dress salmon fly wings.
So I wholeheartedly recommend starting your marrying
career doing some wet flies tips out, then moving on
to full dress flies once you've gotten things down.
Some Conclusions
Marrying wings is either the easiest thing in the world,
or the hardest depending on two factors. The first is
your materials. Are they clean, steamed, fresh, undamaged,
high quality matched pairs of feathers? Are these feathers
free from a lot of reverse curl? Is their curvature
generally the same? Are you cutting slips from the good
area of these feathers (the middle third or slightly above)?
The second factor is you. Have you gotten things laid out
and prepped properly? Have you measured the strand length
on your feathers? Are you working with just one group of
feathers at a time (lefts or rights)? You haven't mixed up
the rights and lefts have you? This is the kiss of death.
You will NEVER marry a right to a left. Am I marrying good
side to good side with my slips? In other words, do the
curvatures of the slips I'm trying to marry match? If one
gets flipped, you've got a problem. Are you working hard
enough to get these things together? Manhandle these puppies.
MAKE them go together. If you've done everything right, and
they still won't marry solidly, throw one or more slips away.
Try another feather. Don't take no for an answer. I like to
swear at the feathers, but that may not be for everyone.
Just keep in mind that it's natural for these fibers to
want to marry, and chances are good that if they're not,
it's your fault. Above all, have fun. ~ Eric Austin
Back to Index
|