Welcome to ADVANCED Fly Tying

Tiger Weave Bitch Creek Nymph

Advanced Fly Tying:

Tiger Weave Bitch Creek Nymph
By Al Campbell


Woven bodies create a look that is unmatched in other forms of tying. If you can weave a fly body, you can create another dimension in your fly that simple tying steps can't create. This added dimension results in a fly that looks more realistic to the fish.

Since the size of the fly is important if you are going to see detailed pictures of the steps, I'll be picking on larger insects in this series, but these tying steps can be used to create much smaller flies as well. A woven midge larva isn't out of the question once you learn how to weave a certain style of weave.

My focus here is to show you how to perform the weave, not merely a pattern. It will be up to you to put on the thinking cap and use these new skills in other patterns as you see fit. The only limiting factor here is your imagination and willingness to experiment a little.

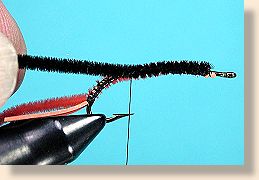
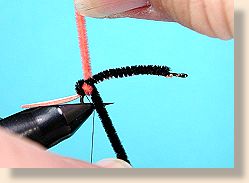
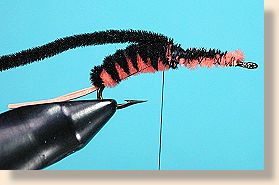
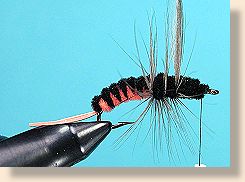
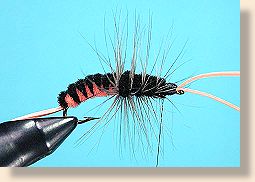
Although I have chosen materials that are easy to see in a photo, color and size of the materials you select should be based on what you are trying to imitate. If you're trying to imitate a damselfly nymph, shades of olive, yellow and brown will work well. Stoneflies are generally some combination of black and orange or yellow and brown, but investigation in your local waters with a nymph net might reveal a tendency toward tan and olive or black and yellow. Ultra chenille, punch embroidery yarn, wool yarn, poly yarn and antron are just the tip of the pile of materials you can use to create realistic, woven bodies. Use your imagination and the materials you have easy access to.

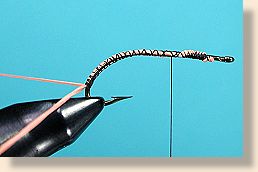
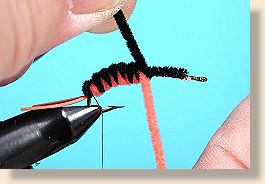
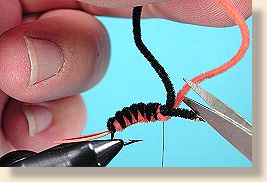
Weaving isn't as hard as it looks. It just takes a little practice to get good at it, but the fish won't be too picky if your fly doesn't look fit for a frame at first. What do you have to lose; time or a few materials? The skills you gain will more than offset your monetary investment and the time will be well spent learning new ways to create something a fish will eat. After all, isn't that why you're here in the first place?

Let's get started.

List of materials: Tiger Weave Bitch Creek Nymph

  • Hook: Nymph, Mustad 80050BR; Tiemco 200R; or equivalent.

  • Thread: 6/0 or 3/0, color as desired for effect, traditional is black.

  • Tail: Rubber leg strands, any color will work. I'm using orange here.

  • Body: Woven strands of orange and black Ultra Chenille (vernille). Again, any color or texture of material can be used to create the body you want.

  • Thorax: Black Ultra Chenille.

  • Legs: Dun or black hackle wrapped around the thorax.

  • Antennae: Rubber leg material, same as tail.

    Tying steps:

  • 1. Start the thread on the hook. Tie in a loop of rubber leg material by the tips of the loop. Keep it spread apart as you tie it down to the hook shank. Tie all the way to the bend.

  • 2. Clip the loop with your scissors to form a split tail.

  • 3. Tie the light colored body material to the far side of the hook.

  • 4. Tie the body material down all the way to the tail.

  • 5. Next, tie the darker body material down to the near side of the hook.

  • 6. Again, all the way to the tail. I usually make several half hitches in the thread here so I can leave the thread dangling at the hook bend as I weave. If that isn't comfortable to you, you can half hitch the thread and cut it off, but you will have to start it later when your hands are full.

  • 7. With your right hand, wrap the light colored material over the top of the hook as shown. Stop with the material where you see it here.

  • 8. With your left hand, wrap the dark material over the light material on the top of the hook, then under the hook and stopping on the near side of the hook as shown. Don't take your hands off either material during this weaving process.

  • 9. Now, wrap the light material over the dark material on the bottom of the hook as shown.

  • 10. Then continue over the top of the hook with the light material.

  • 11. Next, wrap the dark material over the light material on top of the hook.

  • 12. And, under the hook like you did before.

  • 13. Repeat this process, (dark over light on top of the hook, and light over dark on the bottom of the hook), until you have the body length you want (about half the hook shank in length).

  • 14. Holding both body materials in your left hand to keep tension on them, bring the thread forward over the hook in front of the body materials. (If you cut the thread, you will have to start it over here while keeping tension on the body materials).

  • 15. Now, switch hands with the body materials and tie them down with the thread.

  • 16. Inspect the body. Is the light material on the bottom and the dark material on the top?

  • 17. Clip the light material, but leave the dark material attached to the hook.

  • 18. Make sure everything is tied down securely. A couple of half hitches here wouldn't hurt.

  • 19. Tie in a long, soft hackle, curvature down.

  • 20. Wrap the dark body material forward to create a dark thorax.

  • 21. Tie off the body material and trim, leaving plenty of room for a head.

  • 22. Wrap the hackle forward, spacing it as evenly as possible.

  • 23. Tie off the hackle at the head and trim.

  • 24. Tie in a strand of rubber leg material behind the hook eye.

  • 25. Bring the other side of the rubber strand forward and tie it down to form a split antenna.

  • 26. Create a nice head that covers all of the rubber leg material.

  • 27. Whip-finish and trim the thread. Trim the antennae to length.

  • 28. From the top, your finished fly should look like this.

  • 29. From the bottom, it should look like this. You can trim the thread you see on the bottom of the body if you want, but the fish won't complain if you don't.

    You can modify this process by using different materials to create nymphs of other species. Just be sure to practice the weave until you're happy with the results.

    You've worked hard to learn the skills you have, now it's time to use them creatively. You might be surprised by the results you can obtain from a little creative experimentation.

    See ya next month - Remember, I'm always happy to answer your questions, feel free to email me. ~ Al Campbell

    ADVANCED Fly Tying Archives