The 2-Anchor System (part two)
By Joe Hyde, Lawrence, Kansas
|
Listed below are the components for my 2-anchor
system, along with a brief description of each.
Following the components list are photos which
hopefully will show how the anchor bags are put
together, and how the deck hardware was installed
on my canoe. (I considered disassembling my
system so that I could photograph it at various
stages of re-assembly, but abandoned the idea
because it would be too much work.)
In theory, my canoe's anchoring system should
work for kayaks, johnboats, etc. The only
adaptation necessary might be to adjust your
anchor bags so they contain more (or less) weight,
tailoring the anchor poundage to meet your boat's
need.
I am fairly knowledgeable about canoes but ignorant
about the design features of kayaks and many other
small boats. Therefore, non-canoe boaters should
evaluate for themselves whether my anchoring system
is even "install-able" on their boat; for all I
know it might not be.
Notice below that I've identified specific suppliers
for certain components. This is not to show favoritism,
or infer that the provider I've listed is the sole
source for the item. Rather, my intent is to
expedite the shopping process for any readers
wishing to install the 2-anchor system right
away. Why waste months searching for the parts,
right? (In particular the anchor bags, micro
cam cleats and river rescue rope are definitely
NOT available at your corner convenience store.)
The Components
ANCHOR BAGS - Two (2) Granite Gear "Tough
Sacks"®; size #1 (4" x 9.5"); price: $5.50 ea.
Tough Sacks are constructed of 210 dernier
packcloth, seams are double-stitched for strength.
Available at Back Country Gear,
www.backcountrygear.com, phone: 1-800-953-5499.
ANCHOR WEIGHT - Lead bird shot. NOTE:
For environmental protection in the event of anchor
bag rupture, consider using copper-plated lead shot
to prevent lead leaching into aquatic habitat. Bird
shot is sold in 25-lb. sacks at hunting supply stores.
For my solo canoe I used 8 lbs. of shot per anchor
bag; a tandem canoe might anchor more securely with
12 ˝ lbs. in shot per bag (this is what Rick Zieger
has in his anchors.) For a heavier anchor use a
larger size "Tough Sack" (#2 or bigger), to hold
more bird shot. But with more weight you need to
double-bag each shot load to prevent seam blowout).
Estimated price of bird shot: $25.00 per 25 lb. sack.
ANCHOR LINE - Polypropylene river rescue
rope, floating, yellow in color; 3/16" diameter;
1,900 lbs. tensile strength. Price: 29 cents per
foot. Available at Northwest River Supply,
www.nrsweb.com, phone: 1-800-635-5202. NOTE:
For a solo canoe, I recommend 20 ft. of anchor
line per anchor; for a tandem canoe, 30 ft. for
the bow anchor, 20 ft. for the stern anchor.
CAM CLEATS - For a solo canoe, buy two (2)
Harken ® Micro Carbo-cams, Model #423. This cam
cleat has a Ľ" working gap with a 300 lb. breaking
strength under load (far exceeding canoe anchoring
requirements). For a tandem canoe, purchase three
(3) cam cleats, to enable one-person and two-person
operation. Ball bearing cam cleats hold the anchor
lines secure with no need to tie knots. Price:
$18.00 ea. Contact Harken direct at www.harken.com,
phone: 1-262-691-3320
CAM CLEAT CONNECTORS - For each cam cleat,
buy two (2) slotted panhead bolts, width 11/64 x
(however long the bolts need to be), also buy two
(2) flat washers and two (2) nylon stop nuts per
cam cleat. Estimated price for cam cleat
connectors: $1.00 Items are available at local
hardware stores.
U-BOLTS - Purchase two (2) stainless steel
U-bolts, one each for your canoe's bow end cap
and stern end cap. Once mounted, these U-bolts
serve as fairleads that guide the anchors and
the anchor lines off the exact ends of your canoe.
(NOTE: Most U-bolts are sold with a
"bridging strap." On canoes with end decking
instead of end caps, this bridging strap should
be left on during installation; position it on
the weather side of the decking.) Estimated
U-bolt price: $3.75 each; available at local
hardware stores.
FLAT WASHERS, NYLON-TIP "STOP NUTS" FOR U-BOLTS -
Washers: If mounting the U-bolts on decking,
consider stacking two (2) washers of graduated
size per U-bolt leg below deck. Then if the
fairlead comes under heavy load, its wider "feet"
will safely distribute the stress without
fracturing the decking. Nuts: nylon tip stop
nuts will grip the bolt threads and resist
backing off. Estimated total price for eight
(8) flat washers and four (4) nylon nuts: $1.50;
all are available at local hardware stores.
Total estimated system cost for a solo canoe: $100
Total estimated system cost for a tandem (2-seat)
canoe: $120.
Anchor Line Preparation
With a cigarette lighter, melt both ends of each
anchor line to prevent unraveling. On one end of
each anchor line, tie an overhand (Granny) knot,
then melt-weld the knot to prevent loosening; this
serves as a stopper knot in the anchor bag
connection.
Anchor Bag Construction
Set the 25-lb. sack of bird shot in the bottom
of a plastic bucket before opening the shot sack.
This way, when the shot sack tips over you won't
spill all those pellets across the floor. Using
a kitchen measuring cup, scoop lead pellets from
the bucket into each anchor bag. Fill each anchor
bag no more than halfway with pellets, leaving
enough bag material to form a connection loop
for the anchor line.
Anchor/Anchor Line Connection
With the anchor bag now half full of shot,
squeeze the bag's neck together, twist the
fabric then fold it over into a U-shape.
Now pass the anchor line through this bend,
wrap it around once then pass it under the
anchor line. What you are doing here is
forming a sheet bend that has the stopper
knot laying outboard to prevent pull-through.
(A conventional sheet bend connects two
separate pieces of rope. But in this case,
your anchor bag's neck is substituting for
one of the ropes.) NOTE: The entire
rest of the anchor line must now be kept
knot-free at all times for boat handling safety.

U-Bolt (Anchor Fairlead) Installation
Each U-bolt is oriented so that the gap lays
perpendicular to the canoe's keel line (to
eliminate binding when the anchor line slides
through). Find two installation points, each
as close to a boat end as possible. Select
sites that offer hand and tool clearance below
deck, so that you can reach underneath and
attach the flat washers and nuts to the U-bolt's
threaded legs. If the U-bolt legs will pass
through two hard surfaces (like on my canoe)
take care to make your drill holes run parallel
on all three axis.
After using the U-bolt feet as marker templates,
drill two holes for the U-bolt legs to pass through.
Insert the U-bolt into the mounting holes then
fasten from below using flat washers and stop nuts.
(NOTE: If a U-bolt is mounted on thin-walled
end decking, prior to inserting the bolt legs into
the mounting hole you should thread two common nuts
as close to the arch of the U-bolt as possible.
Next, place the metal bridging strap below these
two nuts; then run both legs through the mounting
holes and fasten from below. This configuration
keeps the curved part of the U-bolt from crushing
down through the thin decking as you tighten the
nuts below deck.)
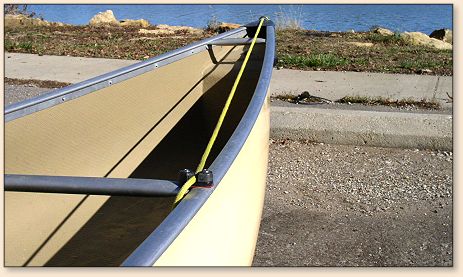
The photo above shows the stern end cap of my
canoe with the rear anchor held in ready position.
The legs of the U-bolt pass through the end cap
in two places, the nuts and washers are located
outboard. I was able to do this due to the lip
overhang on the end cap; most canoes don't have
end caps with this design shape.
Micro Cam Cleat Installation
The most important part of this task is mounting
your cam cleats where they can be reached without
you leaving your seat. Fortunately, most canoes
and small boats have suitable mounting spots on
their thwarts and gunwales. Canoes will
generally have at least one thwart located near
where the paddler sits. My solo canoe has a
thwart in front of my paddling saddle and another
close behind me. Both of my thwarts, however,
are made of aluminum tubing instead of wood.
Being tubular, they have no flat surface on
which to mount a cleat (the cam cleats have a
flat base). I solved this problem by bolting
one end of each cam cleat to the flat surface
of my aluminum gunwale, then bolting the other
end of the cleat to the top of the thwart tubes.
Having only one foot of the cam cleat bolted
to a flat surface is not what I wanted, but
my canoe's aluminum trim gave me no other choice.
This attachment method has proven sufficient,
though; both my cam cleats have stayed very
solidly connected.
For a tandem canoe, you need to install two
cam cleats near the stern seat so that a lone
paddler can operate both anchors. If you intend
to take a guest fishing, the guest will sit in
the bow seat. You might as well install a third
cam cleat up near the bow seat so your guest can
operate the bow anchor for you. Sit up there
yourself to get a feel for where a good mounting
spot would be.
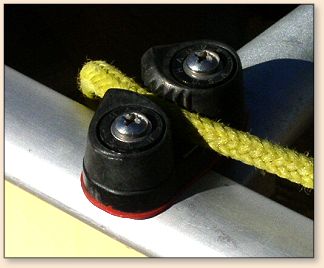
The second important part of mounting the cam
cleats is to make sure their pawls pivot open
AWAY from the designated fairleads. The way
these cleats work, you pull the anchor line down
between the pivoting pawls then release the line.
The pawls squeeze shut and keep the line from
pulling back through. But this gripping action
works in one direction only. So if you install
the cam cleats backwards by accident, out on the
lake you might see not just your anchors but also
both anchor lines disappear over the side. Not
good!
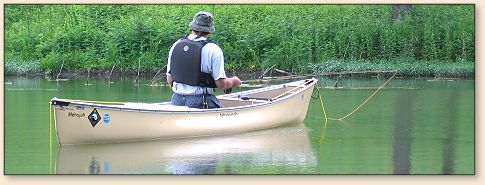
Here are some more photos of my canoe, showing
both anchors held in the ready position with
their anchor lines secured by Micro Carbo-Cams.
Hopefully each picture is worth a thousand words
in terms of offering you a better idea how to
install your own system.
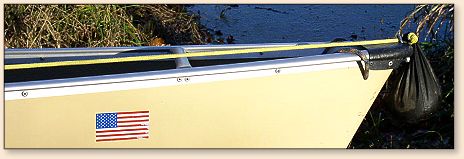
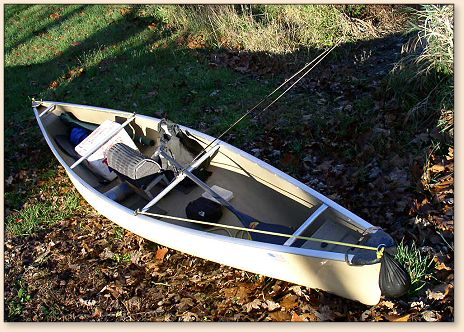
By examining how I mounted the main components
on my canoe, you can appreciate one of the finer
points of this anchoring system; namely, the bow
and stern fairleads do not stand very tall above
my end caps? When I paddle through standing brush,
submerged trees, weeds, etc., my canoe ends do
not get snagged because intruding vegetation has
almost nothing to grab hold of. The system's
low-profile is very helpful when making stealth
approaches through flooded vegetation.
It may confuse some readers to see photos of this
anchoring system mounted on a solo canoe, which
is understandable since the majority of canoeists
own a tandem canoe. If your canoe is a tandem,
be advised that the mounting spots for your cam
cleats will be different. I'm confident you can
devise a configuration that works best for you,
now that you understand the basic idea.
Don't be concerned if your U-bolts cannot be
mounted at the exact ends of your boat, like
mine are. If your fairleads are sitting back
a few inches from the ends, all it means is
your anchors will come off the ends to one side
of the boat or the other, but still very near
the ends of the boat. Once you're out there
on the water, those few inches won't detract
from the effectiveness of the system.
Also, don't be concerned about rope friction
severing the anchor lines as they rub repeatedly
through the U-bolts and down across your canoe
ends (or gunwales). This 3/16-inch diameter NRS
River Rescue rope is extremely durable. And
besides, if you ever did notice frayed spots
and became worried about anchor line failure,
for only 29 cents a foot it won't max out your
credit card to phone in an order for 50 feet
of new rope. My anchor lines have seen hard
use for a full season now, and both look good
as new.
Likewise, it is unlikely your canoe will suffer
significant damage from these anchor lines rubbing
repeatedly across your end caps and/or gunwales.
True, small areas of wear may eventually appear,
but it won't be anything to write home about.
Remember, it is only when the anchors are being
raised and lowered that the abrasion happens.
When the anchors are cam locked in the raised
position, or laying on the bottom, there is
very little rubbing action against the boat.
Last, in case anyone wonders why I prefer a
solo canoe over the traditional 2-seat tandem
canoe, it's like this: The first two canoes
I owned were aluminum tandems, and I liked them
just fine. Then about 15 years ago, a friend
let me try one of his solo canoes during a
13-mile full moon cruise down the Kansas River.
I immediately appreciated the quicker handling
of a solo canoe, and I especially liked the
independence that a solo canoe offered. Also,
his Kevlar solo canoe was almost 40 pounds
lighter than my aluminum tandem, a most desireable
feature to me since I generally fish alone and
thus have to rack and unrack my canoe by myself
every trip out. So for me, it's been nothing
but solo canoes ever since that moonlight cruise
15 years ago.
With a solo canoe only one paddler propels the
boat, which means only one brain is running the
operation. There are no bitter debates over
which route to take, which paddle stroke to
use when and by whom. History books tell us
that ancient North American Indians invented
the classic tandem canoe design. Well, Indians
might have invented it, but North American
divorce lawyers are the pesky savages who have
kept the design commercially available ever
since. Something to do with job security,
I'm sure. ~ Joe riverat@sunflower.com
About Joe:
 From Lawrence, Kansas, Joe is a former municipal and
federal police officer. In addition to fishing, he hunts
upland birds and waterfowl, and for the last 15 years
has pursued the sport of solo canoeing. On the nearby
Kansas River he has now logged nearly 5,000 river miles
while doing some 400 wilderness style canoe camping
trips. A musician/singer/songwriter as well, Joe's
'day job' is with the U.S. General Services Adminstration.
From Lawrence, Kansas, Joe is a former municipal and
federal police officer. In addition to fishing, he hunts
upland birds and waterfowl, and for the last 15 years
has pursued the sport of solo canoeing. On the nearby
Kansas River he has now logged nearly 5,000 river miles
while doing some 400 wilderness style canoe camping
trips. A musician/singer/songwriter as well, Joe's
'day job' is with the U.S. General Services Adminstration.
Joe at one time was a freelance photojournalist who wrote the
Sunday Outdoors column for his city newspaper. Outdoor
sports, writing and music have never earned him any money,
but remain priceless activities essential to surviving the
'day job.'
|
Archive of Warm Water