|
Joe Hyde suggested I write an article about my own version
of the soft anchors he designed. He now has three articles
in the Warm Water archives about his anchor system for a
canoe. I've seen kayak anchor systems on the web but none
of them were as clever as Joe's soft anchors. Most of the
other systems utilize a hard anchor, either the mushroom
style, grappling hook style (as I call them), or the
dumbbell/disc weights for workout rooms and gymnasiums. None
of these hard anchors thrilled me at all.
Joe has the right idea with a soft system; it won't scare
the fish when in use, isn't clumsy, and has no points or edges
that might damage the watercraft. I also like the idea of a
double anchor system to keep the boat in position and prevent
the tendency to spin around when the wind blows. I'd have never
thought that one up, at least not right away.
Another feature in his design is the ability to control each
anchor individually from the other without having to move
around in the boat. How amazingly safe, easy, and convenient
is that? There's no question that this soft anchor system is
hands down the best thing since the last best thing. I just
knew that my kayak would be a better fishing vessel with it,
but for me there were some minor issues in Joe's design.
That's the reason for my modifications.
First, I wanted to do as little work as possible to build and
install the system. (As stated in another of my articles, I'm
a bit lazy.) I also didn't want to spend any more money than
absolutely necessary for the system. (As I've also mentioned
before, I'm a cheapskate.) One issue with Joe's anchors was
the cost of shot and the excess that I might have if I had to
buy it in bulk. I only needed about 10-15 lbs total. So, I began
to ponder my options.
I reconsidered the dumbbells first; they were about the right
size. But they were hard cast metal covered with a soft foam
coating that would likely rot after exposure to water. Also,
most of them were in lovely, soft pastel colors, not exactly
what this gentle-angler had in mind. And, I could've used a
window weight from on old house if I wanted a noisy piece of
metal hanging off the side of the yak. No, the dumbbells were
out, as were the other metal anchors and weights. I really
wanted to stick with the soft anchor, but I couldn't see making
my own.
I kept trying to think of some place to buy weighted pouches;
maybe the hardware store would have sandbags. Then it hit me;
I just needed to buy some ankle weights. Actually, not as popular
as they were in the '80s, they're still available at sporting
goods stores. The set I found are "Weider" brand adjustable
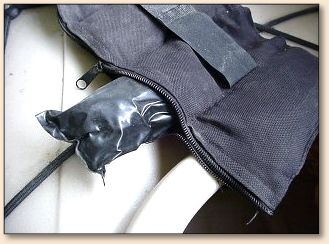
weights with five, sealed plastic, 1 lb. shot pouches inside
each cloth ankle wrap. The plastic pouches would eliminate the
possibility of corrosion and the tendency for bacteria to grow
in the loose shot causing the cloth to rot. Another nice thing
about the ankle weights is they have a Velcro strap that keeps
them rolled up, or you can leave them flat to increase drag if
you're just drifting in the breeze.
My next issue with the system design was the fairleads attached
on the bow and stern. I cringed at the thought that I might
have to drill more holes in the kayak. I wanted something
that would attach easily and wouldn't be permanent. U-bolts
were out for sure. I thought about using the lifting handles
to run the anchor ropes through, but eventually the string on
the handles would wear through and I'd be back to the problem
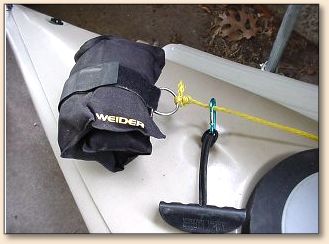
of attachment. I decided to hook carabineers to the lifting
handles to run the ropes through. The added attraction of
these is that I can easily unhook the anchor ropes from
the lifting handles and stow the weights inside the hull
for transport.
At one point, I considered one of the more popular features
folks use with kayak anchor designs, a trolley system. An
anchor trolley only uses one anchor that can be transferred
to any location between the bow and stern by simply pulling
a rope through pulleys attached at each end of the yak. That
system was impressive, but I wanted the stability of double
anchors. Also, the idea of drilling screw holes to attach
pulleys and brackets or rings to clip the rope to the kayak
was not an option. So, I stayed with Joe's double rope feature.
Finally, I wasn't able to find cam-cleats locally to use on
the yak. I was so impressed with cam-cleats when I saw them
in Joe's articles that I was almost tempted to spend money
on the web to get some. That idea was very short-lived and
I opted for a 5-inch traditional-style cleat. I put a "D"
ring on each ankle weight to attach ropes, then tied 50'
of rope on each weight. Most of the areas I fish don't exceed
30' of depth, so I haven't invested in buoys to keep from
losing my anchors. (Very risky for a cheapskate.) The ropes
then pass through the carabineers and then to the cleat. I
tie both ropes to the single cleat, usually the aft anchor
is tied first and the fore anchor is tied over it. After the
anchors are pulled up they both stay above the water's surface
if they're rolled up. If they're left flat they don't clear
the surface and will cause drag while paddling. I can't reach
the bow anchor to lift it to the deck, but the aft anchor is
fairly easy to reach and stow on the aft deck while paddling.
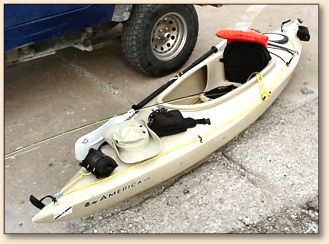
This anchor system was fairly inexpensive. The weights cost
less than $20 per pair at M-C Sports, from Wal-Mart the rope
was less than $2 and the cleat was about $4.99, and carabineers
from the local hardware at .99˘ each finished off the system.
A very affordable system considering how difficult it is to
paddle with one hand and fly cast with the other. Hopefully,
this write-up will help some of you adapt Joe's system to
your own watercraft. I have more photos of my kayak at
https://www.lunceford.org/fishing/yakrig.php. ~ Tim
About Tim Lunceford:
Tim lives and fishes near Kansas City, Missouri. He's
been married 23 years, is the father of four kids and
is now enjoying his first grandchild – Caleb Thomas. He
works as a Heat and Frost Insulator for Local Union #27 in K.C.
|