|
Many fly fishermen consider tying flies an important part of their
passion for fly fishing. With vices that can cost several hundred
dollars and hundred dollar hackle capes, it's not very difficult to
end up investing a couple of thousand dollars. One item that still
seems to confound many fly tiers is a simple effective way to
collect the clippings and bits and pieces that result from a tying
session. I've tried several waste collection devices from a simple
bent coat hanger with a plastic bag attached to the fancy nylon waste
bags that attach to the shaft of the vice. Needless to say, none of
them did everything I wanted and they were soon discarded.
The coat hanger-plastic bag contraption was flimsy and got in my
way when I wanted to move closer to my work. Heaven forbid if
I ever dropped anything into the bag, especially if I hadn't emptied
it in a while. A hook, a tungsten bead or even a completed fly is
immediately lost in the myriad of fly tying refuse. With near perfect
camouflage, the dropped items disappear, necessitating a complete
bag-ectomy or writing off the dropped item as a sacrifice to the fly
tying gods. Scrap the bent coat hanger-plastic bag idea.
Next was the not-so-handy refuse bag that attached to the shaft of
the vice. While they look great in the pictures, they're fairly expensive
and they didn't always work out like it showed in the picture. Again,
these bags always seem to be in the way. Whether it was spinning a
dubbing loop, or just hanging material down below the hook, I always
found myself pulling tools and other materials out of the refuse bag.
Chenille was the worst since it always managed to attract bits of fur,
feather and synthetic clippings like a magnet attracts iron filings. More
often than not, I ended up moving the bag out of the way while tying and
sweeping the bits and pieces of tying refuse into the trash after each
session at the bench. This negated the value of having a waste bag
attached to the vice.
I needed another solution. I needed something inexpensive and simple
to make, that works well, looks good and most of all stays out of the
way when I'm tying flies. The solution I arrived at I called the Trash
Trough. It's very simple, takes around an hour to make and almost
all the necessary materials can be found at your local hardware store.
The one exception on the materials is the heavy vinyl cloth material which
can be found at your local Arts and Craft or fabric store. The total cost
of materials to build the Trash Trough is around $6.00.

The first step is to decide how long you want your Trash Trough to be.
You can make your Trash Trough as short as 6 inches or as long as y
our tying desk depending on your preference. For this article, I will
assume that the trash trough will be approximately 14 inches long.
PVC pipe is generally available in two thicknesses, light duty which is
used for non-pressurized water drainage or heavy duty schedule 40
PVC pipe, which is usually used for pressurized water. Either thickness
of PVC pipe can be cut easily with a circular saw, jig saw or even a hack
saw. While you can use the heavier schedule 40 PVC for your Trash
Trough, the light duty PVC will work fine and is much lighter which makes
it easier to keep in position at your tying desk.
Once you have the PVC pipe cut to the desired length, you need to
mark the pipe where you want to make the lengthwise cuts. Start by
drawing a straight line down the length of the pipe. Now, looking down
the end of the pipe, rotate your ruler until the next mark is 3 ¼ inches
across from the first mark (see diagram 1). This will leave about 60%
of the pipe remaining, which creates a nice wide opening that catches and
holds the refuse well and is easy to empty. Draw a second line down the
length of the pipe, marking the spot for the second cut. Now, draw a third
line between the first two lines, about ¾ of an inch from the first line.
This thin strip of PVC material will be used later in the project.

Once you have the pipe marked, you're ready to start cutting. Secure the
pipe with clamps or in a vice. The PVC material is fairly thin, so do not
over-tighten the vice or the clamps or you could kink or crack the PVC
pipe. Now, make the first cut with your saw. I find that it is easier and
safer to make the "center" cut first. This leaves more PCV material and
provides greater stability for the remaining two cuts. Rotate and secure
the PCV pipe for the second cut which will produce a strip of PVC pipe
material ¾ inch wide and the length of your Trash Trough. Set this
strip of material aside for later use. Now make the last cut on the PVC
pipe. You now have the basic Trash Trough. I find that it's a good idea
to use a file or some sand paper to smooth the cut edges of your Trash Trough.
Next, you need to make end caps for the Trash Trough. Place the end
of your cut piece of PVC pipe against the 1x4 wood to trace the size
and shape of the end plug. Remember, you want the Trash Trough to
be flat on top, so place the pipe so that the open portion of the pipe is
even with the edge of the board. Make sure that you trace the line on
the inside of the pipe so the plug will fit neatly in the pipe. Once you have
the end plugs marked, cut them out. You can use a coping saw, jig saw
or scroll to make this curved cut. Once you have the end plugs cut to shape,
take one of the end plugs and round the edge of it as shown in diagram 2.
This will allow that end plug to swing open like a trap door to facilitate
emptying the Trash Trough.

You're ready to start assembling your Trash Trough. Start by positioning
the end plugs into the PVC pipe. The end plug with the rounded edge can
go on either end of the Trash Trough, but the rounded edge must face
towards the inside of the Trash Trough. With the plugs in place, drill
four holes as indicated by diagram 4. Slip the screws through the plastic
screw caps and screw the end plugs in place. (see diagram 1) The plastic
screw caps are not necessary, but they add a finished look and help
prevent the screw heads from scratching or marring your tying desk.
The placement of the screws does not have to be exact, but the end
of the Trash Trough that will pivot outwards should have the screws
opposite each other to allow them to act like hinges. (see diagram 2)
You can add a coat of varnish or polyurethane to the end plugs for a
more finished look, but this is certainly not required.


Trash Trough with end plugs ready to be attached
Once the end plugs are in place, you're ready to attach the vinyl apron.
First, trim the remaining ¾ inch by 14 inch piece of PVC pipe to
about 12 inches long. This will allow it to fit inside the Trash Trough with
the end plugs in place. Begin by mixing up a batch of epoxy or whichever
adhesive you're planning to use. Lay the vinyl down flat with the finished
vinyl side facing down. Apply a generous¾ inch strip of adhesive
to the edge of the back of the vinyl. Position the ¾ X 12 inch piece
of PVC pipe on the adhesive with the curved side down. Now, apply a
¾ inch strip of adhesive to the inside edge of the Trash Trough.
This will be the back of the Trash Trough, so make sure that the "trap
door" end plug is facing the side you want it to. With the adhesive applied
to the Trash Trough, position the vinyl and strip of PVC pipe material on to
the adhesive you applied to the Trash Trough. The vinyl should be lying across,
covering the Trash Trough with the back of the vinyl material facing up.
You will need to use small clamps to hold the PCV pipe and vinyl in place
until the adhesive dries.
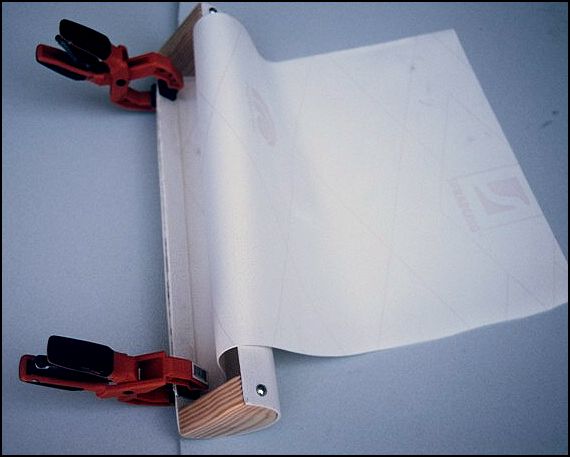
The vinyl is sandwiched/glued between the 1 inch wide strip of PVC pipe
and the Trash Trough. The back (unfinished) side of the vinyl should be f
acing up in this step. Use small clamps to hold the vinyl and strip of PVC
pipe in place while the adhesive dries.
When the adhesive is dry you're ready for the final step of adding the non-slip
pad to the back of vinyl. While the non-slip pad is not required, it helps to keep
the Trash Trough from sliding down out of position while in use. Position the
Trash Tough so that the vinyl is laying out flat with the back of the vinyl facing
up. Apply spray-on adhesive or double-sided tape to attach the non-slip
backing to the vinyl. With the non-slip pad in place you're ready to use your
Trash Trough. Position the Trash Trough so that the top of the trough is even
with the top of your tying desk. Place your vice on top of the vinyl and you're
ready to go.

Position the trash trough so that it is even with the top of your tying desk, then place
your fly tying vice on top of the vinyl apron to help hold it in place.
I have found the Trash Trough to be the best trash collection system I've
ever used. It stays out of the way while I'm tying and yet is exactly where
I need it when I want to discard bits of wire, thread or fur. As an added
bonus, I've found it to be a great backstop for those occasional dropped
tool or hook. To empty the Trash Trough, simply rotate the end plug
outward to sweep the refuse into a waste basket or trash bag for disposal.
Tying flies is a favorite pastime for me and tools that simplify the process
add to the enjoyment. The Trash Trough does that for me and I hope it
does it for you as well. ~ Jim Smith
|
