|
A quick search on Google.com or in your tying
catalogs will show you that there are many tying
benches available for your desktop. Most of them
share two major drawbacks. First, they cost too
danged much, and secondly, they were not laid out
specifically to fit your tying style.
While checking out our local Big Lots discount store,
I found a nice selection of cutting boards. They were
well constructed and nicely finished maple. I picked
up a heavy 12" x 18" cutting board for a base for $9.00
and then selected two 5" x 7" mini cutting boards at $2.00
each to make thread and tool racks. On the way home I
stopped by the hardware store and purchased a Ẅ" as well
as a ỳ" wooden dowel.
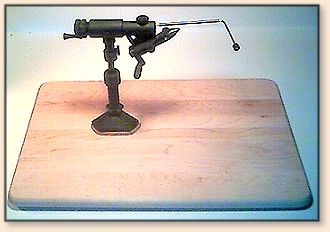
First thing I did was to mount my vise on the large
cutting board. Many vises can be readily mounted on
your bench without using the clamping device. The
Danvise I use required only a ẅ" hole through the
desired location on the bench to facilitate a clean
flush mount. Now I could position my tool and thread
shelves and insure adequate space around the vise for
tying. If your vise does not lend itself to bolting
to your base, you will first want to design your
clamping arm to position the vise in the desired
location. Make sure you consider height as well
as location and ample room for working around the jaws.
After positioning the shelves to suit me, I cut four
6" x Ẅ" wood dowels to support them. I also cut twelve
3" x ỳ" wood dowels as thread spindles. Using a drill
press and appropriate bits, I made holes for mounting
the shelves as well as holes for the thread rack spindles
and tools. Take your time and ensure that your tool
layout is comfortable for you.
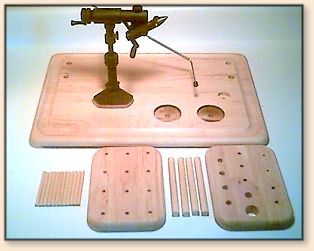
Before mounting my shelves I took a 2 ỳ" forstner bit and
drilled depressions near the front of my bench to keep
hooks, beads, and eyes from going adrift as well as a
depression to fit my ever present bottle of Sally Hansens
Hard as Nails. Then after first assembling the bench dry
to ensure fit, I reassembled it with glue and allowed it
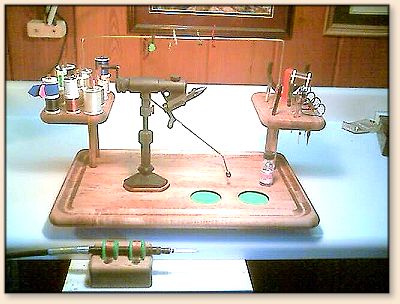
to dry before proceeding. I took a brazing rod and bent
it to fit across the back of my tool shelves to provide
a drying rack for my flies. A piece of metal clothes
hanger would work as well. I also cut some 2mm foam to
fit the recessed depressions I had drilled in front of
the vice as well as four small pieces to glue on the
bottom corners to keep the bench from sliding or
scratching the desk top. When the glue was dry, I
rubbed in a coat of Minwax oil stain. You can leave
the wood natural, stain, varnish or whatever type finish
appeals to you. Just ensure that you remove any glue
from surfaces to be finished before it dries.
This bench suits my tying well. It may not suit your
style at all. This is provided not as a sporty-do-it-all
bench, but rather just food for thought for those
wanting a bench that best fits them and their budget.
The advantages of the cutting boards are obvious. They
are already laminated, cut and routed to shapes that
work well for the tying benches. They are constructed
of a durable hardwood, normally maple, and are quite
affordable. Many of them have a pronounced blood groove
routed around the outside edge which will prevent your
tying goodies from rolling onto the floor. My bench cost
$16.00 and took two hours to build and finish. While my
desk and backdrop are white and provide a good background
for tying, you could easily mount a piece of poster board
on your drying rack if needed for a brighter background.
Good luck! ~ Jim Hatch
|
