|
Publishers Note: Host Bob F. from Alaska found this article on the
mwflytying.com website and sent
it to us. Author of the article, Ed Engelman, has his own website,
EdEngelman.com (featuring "Low Budget Fishing And Fly Tying"),
and kindly gave us permission to use the information here. Thanks Ed!
By chance I happened to meet Ed Engelman. Ed works for
SAREP which is
a program designed to help kids get involved in the outdoors. When I saw
Ed's tools, I got a jolt and a laugh as I honestly couldn't believe that anyone
could actually tie flies on a Blender, a Hub Cap or a Frying Pan.
After spending some time talking to Ed and convincing him to use his material,
I have edited Ed's material for all of you. I will say this . . . this is very, imaginative,
creative and unique. I honestly have not tried these vises, but Ed assures me that
these vises will tie from a size 4 to 18 without any trouble. While I seriously
doubt if the Engelman Vises will put much of a dent in Regal's sales, I think
these ideals are useful, fun and interesting.
For all of you Scout Leaders, 4Her's and other folks that always hound me for
donations . . .here you go. Knock yourself out. I should think that a few bottle
and can drives ought to raise the $25 you need to make these for a tying class.
As a side note: I really have no idea how to make these and I have left Ed's
e-mail at the bottom of the page for you to contact him regarding any questions
or "warranty" issues. Thanks again to Ed Engelman for some neat ideas and
a great story. ~ Mike Hogue
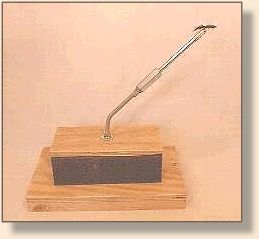
How To Make Your Own Fly Tying Vice for $6.00
Why make a Vise for $6.00?
This fly tying vise can be built and used as a low-cost way to introduce tying
flies and jigs. It is designed to be built by or for those who may not be willing
to commit the financial resources to purchase quality equipment. I have
introduced children to tying foam bugs for panfish on these vises. The foam
bugs can then be fished on a fly rod or can be used with a spinning outfit
when a casting bubble is used. When children catch a fish on a bug of their
own creation, it is almost as though they are catching their first fish again!
And of course, the participants experience the connection between insect,
fish and themselves. The price tag of under six dollars fits into the common
cost range of a 4-H project that results in an item that can be exhibited at
their county fair. It is also less than the price of a movie ticket with popcorn.
ĀĀĀĀ
Parts List:
- One 6 1/2" x 11" piece of plywood (1/2", 5/8" or 3/4" plywood can be used).
- One 3 1/2 x 8 piece of plywood (1/2", 5/8" or 3/4" plywood can be used) Note:
This piece of plywood is a cap for the top of the brick. It should be the same size
as the brick. Since the size of bricks vary, it is suggested that you acquire the
brick first and then cut the plywood to match.
- Two 3/4" x 1 1/2" x 11" pieces of softwood.
- One brick (formed with one or more holes though the brick).
- Three 5/16" nuts.
- One 5/16" wing nut.
- Three 5/16" lock washers.
- Two 5/16" flat washers.
- One 5/16" threaded rod coupling nut.
- One 5/16" threaded rod 9" long (Threaded rod normally is sold in 3 foot
and 6 foot lengths. Generally the longer pieces cost less per foot of rod).
- One X-ACTO knife # 1 (5/16 diameter handle).
- Six 1" Brads.
- Wood Glue.
ĀHow To Build:
1. Use a die to thread the bottom end of the aluminum knife handle with
a 5/16 NC (national coarse) thread. (This is a common die in a tap and
die kit.) Continue threading until you have threaded a length equal to one
half of the length of the coupling nut.
2. Screw a 5/16 nut onto the knife handle and place a lock washer on next.
Now screw the knife into the coupling nut and tighten until the lock washer
is compressed and the knife is held securely.
3. Measure and mark a nine-inch length of 5/16 threaded rod. Place a nut
on each side of the mark. Place the rod in a shop vise and cut the rod with
a hacksaw. Use a file to smooth the sharp edges of the rod. Now you can
remove the nuts which will align the threads that may have been damaged
during the cutting and filing process.
4. Make a mark five and one-half inches from one end of the threaded rod.
Place the threaded rod in a shop vise so that the mark that you just made is
at the vise jaw. Now bend the exposed five and one-half inch portion of the
threaded rod 45 degrees. The easiest way to do this is to slide a piece of pipe
over the rod and pull on the pipe until you have reached the desired angle.
The bend can also be made by placing and holding a piece of wood on the
rod and hitting the piece of wood with a hammer so that the rod is bent. If
you hit the rod with a hammer directly, you will damage its threads.
5. Drill a 3/8-inch hole in the center of each piece of plywood.
6. Place wood glue on each 3/4" x 1 1/2" x 11" piece of wood. Position each
one in place under the larger piece of plywood so that the smaller pieces of
wood act as feet for the vise. Nail the one-inch brads through the plywood
base to hold the pieces together while the glue sets.
7. Put a nut onto the rod and thread it near to the middle of the rod. Next place
a lock washer, and flat washer onto the rod. Next place the small piece of plywood,
the brick, and the larger piece of plywood onto the rod. Now put the flat washer,
lock washer and nut onto the rod. Thread the nut on until the rod is flush with the
end of the nut. Next tighten the nut that is close to the midpoint of the rod until
the lock washers are fully compressed.
8. The wing nut can now be put in place. Thread it on the rod so that the
wings point towards the brick. Last, but not least, thread the "knife assembly"
onto the rod. The vise is now complete.
To put a hook in place, loosen the knurled portion of the knife. Insert the hook
into the slot in the knife head. Tighten the hook by turning the knurled ring
clockwise, while pulling the knurled ring against the knife head. After the
hook is tight, turn the coupling nut to align the hook in the vertical position.
Screw the wing nut until it jams the coupling nut in place. This will maintain
the hook in the vertical position.
You may wish to fill any voids in the plywood with a latex wood putty. Sand
and finish as you wish. Happy tying!
ĀMore Low Budget Vise Designs
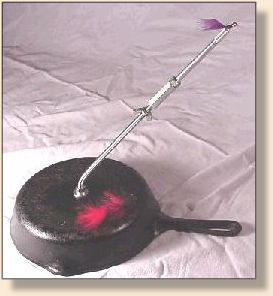
The vises shown here show some alternatives. The cast iron frying pan is
heavy enough so that no additional weight is necessary.
 ĀĀĀĀĀĀĀĀĀĀ
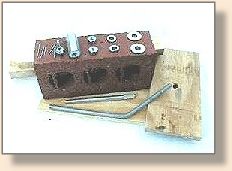
The Osterizer blender base is filled with large pieces of gravel.

ĀĀĀĀĀĀĀĀĀĀĀ
The hub cap [from Mike Hogue's pick-up truck that was towed to the
great auto recycling center] is filled with concrete. Mike as helped others
build their vises out of detergent bottles partially filled with concrete and
aluminum frying pans filled with concrete. [Ed also has an antique blow
torch as a base!]
Let your imagination be your guide to building your own special vise!
~ Ed Engelman
If you have any questions or comments concerning this vise, feel free to contact
Ed Engelman at : seaa@mkl.com
|
