For the last segment of this series I'm not going into the details of
building the individual poppers. The techniques are
similar; shaping, sanding, embedding the hook, etc. I'll try to highlight
any real differences.
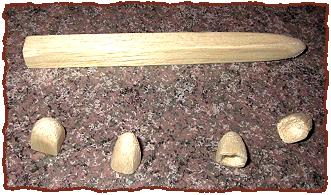
Balsa Wood. Okay, I admit it. I cheat whenever and however I can to make
life easier and get a job done quicker. You can buy large chunks of balsa
wood, pare them down into smaller pieces, then carve, shape, sand, and finish
them but why not try it another way. At the craft and hobby shops they sell
balsa wood in lengths of about 3 feet. I've bought them in squares, rounds
and even triangles and a variety of sizes. Then all you do is start at one
end of the stick, shape the rear portion of the popper, using fine grit sand
paper, and slice off the front end from the stick at the angle you want for
the face of the popper. Repeat the process for the number of poppers you want
to work on by working your way down the stick, sanding, shaping, slicing off,
etc. Poof, an instant collection of blanks. A little sanding on the faces,
maybe rout out the mouth area, slit, and insert the hook, glue up, and finish.
All done, go fish!
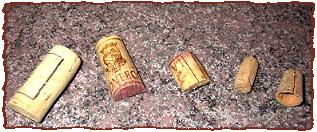
Cork Poppers. These can be made in a variety of ways. The simplest way is to
go to a craft store and purchase ready formed corks in the size(s) you want
for poppers, carefully slit them, insert the hooks, glue or epoxy the slit,
paint, embellish and use. Using the preformed corks really reduces the time
it takes to shape them. You can still modify the overall shape if you like,
but for the most part, it isn't necessary. Another way is to shape them from
wine or champagne corks. This works especially well for large sized & salt-
water poppers. One technique in cutting cork I'll share with you is that you
need a fresh, single-edged, razor blade. Then slice the cork with a sawing
motion, don't try to shove it through the cork, it'll only mash the fibers in
the wood and the result will be a lot of splintering and rough edges. Also
use 150 grit and higher sand paper when finishing them. If the sand paper is
too rough the cork will seem to peel or ball up, leaving an even rougher
surface. For those who are more demanding, wealthy and have lots of time on
their hands, Dremel does make a miniature lathe that works well for shaping . . .
Closed-Cell Foam. The foam itself can be recycled from packing materials,
purchased at craft and hobby stores, or as my friend, Al Campbell, mentioned,
picked up along the highway or on concrete construction sites (known as
expansion joint roping). The easiest to work with is the roping
material. It comes in a variety of diameters, and colors, just slice
off, insert a hook, glue it in place, use a permanent marker to color, add a
few embellishments, and you'r done. You can also glue flat pieces together, and
shape the poppers by hand if your looking for a flat popper, like a "Gagirble
Bug", using a rubberized adhesive, such as GOOP for shoes, inserting the
"legs" and hook through the body layers during the lamination process. Again,
very easy substance to work with, very quick results . . .just make sure you let
the adhesive dry or your parts will be floating in the air behind you on the
first back cast!
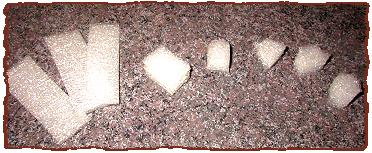
Foam Insulation. Hey, that little piece of rigid foam insulation, along with
a small piece of fine sand paper and a couple minutes can make a lot of
poppers. Yes, you know, that pink or blue compressed styrofoam like stuff.
Slice it off with a razor blade, shape it with sand paper, insert a hook and
glue it into place, color it with permanent marker or exterior latex paint and
you have one heck of a nice popper. If you bought an entire 4 x 8 foot piece
of the stuff, usually it's 2 or 3 inches thick, you'd have millions of them!
Talk about an easy material to work with!
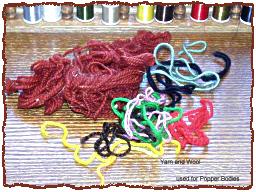
Yarn and Wool Bodied Poppers. Making these is as simple as going to the
sewing department of any discount store and buying the materials in skeins.
They are tied basically the same way as "normal" flies, just a lot bulkier.
It's important to note though that different types will absorb water more than
others. To help alleviate this problem I spray mine with a water repellant
substance before, during and after the tying process. Another note is to make
sure they are completely dry before you store them. It'll only take one whiff
of rotting wool or a rusty broken hook to cure you of your forgetfulness!
Foam Rubber (the "FlipFlop" trick). This was donated during a Monday night
Pan Fish chat session by a friend who calls himself "WindKnot, Ark." Now "WK"
looks for year end and close out sales on those foam rubber sandals known as
"flipflops" (you know the ones in the wild colors with the rubber thong that
always give you blisters between your big toe and the next one�). He uses a
short piece of sharpened copper tubing, the diameter of the popper he wants,
lays the sandal on a piece of wood and smacks the copper tube with a mallet,
cutting out the "popper". He then inserts a small screw and a set of washers
through the piece, tightens the whole thing down with a nut, places the end of
the screw into his electric drill and spins it up against a piece of fine grit
sand paper to shape it. The he removes the screw and washer, inserts a hook,
glues it in place, and "Viola!" a finished popper. How simple can you get?
And considering the number of colors these things come in and the price
(usually under $1.00 a pair) he can get a huge number and variety in a hurry.
Plus he says he sometimes glues multiple colors together, using Goop
adhesive to make "custom" color combinations.
Embellishments. Making the popper bodies is only part of the job. 'Plain
Jane" poppers will do the trick a lot of times, but adding things to the
popper may make it work even better. The main purpose of the popper is to
make a disturbance on the surface of the water, the more movement, the larger
the attraction, to a point . . .
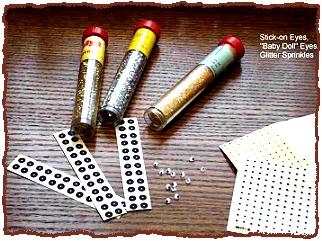
Eyes. Do the attacking fish really notice whether or not the popper has an
eye or not? I certainly haven't gotten a straight answer from the fish! I
know that the more real a frog or crawdad pattern is (including the eyes) the more
fish I catch. But then I also know that there are times when the fish are
just attacking that disturbance on top of the water, regardless of color,
shape, size or if it has eyes. You form your own opinion. Eyes come in a
variety of shapes, colors, materials, and sizes. The self adhesive (peel off a
sheet) are convenient and quick. You can actually carve the eyes into the
popper for a 3 dimensional look like in the old days. There are "stick pin"
eyes that are inserted and glued into the lures. Glue on "Baby Doll eyes give
an added rattle to the popper. And you can always paint the eyes on, using a
single color pattern or double. It's really up to you (and the fish).
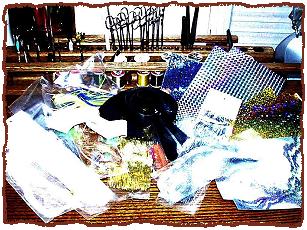
Flash. I classify flash into 2 categories, the 'tinsel type' and the
'adhesive type'. The tinsel type most tiers are familiar with, it comes in
strands and dozens of shapes, colors, and sizes. There are flats, crinkles,
multi-twist, etc., and the number keeps growing. Most are made of a Mylar
plastic material these days so they can be used in both salt and fresh water
without much worry. The other type is the sheet film materials you can buy at
art stores. These are etched by lasers in a wide variety of patterns (you may
have seen them used on toys, when you spin the toy the pattern changes or
changes color hues). The material comes in peel off sheets with self adhesive
backing. I started using it originally for some poppers I made for my
brother, who fishes the Texas Gulf area. He said he wanted something that
looked like a Dorado in color. Well we're talking a rainbow of color here
folks, and I can't paint like that! I was in an art store one day (Dick Blick
Art Supplies (also on line), came across this stuff and found the answer! You
can even clear epoxy over the stuff once it's stuck on the body of the popper
without losing too much of the light refraction qualities. You can cut and
shape it and way you want, stick a line of it on the sides or bottom of the
popper for some added attraction, etc. (For those who are also spin cast
anglers (hide your faces), adding a little of this stuff onto spoons really
adds to the flash of the lure!)
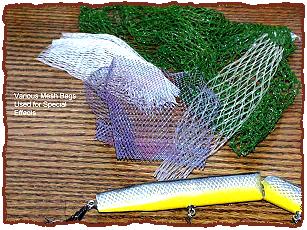
Plastic Mesh Bags. Say what??? Okay, the next time you go to the store to buy
garlic (the real, whole garlic bulbs (remember them?)) instead of buying the
ones that are in the little cardboard box, pick up the ones that are in the
plastic mesh bags. I won't get into the hundreds of recipes for using garlic
but (for now) the mesh bag is what's important. Give this a try: Take one of
your poppers that's been painted, but doesn't have any legs or other
embellishments on it, wrap it in the plastic mesh bag, pull the bag tightly
and tie it of with a twist tie or clothes pin. Then, take a can of spray
paint in a contrasting color and lightly over spray the enclosed popper. Let
the paint dry completely! Then remove the mesh bag. Hey, little fish scales . . .
Tricky, huh? Now, imagine the possibilities! And with the number of mesh
bags in the super market (and other places) imagine how many different
varieties of patterns you can make using this simple method!
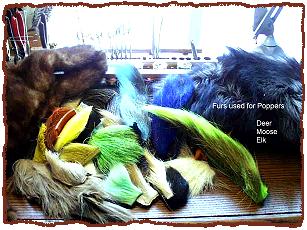
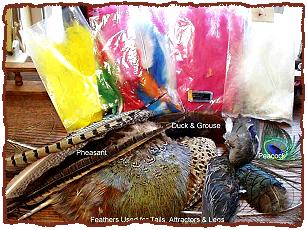
Furs and Feathers. Obviously, these play into making different types of
poppers. I'm usually lucky enough to have friends who are hunters and
trappers who keep me in a good supply of fur and feathers and I keep them
supplied with flies and lures (yes, I also do a lot of lure crafting for those
'other' anglers) Most of the fur and feathers are used in the tail area of
the popper. Zonker strip add ons, flashabou mixed with feathers, etc.
Feathers can also be used for legs, instead of live rubber and unlike live
rubber, come in a variety of flexibility. If you want the popper to push more
water, use a stiffer feather (try that with live rubber!). You can also face
the curve of the feather in a variety of directions to add to the flexibility
of your poppers, including at an slight downward angle to make the popper
dive. Again, it's only limited to your imagination and experimentation.
Summary: I guess the most important thing I've tried to show in this whole
series isn't about saving money by making your own poppers. After all,
they're not that expensive to buy. Rather, a different way that you can spend
a rainy day or a winter month in your shop and at your tying bench,
experimenting, recycling "junk" like closed cell foam, rigid insulation
scraps, little plastic mesh bags, creating your own poppers for about a dime
apiece (or less). You can be as conservative or as radical as you want with
the finished "product". Remember, "These are your poppers, and because
they're YOUR poppers, you can make them ANY WAY YOU WANT!" Besides, if they
really are ugly and don't work you can always pull the hooks out and recycle
them! Have fun, create, but most of all FISH!
~ Randy Fratzke
|